


Summary of PIC16F84A + DHT11 Proteus simulation
This article details interfacing the DHT11 (RHT01) temperature and humidity sensor with a PIC16F84A microcontroller using Proteus 8.1 or higher for simulation. It explains the sensor's specifications, including its 3.3-5.5V operation range and measurement capabilities. The text outlines the proprietary one-wire communication protocol, emphasizing precise timing for start signals and data reception. Finally, it describes the 40-bit data structure comprising relative humidity and temperature values along with a checksum.Parts used in the PIC16F84A and DHT11 Interfacing Project:
- PIC16F84A microcontroller
- DHT11 (RHT01) sensor
- Proteus software version 8.1 or higher
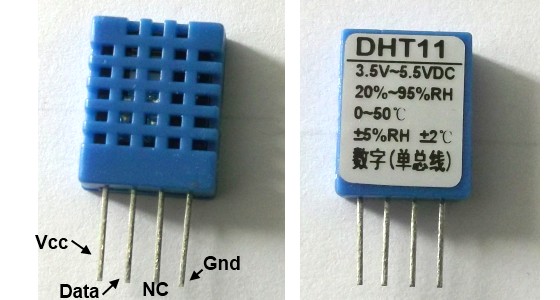
The DHT11 sensor comes in a single row 4-pin package and operates from 3.3 to 5.5V power supply. It can measure temperature from 0-50 °C with an accuracy of ±2°C and relative humidity ranging from 20-90% with an accuracy of ±5%. The sensor provides fully calibrated digital outputs for the two measurements. It has got its own proprietary 1-wire protocol, and therefore, the communication between the sensor and a microcontroller is not possible through a direct interface with any of its peripherals. The protocol must be implemented in the firmware of the MCU with precise timing required by the sensor.
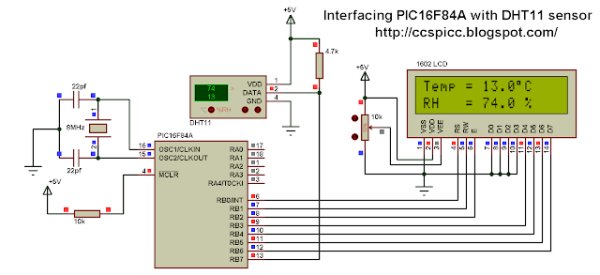
Data format: 8bit integral RH data + 8bit decimal RH data + 8bit integral T data + 8bit decimal T data + 8bit check sum. If the data transmission is right, the check-sum should be the last 8bit of "8bit integral RH data + 8bit decimal RH data + 8bit integral T data + 8bit decimal T data".
Quick Solutions to Questions related to PIC16F84A and DHT11 Interfacing:
- What Proteus version is required for this simulation?
Proteus version 8.1 or higher is required as it includes the DHT11 library. - Can I use an external library for the DHT11 sensor in Proteus?
No, you do not need to install any external library if using Proteus 8.1 or higher. - What is the operating voltage range of the DHT11 sensor?
The sensor operates from a 3.3 to 5.5V power supply. - How does the MCU initiate data transmission with the DHT11?
The MCU initiates transmission by pulling the data line low for at least 18 ms and then high for 20-40 us. - What happens after the MCU sends the Start signal?
The sensor responds by pulling the line low for 80 us followed by a logic high signal lasting 80 us. - How many bits of data does the sensor send continuously?
The sensor sends 40 bits, which equals 5 bytes of data. - In what order does the sensor transmit the data bits?
The sensor sends the most significant bit first during transmission. - What components make up the complete 40-bit data transmission?
The data consists of 8bit integral RH, 8bit decimal RH, 8bit integral T, 8bit decimal T, and an 8bit check sum.
Related projects
PIC Stepper Motor Controller using PIC16F84A with Proteus Simulation
Introduction Stepper motors are widely used in embedded systems and DIY electronics projects where precise position control is required. This PIC Stepper...
Programmers & ICSP · PIC16F84APIC Musical Doorbell using PIC16F84A with Proteus Simulation
IntroductionThis microcontroller project demonstrates a musical doorbell built around a PIC16F84A and a simple piezo sounder.Using two push buttons, the system allows...
Beginner Tutorials · PIC16C84Exploring the World of PIC Microcontrollers: An Architectural Overview
A Peripheral Interface Microcontroller (PIC), developed by General Instruments Microcontrollers in 1993, operates under software control and is programmed to execute various...
Sensors & TemperatureSpectrum Analyzer using TMS320F28023DA with Proteus Simulation
Introduction This project demonstrates a real-time audio spectrum analyzer using the TMS320F28023DA Piccolo microcontroller, simulated in Proteus VSM. The system captures an...
Sensors & TemperatureDHT22 Low Cost Humidity Sensor using PIC18F25K20 with Proteus Simulation
IntroductionThis microcontroller project demonstrates how to interface a DHT22 (RHT03) digital temperature and humidity sensor with a PIC18F25K20 using Proteus simulation.The project...
Sensors & TemperatureCrafting a Microcontroller-Based Temperature Monitoring System
Abstract As technological advancements progress, processes become increasingly intricate, demanding a corresponding expansion in the parameters necessary for efficient analysis. Data acquisition,...

Ibrar Ayyub
I am an experienced technical writer holding a Master's degree in computer science from BZU Multan, Pakistan University. With a background spanning various industries, particularly in home automation and engineering, I have honed my skills in crafting clear and concise content. Proficient in leveraging infographics and diagrams, I strive to simplify complex concepts for readers. My strength lies in thorough...