Summary of Wireless Control of Robotic Arm via PS2 Joystick and Microcontroller Technology
Summary: This project designs and implements a Bluetooth-controlled mobile robotic arm using a PS2 joystick and Arduino UNO. The transmitter (PS2 joystick, Arduino, HC-05 master) sends commands to a receiver (Arduino, HC-05 slave) which drives a Rover 5 mobile platform and an OWI-535 robotic arm via L298 motor drivers. System setup, HC-05 AT configuration, serial command mappings for arm and platform motions, simulation in Proteus, and a practical prototype are presented.
Parts used in the Mobile Arm Robot Project:
- PS2 joystick controller
- Arduino UNO microcontroller (transmitter)
- Arduino UNO microcontroller (receiver)
- Bluetooth module HC-05 (master)
- Bluetooth module HC-05 (slave)
- OWI Robotic Arm Edge kit Model OWI-535
- Rover 5 mobile platform with four DC gearbox motors and encoders
- L298 motor driver
- Proteus simulation software
- Wiring and power supplies (3.3V and 5V as required)
1. INTRODUCTION
A robot is a machine capable of performing a multitude of tasks [1]. Specifically, a robotic arm, functioning as a robot rigger, exhibits the ability to execute various functions akin to a human arm. In industrial settings, these robotic arms undertake diverse tasks such as welding, trimming, picking, and placing, among others. An outstanding advantage of these robotic arms is their capability to operate in hazardous environments and areas inaccessible to humans [2]. On the other hand, mobile robots possess the ability to traverse their surroundings and are not confined to a single physical location.
Recent advancements in robotics research emphasize enhancing systems that demonstrate modularity, redundancy, flexibility, and software connectivity with other machines. Some researchers concentrate on industrialization processes, aiming for complete automation through the integration of intelligent sensors. Simultaneously, others strive to establish analytical foundations for the conceptual development of robotics [3].
The objective of this endeavor is to design and implement a mobile arm robot specifically tailored for perilous and challenging locations that are beyond the reach of humans, and to execute specific tasks in such environments.
2. LITERATURE SURVEY
N. Firthous Begum
In 2015, a wireless controller system was introduced [3]. The transmitter includes an HM2007 voice kit for command recognition and a PIC microcontroller for controlling the transmission process through an RF module. On the other hand, the receiver incorporates an RF module to receive commands. The PIC microcontroller receives images of objects from an Android application and sends the output signal to the robot for pick-and-place operations.
Saravana Kumar K, In 2015, a system was introduced [4] to manage the movements of a mobile robot using Bluetooth. This system incorporates a wireless camera to navigate the operational area. The transmitter is represented by an Android application, while the receiver comprises Arduino microcontrollers. These microcontrollers receive commands via a Bluetooth module, enabling the generation of specific motions for the robot.
Aiman Ansari, In 2015, a Cleaner mobile robotic arm concept was introduced [5] with the aim of simplifying the cleaning process. The control mechanism involves an Android application acting as the transmitter, while the receiver comprises an Arduino microcontroller. This microcontroller receives commands and generates output signals directed to the Motor Shield L298n, facilitating specific actions for the robotic arm.
Prerna Jain, In 2014, a design was introduced [6] aimed at minimizing human casualties in a terrorist attack through the creation of a spy robot. This robot facilitates the acquisition of information from a potentially dangerous location through the use of a wireless camera. The robot’s mounted LEDs are designed to mimic the function of a chameleon using a color sensor. Additionally, a gas sensor is incorporated to detect poisonous gases. The robot is controlled wirelessly using an RF transmitter joystick.
Mohd Ashiq Kamaril Yusoff, In 2012, a mobile robot arm designed for pick and place operations was introduced [7]. It is capable of moving in various directions, such as right, left, reverse, and forward, utilizing a wireless PS2 controller as the transmitter. The wireless PS2 receiver is connected to the Arduino Mega platform to facilitate control over the robot.
2. PROPOSED SYSTEM
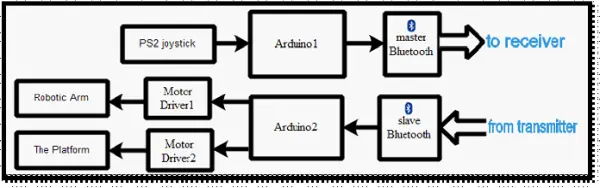
The depicted scheme in Figure 1 comprises a transmitter segment and a mobile robotic arm section. Commands are transmitted through a PS2 joystick using Bluetooth for both the robotic arm and the mobile platform.
The Transmitter
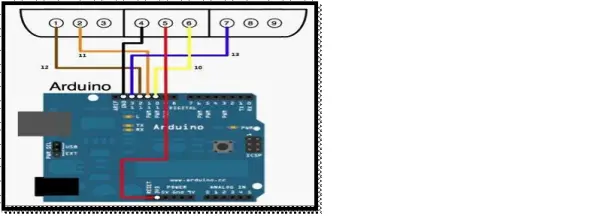
The controller segment, illustrated in Figure 2, comprises the PS2 joystick for providing specific motion inputs, the Arduino UNO microcontroller board serving as the system’s central processing unit, and the master Bluetooth module (HC-05) responsible for transmitting commands to the receiver. Upon establishing a connection between the Arduino and the PS2 joystick, as depicted in Table 1 and Figure 3, the Arduino code is uploaded. Subsequently, the functionality of the joystick is tested by opening the serial monitor to observe the transmitted data.
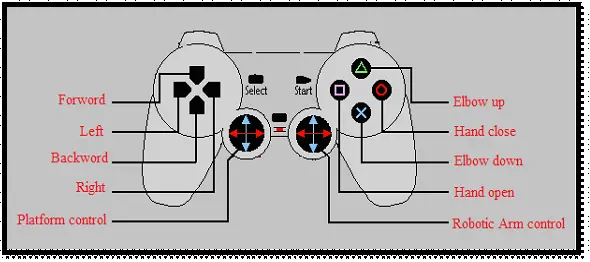
The PS2 joystick is equipped with fourteen analog buttons ( , , , , L1, R1, L2, R2, up, down, left, right, Select, and Start), two analog sticks, and three digital buttons (L3, R3, and the analog mode button). In this study, specific buttons, highlighted in Figure 4, are utilized along with their respective functions.
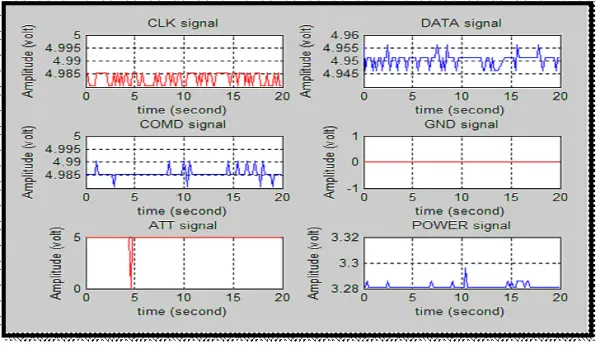
The PS2 joystick engages in simultaneous bidirectional serial communication, sending and receiving a byte of data at the same time. The clock signal, responsible for synchronization, is maintained high until a byte needs to be transmitted. Real-time reading of the PS2 signals is conducted by Matlab, as depicted in Figure 5. The clock signal is generated by Arduino and sent to the PS2 joystick to ensure synchronization, remaining high until data transmission is initiated. The attention signal, also generated by Arduino to the PS2 joystick, undergoes a low state during transmission. Power (3.3V) and ground connections are established from Arduino to the PS2 joystick.
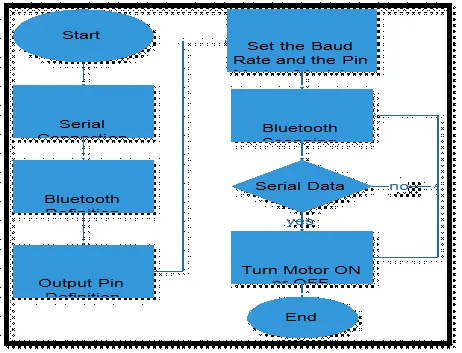
An eight-bit data signal is transmitted from the PS2 joystick to Arduino through synchronous serial transmission aligned with the falling edge of the clock. Simultaneously, a command signal conveys instructions from Arduino to the PS2 joystick via an eight-bit serial transmission. Figure 6 illustrates the commencement of the transmitter process through a serial connection on the digital pins of Arduino, followed by the definition of Bluetooth and PS2 joystick pins. Once all definitions are established, the baud rate and pin mode are configured. Subsequently, Arduino enters the loop to check the status of the button pins and transmit the data through Bluetooth.
The Reciever
The receiver comprises the Arduino UNO microcontroller board, serving as the central processing unit of the system, and the slave Bluetooth module (HC-05), which receives commands from the transmitter to execute specific motions.
As depicted in Figure 7, the reception process initiates with a serial connection on the digital pins of the Arduino, followed by the definition of Bluetooth and output pins. Once all definitions are complete, the baud rate and pin mode are configured. Subsequently, the Arduino enters the loop to continuously monitor the serial data received from the Bluetooth. It interprets this data and sends commands to the robot’s motors, instructing them to either turn on or off. Table 2 provides a summary of essential Arduino instructions and their corresponding actions employed in both the transmitter and receiver programs.
Mobile Robotic Arm
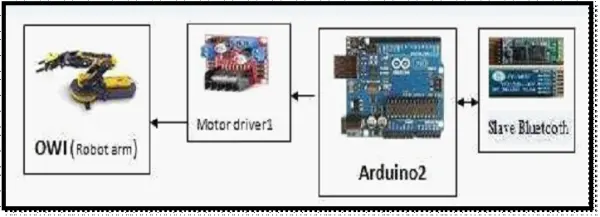
The Bluetooth module receives commands from the transmitter, directing the motion control of the wrist (up, down, or stop) and the hand (open, close, or stop) motors through the motor driver (L298), as depicted in Figure 8.
The robotic arm utilized in this study was assembled from an OWI Robotic Arm Edge kit Model OWI-535 [8]. The arm’s dimensions are 6.3 x 15 x 9 inches, and it weighs 2.5 pounds. Originally powered by four D batteries, it was controlled with a five-switch hardwired controller featuring five control points. The robotic arm has a vertical scope of 15 inches, horizontal scope of 12.6 inches, and a lifting capacity of 100g [9].
Control of Mobile Robot
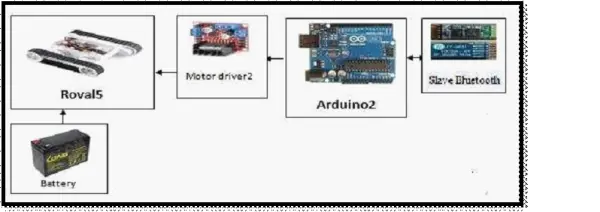
In the mobile robot illustrated in Figure 9, the Bluetooth module receives commands from the transmitter, directing the generation of motion by controlling four movements (forward, backward, left, and right), or bringing all motors to a halt via the motor driver (L298).
The chosen platform for this application is the Rover 5, featuring four DC motors, each equipped with a gearbox. The motors are equipped with encoders that generate pulse signals, allowing for the measurement of motor speed and direction [10].
Bluetooth (HC-05)
The Bluetooth module HC-05 is user-friendly and designed for establishing a transparent wireless serial connection. This Bluetooth serial module is employed to convert the serial port into a Bluetooth-enabled interface, offering two operational modes: master and slave devices [11].
Bluetooth, recognized for its short-range, low-power, and cost-effective wireless communication, utilizes radio technology. The Bluetooth transceiver functions as a frequency-hopping spread-spectrum (FHSS) device within the 2.4 GHz ISM frequency band, adopting a star topology [12]. Its high immunity and faster transmission rate compared to other ISM band radio devices are attributed to the capability to change the transmission frequency 1600 times per second [13].
For effective communication between two Bluetooth modules, two conditions must be met: master and slave communication, and the correct password. Setting up the Bluetooth module is crucial for its utilization in any application. Before integration with the system, the HC-05 needs setup using a computer to adjust the Bluetooth settings and modify the factory parameters. The Bluetooth module is entered into AT mode by setting the KEY pin (PIN34) to a high level with a 3.3V supply. The Arduino, as indicated in Table (3), is then employed to link the Bluetooth to a PC, using the serial monitor to input the key at the end of commands, effectively altering the factory parameters, as depicted in Table (4).
Following the configuration according to Table (4), the 3.3V supply to the KEY pin is removed, and the module is reset. Post-reset, the status LEDs of the slave and master will rapidly blink, with the Pairing LED eventually stabilizing. Setting the master Bluetooth (AT+LINK=<address>) selects the specific HC-05, and by entering the password (as specified in Table (5)), the linking process is completed.
The Bluetooth (HC-05) network is referred to as a Piconet, or a small network, capable of accommodating up to eight stations, with one designated as the master and the rest as slaves. Communication between the master and slaves can be one-to-one, as employed in this study, or one-to-many [11], [12].
4. SIMULATION AND PRACTICE MODEL
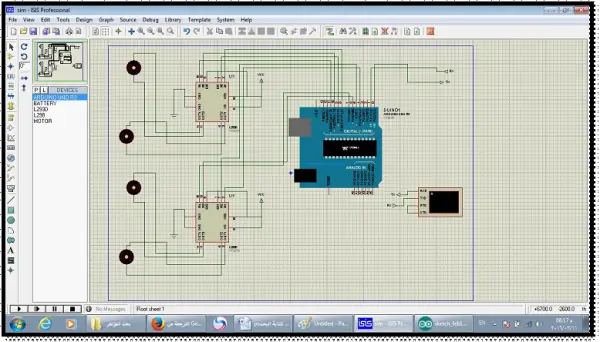
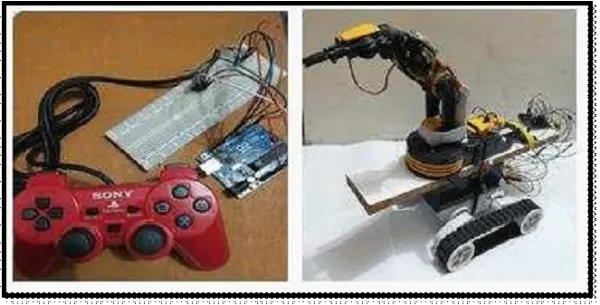
The envisioned system was formulated and simulated through the Proteus program, illustrated in Figure 10. The program was then uploaded to an Arduino microcontroller kit, and the physical control system model was constructed, as depicted in Figure 11.
Table (1): connecting between the Arduino and PS2 joystick.
| Arduino pin | PS2 joystick wire |
| 12 | Brown: data |
| 11 | Orange: command |
| GND | Black: ground |
| 3.3V | Red: power |
| 10 | Yellow: attention |
| 13 | Blue: clock |
Table (2): the important instruction and its action for the transmitter and receiver.
| Instruction | Action |
| #include <SoftwareSerial.h> | Allow serial communication on digital pins of the Arduino. |
| #define BT_SERIAL_TX 0 | Define TX of Bluetooth as pin 0 of the Arduino |
| #define BT_SERIAL_RX 1 | Define RX of Bluetooth as pin 1 of the Arduino. |
| Serial.begin(baudrate); | Set the baud rate for serial data transmission. |
| Serial.println(data); | Prints data to the serial port. |
| digitalWrite(digital pin,status); | Write a HIGH or a LOW value to a digital pin. |
Table (3): Bluetooth (HC-05) pin configuration.
| HC-05 Pin Name | Analog Function | Arduino linking |
| KEY | Command Mode | +3.3V |
| Vcc | Supply voltage | +5V |
| GND | Supply Ground | GND |
| TXD | Serial data transmit out | Pin 11 |
| RXD | Serial data receive in | Pin 10 |
Table (4): The main factory parameters of HC-05 that must be setting.
| The Instruction | The Action |
| AT+ ROLE =1 | Get master mode |
| AT+ ROLE =0 | Get slave mode |
| AT+RENAME= XXXXX | Specified the Bluetooth name |
| AT+PSWD=XXXX | Specified the Bluetooth Password |
| AT+UART=38400 | Set the baud rate |
| At+ADDR? | Get the address |
| AT+LINK=<address> | Connect the master to the slave by entering the address of the slave to the master Bluetooth |
Table (5): Chose the specific Bluetooth.
| Main parameters | Master Bluetooth | Slave Bluetooth |
| Address | 98:D3:31:F5:13:14 | 98:D3:31:FD:0C:7C |
| Name | PS2 | Robot |
| Password | 1234 | 1234 |
| Baud rate | 38400 | 38400 |
Table (6): serial number and motion for slave Bluetooth to control the platform.
| Motion | Serial number |
| Forward | 0001 |
| Backward | 1010 |
| Left | 1000 |
| Right | 0011 |
| Stop | 0000 |
Table (7): serial number and motion for slave Bluetooth to control the robotic arm.
| Motion | Serial number |
| Elbow up | 0010 |
| Elbow down | 1001 |
| Hand open | 1011 |
| Hand close | 0101 |
| Stop | 0000 |

- How does the transmitter send commands to the robot?
The transmitter uses a PS2 joystick connected to an Arduino UNO which sends commands via the HC-05 Bluetooth master module. - Can the PS2 joystick be read in real time?
Yes, PS2 signals are read in real time with the Arduino and can be monitored via the serial monitor or Matlab as described. - What components constitute the receiver?
The receiver consists of an Arduino UNO and an HC-05 Bluetooth slave module which interprets serial data and controls motors via L298 drivers. - How are arm motions controlled?
Arm motions (wrist and hand) are controlled by commands received over Bluetooth that drive motors through the L298 motor driver, using mapped serial codes. - How are platform motions represented?
Platform motions are represented by serial numbers (for example 0001 for forward, 1010 for backward) sent from the transmitter to the slave Bluetooth. - How is the HC-05 configured for master and slave roles?
The HC-05 is placed in AT mode by pulling KEY high to 3.3V, then AT commands (for example AT+ROLE=1 or AT+ROLE=0) are entered via a PC serial monitor to set parameters. - Does the project include simulation before building the prototype?
Yes, the system was simulated in Proteus before uploading code to Arduino and constructing the practical control model. - What is the chosen robotic arm and its specifications?
The OWI Robotic Arm Edge model OWI-535 is used; dimensions 6.3 x 15 x 9 inches, vertical scope 15 inches, horizontal scope 12.6 inches, lifting capacity 100 g. - How is synchronization achieved between Arduino and PS2 joystick?
Arduino generates a clock signal and an attention signal to the PS2 joystick; data is sent synchronously on the falling edge of the clock. - What baud rate is used for Bluetooth communication in this project?
The HC-05 modules are configured to use a baud rate of 38400 as specified in the setup tables.