PID Controlled Oven using TMS320F28027PT with Proteus Simulation

Summary of PID Controlled Oven using TMS320F28027PT with Proteus Simulation


This project implements a PID-controlled oven using a TMS320F28027PT PICCOLO microcontroller, thermocouple sensing with cold-junction compensation, op-amp signal conditioning, and Proteus simulation to verify closed-loop temperature control, timing, and watchdog management. It demonstrates ADC-based feedback, firmware delay routines, and safe startup for learning PID control and embedded systems without physical hardware.

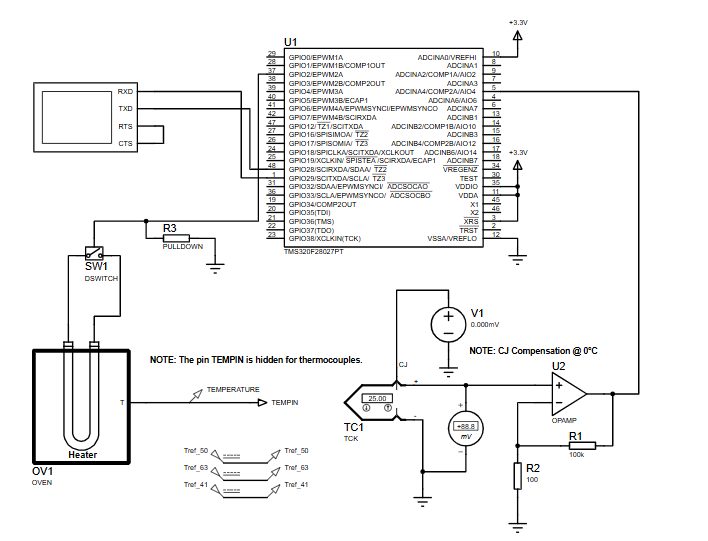
Parts used in the PID Controlled Oven using TMS320F28027PT with Proteus Simulation:

  • TMS320F28027PT (PICCOLO MCU)
  • Thermocouple (TC1)
  • Cold Junction Compensation circuitry
  • Operational Amplifier (OPAMP) for signal conditioning
  • ADC input of TMS320F28027PT (as part of MCU)
  • Heater / Oven block (OV1)
  • Push button switch
  • Pull-down resistor
  • Power supply (+3.3V)
  • Proteus virtual instruments / simulation environment

Introduction

This project demonstrates a PID controlled oven implemented using a PICCOLO TMS320F28027PT microcontroller and verified through Proteus simulation.
It is a practical microcontroller project focused on temperature control, widely used in embedded systems and industrial electronics.
The system reads temperature feedback from a thermocouple, processes it digitally, and regulates heating accurately.
By simulating the full setup in Proteus, the project becomes easy to test, tune, and understand without physical hardware.
This makes it ideal for learning PID control, practical electronics, and firmware behavior in closed-loop systems.

PID-controlled oven prototype with microcontroller and laptop simulation on a lab bench.
Illustrative View of the Concept.

How the Project Works (Overview)

The oven’s temperature is monitored using a thermocouple connected through signal conditioning circuitry.
The conditioned signal is fed into the ADC of the TMS320F28027PT, where the control algorithm processes it.
A PID control strategy determines how much heating is required to reach and maintain the target temperature.
Based on this calculation, the controller adjusts the heater operation, ensuring stable and accurate temperature control.

Block Diagram / Workflow Explanation

  1. Thermocouple (TC1) senses oven temperature

  2. Cold Junction Compensation (CJ) corrects measurement offset

  3. Op-Amp Signal Conditioning amplifies the thermocouple voltage

  4. ADC of TMS320F28027PT converts analog signal to digital

  5. PID Control Logic (Firmware) calculates control output

  6. Heater (OV1) adjusts temperature based on control signal

This closed-loop workflow continuously maintains the desired oven temperature.

Key Features

  • Closed-loop PID temperature control

  • Thermocouple-based temperature sensing

  • Cold junction compensation for accuracy

  • ADC-based feedback using PICCOLO MCU

  • Fully simulated Proteus environment

  • Assembly-level timing control using delay routines

  • Watchdog management for stable startup

Components Used

  • TMS320F28027PT (PICCOLO MCU)

  • Thermocouple (TC1)

  • Operational Amplifier (OPAMP)

  • Heater / Oven block

  • Push button switch

  • Pull-down resistor

  • Power supply (+3.3V)

  • Proteus virtual instruments

Applications

  • Industrial temperature-controlled ovens

  • Embedded heating systems

  • PID controller learning platforms

  • Process control training setups

  • Embedded systems and control labs

  • DIY electronics temperature regulation projects

Explanation of Code (High-Level)

The provided firmware focuses on system startup, timing accuracy, and safe execution flow:

  • Delay Routine (DSP28x_usDelay)
    Implements a precise software delay using CPU cycle counting. This ensures accurate timing when required by control algorithms.

  • Code Start & Boot Handling
    Redirects execution after reset and safely disables the watchdog timer before entering the main program.

  • Watchdog Control
    The watchdog is explicitly disabled during startup to avoid unintended resets during simulation or debugging.

This low-level setup is critical for predictable behavior in real-time embedded systems.

Source Code

Download
    .if WD_DISABLE == 1

    .text
wd_disable:
    SETC OBJMODE        ;Set OBJMODE for 28x object code
    EALLOW              ;Enable EALLOW protected register access
    MOVZ DP, #7029h>>6  ;Set data page for WDCR register
    MOV @7029h, #0068h  ;Set WDDIS bit in WDCR to disable WD
    EDIS                ;Disable EALLOW protected register access
    LB _c_int00         ;Branch to start of boot.asm in RTS library

    
    .endif

;end wd_disable

Proteus Simulation

In Proteus, the thermocouple generates a millivolt-level signal corresponding to oven temperature.
The op-amp conditions this signal before feeding it into the ADC pins of the PICCOLO MCU.
As temperature changes, the simulated firmware processes feedback and stabilizes the oven temperature.
This allows safe testing of control behavior, startup logic, and timing without real hardware.

(FAQs)

1. Can this project run fully in Proteus?

Yes, the complete system is designed and tested using Proteus simulation.

2. Why is cold junction compensation used?

It improves thermocouple accuracy by compensating for reference temperature errors.

3. Can the PID parameters be modified?

Yes, PID tuning values can be adjusted in firmware for different response behaviors.

4. Is this project suitable for beginners?

It is best suited for users with basic knowledge of embedded systems and control theory.

5. Why is the watchdog disabled?

To prevent unwanted resets during startup and debugging in simulation.

6. Can this be implemented on real hardware?

Yes, the schematic and firmware structure support real-world deployment.

7. Does the delay routine affect control accuracy?

Accurate delays help maintain predictable control loop timing.

8. Can other temperature sensors be used?

Yes, with appropriate signal conditioning and ADC scaling.

Conclusion

This PID controlled oven project is a strong example of real-world embedded systems design using the TMS320F28027PT.
It combines control theory, firmware timing, and analog signal processing in a clean Proteus simulation.
The project offers excellent learning value for anyone exploring microcontroller projects, PID control, and DIY electronics with professional-grade tools.

Quick Solutions to Questions related to PID Controlled Oven using TMS320F28027PT with Proteus Simulation:

  • Can this project run fully in Proteus?
    Yes, the complete system is designed and tested using Proteus simulation.
  • Why is cold junction compensation used?
    It improves thermocouple accuracy by compensating for reference temperature errors.
  • Can the PID parameters be modified?
    Yes, PID tuning values can be adjusted in firmware for different response behaviors.
  • Is this project suitable for beginners?
    It is best suited for users with basic knowledge of embedded systems and control theory.
  • Why is the watchdog disabled?
    To prevent unwanted resets during startup and debugging in simulation.
  • Can this be implemented on real hardware?
    Yes, the schematic and firmware structure support real-world deployment.
  • Does the delay routine affect control accuracy?
    Accurate delays help maintain predictable control loop timing.
  • Can other temperature sensors be used?
    Yes, with appropriate signal conditioning and ADC scaling.

About The Author

Ibrar Ayyub

I am an experienced technical writer holding a Master's degree in computer science from BZU Multan, Pakistan University. With a background spanning various industries, particularly in home automation and engineering, I have honed my skills in crafting clear and concise content. Proficient in leveraging infographics and diagrams, I strive to simplify complex concepts for readers. My strength lies in thorough research and presenting information in a structured and logical format.

Follow Us:
LinkedinTwitter