Summary of How to implement free running counter in PIC16F84A using seven segment display
This article explains the implementation of a free-running counter using a PIC16F84A microcontroller programmed in C. The counter starts at '0' on a common cathode seven-segment display and increments every second, cycling through hexadecimal values 0 to F before repeating. A 20 MHz crystal oscillator is used for timing, making the microcontroller run at 5 MIPS. PORTB pins RB0 to RB6 connect to the seven segment display segments. The project includes source code compiled with MPLAB and HI-TECH C, along with Proteus simulation files.
Parts used in the Free Running Counter Project:
- PIC16F84A microcontroller
- Common cathode seven segment display
- 20 MHz crystal oscillator
- Proteus simulation software
- MPLAB IDE (v8.85)
- HI-TECH C compiler (v9.83)
This post provides the implementation of free running counter ( using c language ) for PIC16F84A micro-controller. This code is written in such a way that, the counter starts from a value of ‘0’ ( displayed on the seven segment ) and then increments this value after every second. So, the seven segment display starts from ‘0’ and then displays ‘1’, ‘2’, ‘3’, ‘4’, ‘5’, ‘6’, ‘7’, ‘8’, ‘9’, ‘A’, ‘b’, ‘C’, ‘d’, ‘E’, and in the end ‘F’. After displaying ‘F’, counter starts from ‘0’ again and this pattern repeats forever.
The code and Proteus simulation is given in the ‘Downloads‘ section at the bottom of this page. It is assumed that you know how to make an LED blink with PIC16F84A micro-controller. If you don’t, then please read this post first.
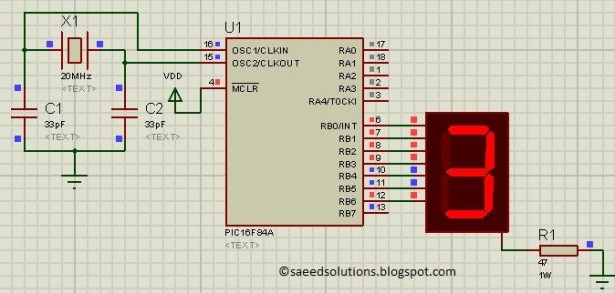
The following figure shows the circuit of free running counter in Proteus.
A crystal of 20 MHz is used here. You can use any crystal value from 0 to 20MHz with PIC16F84A. As we know that PIC16F84A microcontroller has an architecture which executes an instruction in 4 CPU cycles [1], hence this 20Mhz crystal makes this PIC16F84A run at 5.0 MIPS (Million of instructions per second).
PORTB is used here to connect PIC16F84A with the seven segment display. RB0 pin is attached with the ‘a’ segment of the seven segment display. Similarly, RB1 pin is connected with ‘b’ segment, RB2 pin is connected with ‘c’ segment and so on.
Common cathode seven segment display is used in this example. You can easily modify this circuit and code for the common anode seven segment display as well.
Code
The following function is used in the code to display values on the seven segment display.
Downloads
Free running counter code using PIC16F84A was compiled in MPLAB v8.85 with HI-TECH C v9.83 compiler and simulation was made in Proteus v7.10. To download code and Proteus simulation click here.
For more detail: How to implement free running counter in PIC16F84A using seven segment display


