


Summary of Homemade Scope Clock DG7 tube and PIC16F876
Summary: This article describes building a homemade CRT scope clock using DG7 tubes, repurposed oscilloscope parts, transformer-based and custom transformer power supplies, deflection and blanking circuits, and a PIC16F876 microcontroller with various DAC options. Schematics, PCB layouts, and photos are provided for PSU, deflection/blanking, and PIC boards, with suggested DACs (ZN508, AD7302, DAC8229, AD5332) and notes on voltages and component choices.Parts used in the Scope Clock:
- DG7 cathode ray tubes (Mullard and Philips examples)
- Old tube transformer (or custom transformer)
- Series resistors (for transformer-based PSU option)
- Large filter capacitors (huge capacitors on PSU)
- Deflection and blanking circuit PCB and components
- PIC16F876 microcontroller
- ZN508 dual 8-bit parallel input DAC (optional)
- AD7302 DAC (optional)
- DAC8229 DAC (optional)
- AD5332 DAC (optional)
- Various discrete components for PCB assemblies (resistors, capacitors, connectors)
- Blanking circuitry components
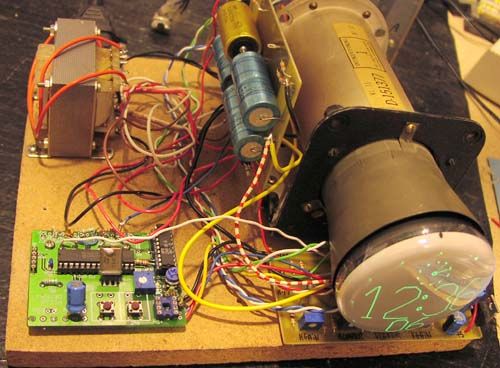
Powersupply and CRT deflection and microcontroller test circuit.
I was lucky to purcase two used but working DG7 tubes and a transformator cheap, one from Mullard and one from Phillips.
Other CRT Cathode Ray Tube types can be used, you can even rip one from an old and maybe dead oscilloscope,
then you also get the powersupply and stuff, if you are lucky the deflection amplifiers also work 🙂
Then your own home made Scope Clock is soon up and running, good luck.
Here is the complete scope clock Powersupply schematic and PCB layout. Board with parts.
This powersupply uses an old tube gear transformator, so series resistors was used to make all the different voltages.
Voltages written on the schematic are optimal values for a DG7-32 CRT.. but other tubes can also be used, read below.
Download PSU PCB layout for easy homemade Height = 105mm, Width = 85mm.
Powersupply using special made transformator, using no series resistors:
See schematic the huge capacitors can be changed !
New Powersupply board first test of transformator
New special trafo close up picture.
Trafo in hand see the small size.
This is the schematic over the blanking circuit, and PCB layout over Deflection and blanking circuit.
Baord with parts and here also
Download Deflection PCB layout for easy homemade Height = 50.8mm, Width = 111.7mm
PIC16F876 board schematic, using ZN508 DAC download and print out (updated May 2003)
PIC16F876 board schematic, using AD7302 DAC download and print out (updated Okt 2005)
See a closeup of my PIC16 demo board this board was easy to change into a scope clock controller.
I use an old ZN508 dual 8 bit parallel input DAC (see glitches), if you want a little bit better picture I suggest you use AD7302 or DAC8229 or AD5332.
If your scope tube is small or maybe a little bit out of focus, you will not notice the glitches.
For more detail: Homemade Scope Clock DG7 tube and PIC16F876
- Can I use other CRT types besides DG7?
Yes, other CRT cathode ray tube types can be used and you can even rip one from an old oscilloscope. - Does the powersupply require series resistors?
If using an old tube transformer the design uses series resistors to make different voltages; a special transformer option can avoid series resistors. - Are PCB layouts provided for the PSU and deflection circuits?
Yes, complete PSU schematic and PCB layout and deflection/blanking PCB layout are provided for download. - What microcontroller is used for the scope clock controller?
The project uses a PIC16F876 microcontroller. - Which DACs are recommended for the PIC board?
The article mentions ZN508, AD7302, DAC8229, and AD5332, noting AD7302, DAC8229, or AD5332 give better performance than ZN508. - Will ZN508 DAC glitches affect the display?
The ZN508 can show glitches, but on small or slightly out-of-focus tubes the glitches may not be noticeable. - Are the voltages on the schematic specific to DG7-32?
Yes, voltages written on the schematic are optimal values for a DG7-32 CRT, though other tubes can be used. - Can I salvage parts from an old oscilloscope for this project?
Yes, salvaging from an old oscilloscope can provide the CRT, powersupply, and possibly working deflection amplifiers.
Related projects
Ultrasonic Range Finder Circuit AD605 PIC16F876
Ultrasonic distance measurement, detection circuit pic16f876 microcontroller and ad605 (Dual Low Noise Variable Gain Amplifier singlesupply) integrated circuit diagrams used are C...
Sensors & Temperature · PIC16F876AInterfacing Temperature Sensor with Microchip PIC16F876A
The tutorial aims at providing the necessary information for interfacing an analog type temperature sensor with a Microchip PIC Microcontroller. PIC (Peripheral...
Meters & Test Instruments · PIC16F876AVoltmeter Ammeter using pic microcontroller
Voltmeter Ammeter Description This Voltmeter Ammeter was designed to measure output voltage of 0-70V / 0-500V with 100mV resolution and 0-10A or...
Beginner Tutorials · PIC16F877APIC16F877 Driving LCD in 4-Bit Mode using PIC16F877 with Proteus Simulation
Introduction This microcontroller project shows how a PIC16F877 can drive an LCD display using 4-bit mode inside a Proteus simulation.The project demonstrates...
Beginner Tutorials · PIC18F4550PICDEM FS USB CDC Evaluation Board using PIC18F4550 with Proteus Simulation
Introduction The PICDEM FS USB CDC Evaluation Board is a practical microcontroller project built around the PIC18F4550, designed to demonstrate USB communication...
Beginner TutorialsPIC12CE518 I2C EEPROM using PIC12CE518 with Proteus Simulation
Introduction This microcontroller project demonstrates how to write and read data using the internal I2C EEPROM of the PIC12CE518 and visualize the...

Ibrar Ayyub
I am an experienced technical writer holding a Master's degree in computer science from BZU Multan, Pakistan University. With a background spanning various industries, particularly in home automation and engineering, I have honed my skills in crafting clear and concise content. Proficient in leveraging infographics and diagrams, I strive to simplify complex concepts for readers. My strength lies in thorough...