


Summary of Bicycle Persistence of Vision Light Display using PIC16F84
Summary (under 100 words): In 2007 the author prototyped a persistence-of-vision bicycle wheel display using a single LED string and a microcontroller. The hand-built first revision used an ATTiny26, 14 LEDs, a resistor array, and a magnetic reed switch. A PCB revision expanded to 48 LEDs (24 per side) driven by 74x373 ICs on an 8-bit bus, removed series resistors thanks to IC current limits, and upgraded the MCU to an ATTiny861 with 8 KB program memory for full-resolution bitmap storage.Parts used in the Bicycle Persistence-of-Vision Display:
- ATTiny26 microcontroller (used in hand-built prototype)
- ATTiny861 microcontroller (used in printed PCB revision)
- 14 LEDs (hand-built prototype)
- 48 LEDs, 24 per side (printed PCB revision)
- Resistor array (used in hand-built prototype)
- Magnetic reed switch
- 74x373 ICs (latch drivers for LEDs)
- PCB (printed board for revision)
- AA or AAA batteries (two cells as power source)
In February of 2007 I spent a little while prototyping a board that turns any bicycle wheel into a moving display billboard using a single string of LEDs. The idea was to do something that would be very visible, turn itself on and off automatically, have enough processing power to dynamically generate bike computer style displays, and have enough memory to store full resolution bitmaps.
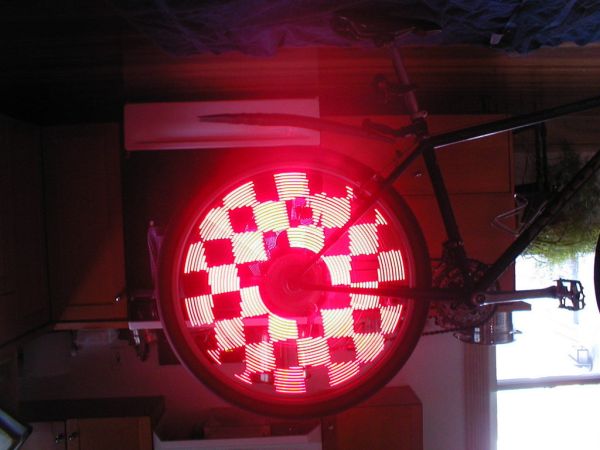
The first revision was a hand built board using a single ATTiny26 micro, 14 LEDs, a resistor array, and a magnetic reed switch.
Next I drew up a board using PCB and had it printed. The printed board differed in a couple of ways from the original hand-built prototype:
- More LEDs: 48 LEDs total, 24 on each side of the board. This gives higher resolution patterns, and they can be seen from both sides of the bike. The LEDs are controlled from a series of 74x373 ICs connected to an 8 bit bus on the microcontroller. As opposed to shift registers, all 48 LEDs can be updated in 20-30 microcontroller cycles, leaving plenty of time to spare to figure out what should go there.
- No Resistors: Turns out the I/V curve of the particular 74x family IC I had maxed out at around 20mA with two fully charged AA or AAA batteries with no series resistor. Yeah!
- Bigger Micro: While the ATTiny26 is very versatile, the ATTiny861 is a strict superset including 8k of program memory. All the better to store full resolution bitmap patterns in.
And some pictures of the final product: (some have been flipped to account for my lack of a proper bicycle stand)
HERO-1 Robot -- April 2004
Zia and I have spent a good amount of time retrofitting a HERO-1 to use a little more modern technology. We replaced the processor board with an Atmel ATMega8535, and some of the peripherals are controlled by ATTiny26's so that they are all capable of operating simultaneously. I don't have any code yet, but here are a few pictures of the retro-fitted robot.
For more detail: Bicycle Persistence of Vision Light Display using PIC16F84
Quick Solutions to Questions related to Bicycle Persistence-of-Vision Display:
- What microcontroller was used in the original hand-built prototype?
The original hand-built prototype used an ATTiny26 microcontroller. - What microcontroller was used in the printed PCB revision?
The printed PCB revision used an ATTiny861 microcontroller with 8 KB of program memory. - How many LEDs were on the PCB revision?
The PCB revision had 48 LEDs total, 24 on each side of the board. - What ICs were used to control the LEDs on the PCB revision?
74x373 ICs were used to control the LEDs and were connected to an 8-bit bus on the microcontroller. - Were series resistors used in the PCB revision?
No, series resistors were removed because the I/V curve of the 74x family IC limited current to around 20 mA with two AA or AAA batteries. - What switch was used to detect wheel rotation or position?
A magnetic reed switch was used in the design. - What advantage did the ATTiny861 provide over the ATTiny26?
The ATTiny861 is a strict superset and provides 8 KB of program memory to store full-resolution bitmap patterns. - How quickly could all 48 LEDs be updated?
All 48 LEDs could be updated in 20–30 microcontroller cycles. - What power source was implied for this design?
The design used two AA or AAA batteries as the power source.
Related projects
PIC Stepper Motor Controller using PIC16F84A with Proteus Simulation
Introduction Stepper motors are widely used in embedded systems and DIY electronics projects where precise position control is required. This PIC Stepper...
Programmers & ICSP · PIC16F84APIC Musical Doorbell using PIC16F84A with Proteus Simulation
IntroductionThis microcontroller project demonstrates a musical doorbell built around a PIC16F84A and a simple piezo sounder.Using two push buttons, the system allows...
Beginner Tutorials · PIC16C84Exploring the World of PIC Microcontrollers: An Architectural Overview
A Peripheral Interface Microcontroller (PIC), developed by General Instruments Microcontrollers in 1993, operates under software control and is programmed to execute various...
Home Automation & SecurityVoice Activated Power Sockets (Home Automation)
Yet another voice controlled home automation system! As shown in the picture, the system can control any electrical appliance, by turning ON...
Home Automation & SecurityHome Security System with GSM Using 8051 Microcontroller
Security is a big challenge everywhere because thefts are increasing day by day owing to the unsafe and insecure security systems in...
Home Automation & SecurityHome Automation and Security System using Microcontroller ATMEGA8 with Arduino Programming
Home automation and security systems have become very popular these days, today industrial automation techniques are widely adopted by luxurious homes and...

Ibrar Ayyub
I am an experienced technical writer holding a Master's degree in computer science from BZU Multan, Pakistan University. With a background spanning various industries, particularly in home automation and engineering, I have honed my skills in crafting clear and concise content. Proficient in leveraging infographics and diagrams, I strive to simplify complex concepts for readers. My strength lies in thorough...