
Summary of How To Use Virtual Terminal in Proteus ISIS
This article announces a new Google search feature for the blog and provides a beginner tutorial on using the Virtual Terminal in Proteus ISIS. It explains that the tool views and sends data via serial ports, serving as a debugging utility when Windows lacks built-in alternatives like HyperTerminal. The guide details how to add COMPIM and Virtual Terminal components, connect TXD/RXD pins, configure matching baud rates (e.g., 9600), and simulate hardware communication to verify data transmission before full software integration.
Parts used in the Virtual Terminal in Proteus Project:
- COMPIM component
- Virtual Terminal component
- Serial Port (DB9)
- Arduino UNO
- Arduino Mega 2560
- PIC Microcontroller
- 8051 Microcontroller
Hello friends, first of all I wanna give a good news to all the readers that I have added a Google search engine in TEP, which was missing for quite a long time. I was receiving a lot of complaints regarding this issue that we are unable to search the topic in the blog so now you can quite easily search any topic in the blog using this search engine which is on the top right corner. Write any topic you wanna search and hit button and your search result will show up just above the blog posts. Must give your feedback and suggestions about this newly added feature. Hope it provide a comfort to many readers.
Let’s come to today’s topic, as the name suggests, today I will show you how to use a virtual terminal in Proteus and what is its use. I will first explain the virtual terminal and then we will look at its uses and how to use virtual terminal in Proteus ISIS. Its a beginner level tutorial and if you are already familiar with Proteus then I think you must have already known with Virtual Terminal in Proteus. But still I recommend to read this tutorial once and then move on to next one. Anyways, let’s get started with Virtual Terminal in Proteus.
What is Virtual Terminal ?
- What is Serial Port?
I have posted many tutorials on my blog in which I have communicated over Serial port using different software. For example, you can check this Serial communication in MATLAB and can also have a look at Serial Communication in Visual Studio 2010. As serial communication is quite common so almost all of the microcontrollers these days, supports Serial communication. Arduino UNO has builtin single serial port at its pins 0 and 1, while the Arduino Mega 2560 has built in four Serial ports in it. Similarly, PIC Microcontroller also supports Serial port and it is also available in 8051 Microcontroller.
Uses of Virtual Terminal
Virtual Terminal in Proteus, as I explained above, is used to send or receive data to or from the serial port. Serial port is a 9 pin port which is mostly find on the computers and is normally used in Embedded System Projects. In most of the projects, the data is sent from the hardware to computer via this serial port and then user design some application on the computer to view that data in some representable form.
Now, in projects there are some testing steps which are quite helpful, if we use them properly, and these testing steps require some tools in order to test the process. Like, suppose some student have designed the hardware to send the data to the computer and have also design its application to receive it and now when he tests it he didn’t receive any data. At that point student got tensed and don’t know where’s the error so at that point there’s may be some error in the hardware or may be in the software.
Now, in order to be sure he need to test both of them separately and here is the point where virtual terminal is used. First connect your hardware with the computer and then run the hardware and check whether you are receiving data on the virtual terminal or not. If you are receiving it, means your hardware is okay and the problem is in software side and if you are not means your hardware is not so good.
Whenever I start working on some projects, I always make sure that I am going in right direction like if I have to made this project then after completing my hardware, I will first check it via this virtual terminal and once I got sure that my hardware is okay then I will move to the software part. If you are gonna design the hardware then I think you must check Serial communication with 8051 Microcontroller, which is also designed in Proteus ISIS software and the data is displayed using the same virtual terminal.
There are also many other applications of this terminal like suppose you wanna design some circuit in Proteus which involves serial port then you can add this terminal on your circuit and can test it before going to the hardware, which we will shortly see below. So, now let’s get started with Virtual Terminal in Proteus.
How to Use Virtual Terminal in Proteus ISIS?
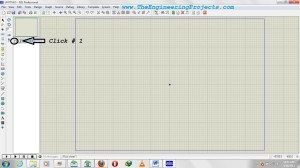
- First of all open the Proteus ISIS and click on the P button to search for the components, as we seen in the previous tutorial and also shown in the below figure:
- Now in the search box type “COMPIM” , when you search this a result will show up as shown in the below figure:
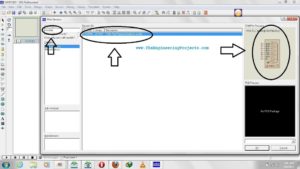
- After Selecting this, click OK to add this component in the database.
- COMPIM is the serial port in Proteus and using its properties we can assign any COM pin of our computer to it and it will behave like that pin. We will change the properties shortly.
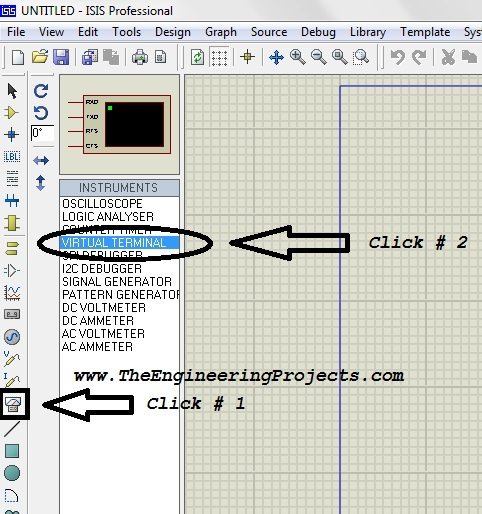
- Now, click on the Virtual Instrument Mode and then on the Virtual Terminal as shown in the below figure and add it in the Proteus workspace.
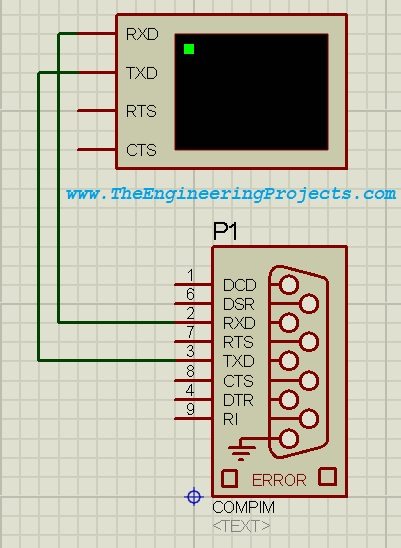
- Now join the TXD pin of COMPIM with the TXD pin of Virtual Terminal and RXD with RXD as shown in the figure below:
- Now, double click on the COMPIM to open the Properties menu and set the properties as shown below:
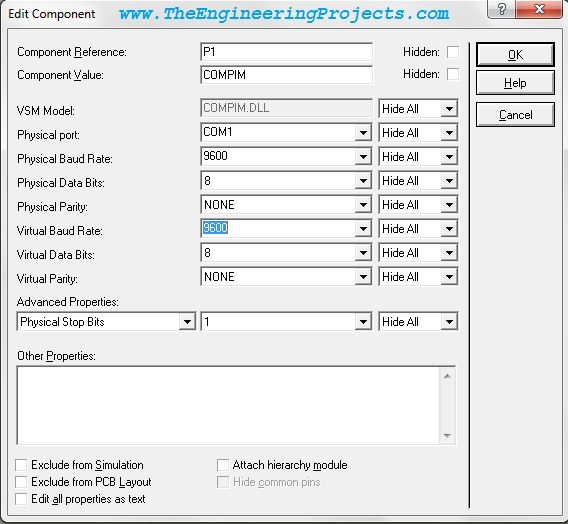
- I have selected COM1 and my baud rate is 9600, you can set it whatever you want like if you are using the COM3 then set the port to COM3 and baud rate of your own choice.
- Similarly open the properties of the virtual terminal and make sure that the baud rate is same in both the cases.
- Now connect your hardware with the computer and play the simulation. Again make sure that the port which you have selected for the COMPIM is same port with which you have attached your hardware.
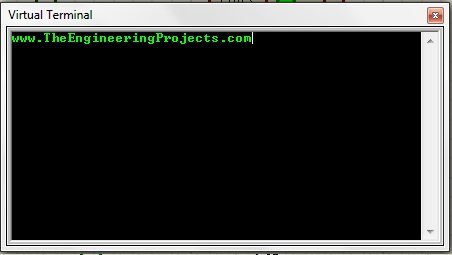
- After you play the simulation a black window will open up which will show the data coming from your hardware to the COM1 pin as shown below:
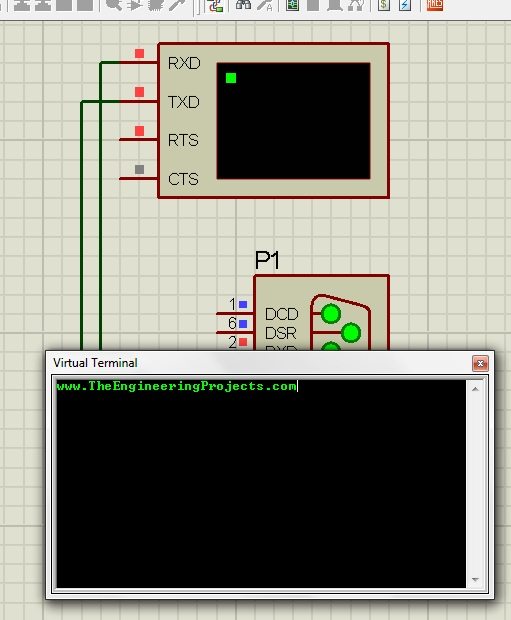
- This black box is actually the Virtual Terminal which is showing data coming from my hardware.
- If you play the simulation and this Virtual Terminal doesn’t pop up then right click on the Virtual Terminal Component and then click on Virtual Terminal which will be at the end in the options and this black window will open up.
I think you guys have got much of the idea of this Virtual Terminal in Proteus ISIS. If you have any problem anywhere, ask in comments and also subscribe to our newsletter via email to get these amazing tutorials right into your mailbox. In the next tutorial, I have explained How to use Oscilloscope in Proteus ISIS. Thanks, take care.
- What is the primary function of the Virtual Terminal in Proteus?
It is used to view data coming from the Serial Port and send data to the Serial Port. - Why is the Virtual Terminal useful for Windows 7 users?
Windows 7 does not have a built-in tool like HyperTerminal which existed in Windows XP. - How can you use the Virtual Terminal to debug hardware versus software errors?
If data appears on the terminal, the hardware is okay and the issue is in the software; if no data appears, the hardware may be faulty. - Which component must be searched to add a serial port in Proteus ISIS?
You must search for the component named COMPIM. - What happens if the Virtual Terminal window does not pop up during simulation?
You should right-click on the Virtual Terminal Component and select the Virtual Terminal option at the end of the menu. - What connection rule applies between the COMPIM and Virtual Terminal components?
The TXD pin of the COMPIM must be joined with the TXD pin of the Virtual Terminal, and RXD with RXD. - What specific setting must match between the COMPIM and the Virtual Terminal?
The baud rate must be set to the same value in both components. - Which microcontrollers mentioned in the text support serial communication?
Arduino UNO, Arduino Mega 2560, PIC Microcontroller, and 8051 Microcontroller all support serial communication.
