Summary of Build this microcontroller controlled rainbow flying disc – and then throw it!
This project makes a flashing RGB-LED rainbow frisbee using a PIC microcontroller, resistors, an RGB LED, and a coin cell battery mounted on veroboard and attached to a cheap frisbee. The PIC cycles seven colors rapidly so when thrown the spinning LED creates a rainbow ring effect. The guide covers programming the PIC, cutting and preparing veroboard, soldering components, wiring the battery, and mounting the assembly to the frisbee.
Parts used in the Rainbow Frisbee:
- One Frisbee
- PIC16F648A or PIC16F628A microcontroller
- One 18 pin IC socket
- One RGB LED
- Three resistors (100 ohm each)
- One coin cell battery (CR2032)
- One coin cell battery holder
- Small piece of veroboard (approximately 20x10 holes)
- Hookup wire (positive blue, negative white)
Hello all and welcome to this super simple and inexpensive instructable.
If you like throwing frisbees AND you like flashing lights AND you like night time – then this instructable is for you!
Have you ever waved a light or torch around and found that it ‘draws’ lines in the air? What if that light was changing colour multiple times per second and then you waved it around? well you would end up with a ‘stream’ of different colours in the air. It is this principle that this instructable works on.
You can try it out here, click on the link below to open up a flashing dot animation.
www.retrobrad.org/flashing_dot.swf
The dot is cycling through seven colours at a rate of 60hz (I.E. it changes colour sixty times per second) Now keep looking at it but shake your head from side to side REALLY FAST! (or you could pick up your monitor and shake it really fast but it’s probably not a good idea…)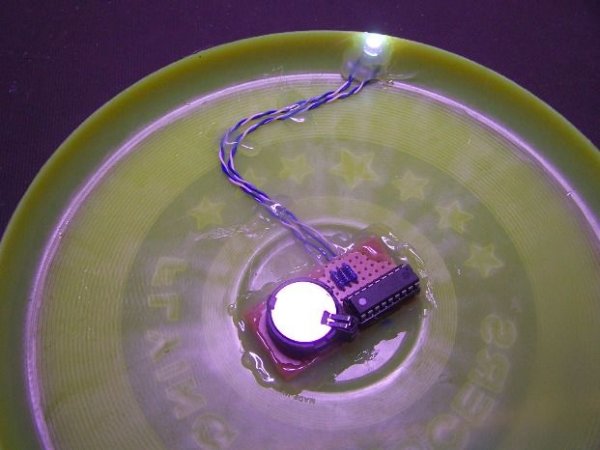
You should start to see the single dot seperate into multiple dots of various colours.
Basically this instructable consists of a cheap $2 frisbee, a pic microcontroller a few resistors and an RGB (RED, GREEN, BLUE) LED mounted to the outer edge of the frisbee. The LED cycles through seven different colours (multiple times per second). When you throw the frisbee, it will give the illusion of a rainbow ring as it flies across the sky. It does look really cool!
So before we get started on this instructable, here’s what you are going to need:
Components:
– One Frisbee
– pic 16f648a or 16f628a microcontroller
– one 18 pin IC socket
– one RGB LED (I was originally going to use three, thats why the pic has three LED’s)
– three resistors (I have used 100 ohm for each)
– one coin cell battery (I have used CR2032 which runs at 3 volts)
– one coin cell battery holder.
– small piece of veroboard (AKA experimenters board)
– hookup wire
Tools:
– Soldering iron
– Solder
– Glue gun
– solder wick (optional – if you make a soldering mistake)
– flux (optional – just helps with soldering)
– pic programmer
– stanley knife or sharp blade (to cut tracks)
– side cutters (to cut the wire)
All the items required to make this can be bought for under $10
Please note, the rainbow ring image below is of the actual project although I had to edit it a little bit because a single image from a digital camera does not capture a complete rainbow ring due to the refresh rate differences. It looks really cool in real life though = )
So, let’s get started!
Step 1: Program the microcontroller.
You can download the hex file to program to your microcontroller on this page.
Load up your programmer software and open the hex file. Program it to the pic and your done!
You are now ready to start building this great rainbow frisbee!
Step 2: Prepare the veroboard
Cut your veroboard to size. approx 20 holes by 10 holes should do the job nicely. This will allow you to fit all of the components on the board quite snuggly.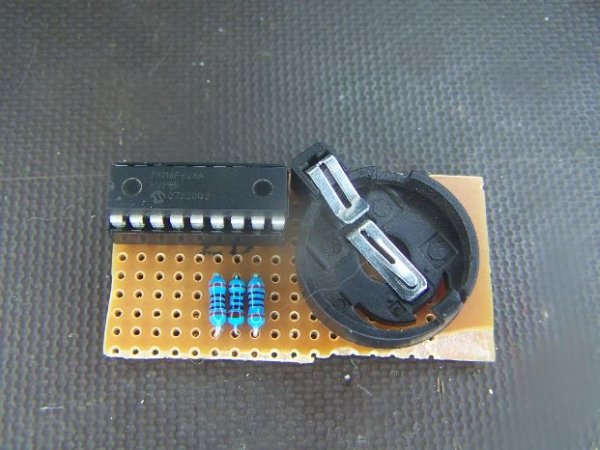
Step 3: Prepare veroboard tracks.
This step is very simple.
You just need to cut two lines through the tracks of the veroboard as shown in the photo. This is where you will be soldering the microcontroller and resistors to.
Step 4: Solder the components to the board.
There are just five components to solder to the board.
– battery holder
– three resistors
– IC socket
Solder them into the locations as shown in the photo’s.
You will also need two wires to go from the battery terminals to the microcontroller.
The positive connection is the blue wire and the negative is the white wire.
For more detail: Build this microcontroller controlled rainbow flying disc – and then throw it!
- What does the project create?
A flashing RGB-LED rainbow effect on a frisbee that appears as a rainbow ring when thrown. - Which microcontroller is used?
Either a PIC16F648A or PIC16F628A microcontroller. - How many colors does the LED cycle through?
The LED cycles through seven different colours. - What power source is used?
A single coin cell battery, for example a CR2032 at 3 volts. - What resistors are required?
Three resistors; the instructable uses 100 ohm for each. - How is the microcontroller programmed?
Download the provided hex file and use a PIC programmer to load it onto the PIC. - What board is used to mount components?
A small piece of veroboard (approximately 20 holes by 10 holes). - What basic tools are needed?
Soldering iron, solder, glue gun, PIC programmer, sharp blade, and side cutters.