Summary of Innovative Approaches to Control System Design for 100KV Impulse Generators
An impulse generator project automates a 100 kV single-stage Marx generator for insulation testing by controlling sphere gaps, charging, discharging, and safety tasks via Arduino Mega 2560 and LabVIEW. The system uses autotransformer voltage control, stepper-driven sphere gap adjustment, voltage feedback through a potential transformer, selenium rectifier charging, relays and Trigatron firing, with user input and process monitoring through a LabVIEW UI.
Parts used in the Impulse Generator Automation Project:
- Autotransformer (5 KVA variable voltage transformer, 230VAC input, 0–200V output)
- Power transformer (10 KVA step-up transformer with primary, secondary, tertiary windings)
- Selenium rectifier
- 100KV single-stage impulse generator (Marx generator at UET Lahore)
- Arduino Mega 2560 board (ATmega2560)
- LabVIEW Interface for Arduino (LIFA) software
- Stepper motor (two-phase four-wire bipolar)
- Bipolar stepper motor driver / H-bridge driver circuit
- Potential Transformer (220/9 ratio for feedback)
- Relays (30A 12V DC for charging disconnect; 9A 12V DC for Trigatron trigger)
- Trigatron (pulse discharge switch)
- Sphere gap electrodes (spherical electrodes and mechanical adjustment assembly)
- Magnetic contactor (to connect/disconnect autotransformer)
- DC gear motor (to set autotransformer voltage)
1. INTRODUCTION
An impulse generator is an electrical device designed to generate short-duration surges of high voltage or high current. Impulse signals are characterized by their very high magnitude and extremely brief duration. These impulses are typically utilized for insulation testing by passing them through a transformer.
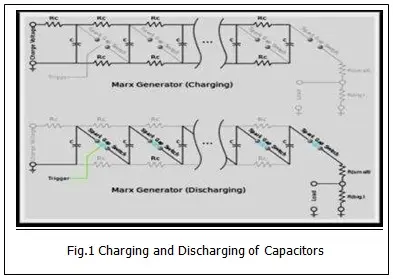
The process of generating impulse voltage involves two phases:
1. Parallel charging of capacitors: Capacitors are charged in parallel to a specified voltage, denoted as V.
2. Series discharging of capacitors: These charged capacitors are then connected in series through spark gap switches, ideally resulting in an output voltage equal to V multiplied by the number of capacitors, represented as “n.” However, practical limitations result in the output voltage being somewhat less than n times V.
The charging and discharging of a Marx Generator, illustrating this two-phase process, are depicted in Figure 1.
In the field of control systems engineering, a system refers to a collection of objects or elements with the capability to carry out distinct tasks. These components are interconnected in a defined sequence to fulfill a specific function. There are two main types of systems:
1. Open-Loop System
2. Closed-Loop System
Each system comes with its own set of advantages and drawbacks. An open-loop system is characterized by its simplicity, cost-effectiveness, and ease of construction. However, it tends to be less accurate, less reliable, and incapable of mitigating the effects of disturbances. On the other hand, a closed-loop system offers greater accuracy and the ability to respond to disturbances, but it comes at a higher cost and is more challenging to construct.
2. COMPONENTS OF IMPULSE GENERATOR
Autotransformer
An autotransformer possesses a solitary winding with two terminal ends and one or more terminals situated at intermediate tap points. Alternatively, it refers to a transformer where the primary and secondary coils share some or all of their turns. The primary voltage is applied across two terminals, and the secondary voltage, drawn from two terminals, consistently shares one terminal with the primary voltage. Consequently, the primary and secondary circuits have multiple winding turns in common. As the volts-per-turn remains consistent in both windings, each generates a voltage proportionate to its number of turns.
In an autotransformer, a portion of the current travels directly from the input to the output, with only a segment being transferred inductively. This feature allows for the utilization of a smaller, lighter, and more cost-effective core. Moreover, it necessitates only a single winding. Currently, I am employing a 5KVA variable voltage transformer, which accepts a 230VAC input and delivers an output range of 0V-200V, depending on the required magnitude for the impulse.
Power Transformer
A power transformer functions as a stationary electrical device that transfers energy through inductive coupling between its winding circuits. When a fluctuating current flows through the primary winding, it generates a variable magnetic flux within the transformer’s core. Consequently, this varying magnetic flux passes through the secondary winding, inducing a fluctuating electromotive force (emf) in the secondary winding. The transformer in question is a 10KVA step-up transformer with a primary, secondary, and tertiary winding (utilized for measurement purposes). For instance, applying 35V to the primary winding results in a voltage of 17.5KV at the secondary winding, achieving a substantial increase in alternating current (AC) voltage. It’s important to highlight that the secondary current rating of this transformer is exceptionally low.
Selenium Rectifier
Invented in 1933, a selenium rectifier belongs to the category of metal rectifiers. These rectifiers found applications as substitutes for vacuum tube rectifiers in power supplies for electronic devices and high-current battery charger setups. Unlike vacuum tube rectifiers that had a mere 60% efficiency due to the necessity of heating, selenium rectifiers boasted an 85% efficiency. Notably, selenium rectifiers eliminated warm-up times, a characteristic absent in high-vacuum rectifiers.
Additionally, selenium rectifiers proved to be more cost-effective and simpler to specify and install compared to vacuum tubes. Despite these advantages, they eventually faced obsolescence as silicon diodes with high efficiencies, approaching 100% at elevated voltages, took over. Selenium rectifiers possessed the unique capability to serve as current limiters, offering temporary protection during a short circuit and ensuring stable current flow.
The primary function of selenium rectifiers involved converting the high voltage generated by the main transformer into DC voltage. This converted voltage was then utilized for charging capacitors in the impulse generator connected upstream in the system.
100KV Impulse Generator
The impulse generator at UET Lahore operates at 100KV and is configured as a single-stage setup, serving as the focal point for my upcoming experiments. Subsequently, all my research efforts and modifications will be directed towards this particular impulse generator.
3. PROPOSED MODIFICATIONS
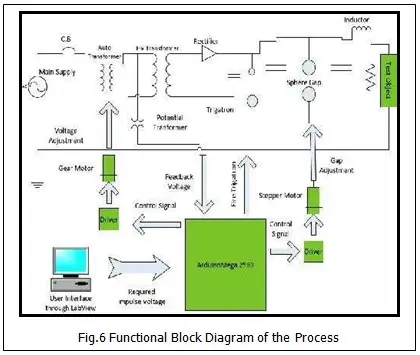
The primary objective of this project is to automate the impulse generator. The following steps outline the sequential process:
1. Adjust the sphere gaps between capacitors based on user input received through the PC.
2. Set the voltage level according to the impulse requirement using a DC gear motor, which connects a feedback-controlled autotransformer through a magnetic contactor.
3. Once the capacitors are charged, the Arduino Board will disconnect the autotransformer by opening the magnetic contactor. It will then command the autotransformer to rotate back to its initial position (0 volts) and trigger the Trigatron to discharge the capacitors across the testing object.
4. Finally, a stepper motor returns the sphere gap to its initial position, eliminating any residual charge in the capacitors.
Refer to Figure 6 for a visual representation of the process.
4. ARDUINO MEGA 2560
To comprehend Arduino, a solid understanding of programmable logics and basic knowledge of control tactics is essential. When dealing with intelligent systems, it is crucial to recognize that microprocessors play a pivotal role. In the 21st century, the awareness of microprocessors is widespread, considering them as the digital brains of any system they are part of. For instance, consider my Impulse generator, where specialized personnel currently handle every task meticulously, particularly during the high-voltage capacitor charging process. By teaching these processes to microcomputers once, the same tasks can be effortlessly executed in the future.
Why Arduino Mega Board?
The microprocessor serves as the central processing unit, acting as the brain, while non-intelligent devices carry out instructions provided by the processor. Peripherals play a crucial role in this process. One option is to utilize a microcontroller, equipped with various peripherals such as ADC and Serial Communication. However, finding these peripherals insufficient led me to explore the Arduino board, a comprehensive solution that includes a built-in code burning facility.
Overview
The Arduino Mega 2560 stands as a comprehensive package centered around the ATmega2560 controller, boasting the following key features:
1. Incorporates 54 digital input/output pins (with 15 of them doubling as PWM outputs).
2. Offers 16 pins designed for analog inputs, each connected to integrated ADCs.
3. Equipped with 4 UARTs, providing hardware serial communication ports.
4. Utilizes a 16 MHz crystal oscillator.
5. Features built-in USB communication support.
6. Includes a power jack for external supply when functioning as a standalone system.
7. Comprises an ICSP header and a reset button.
8. Employs a robust RESET circuit for enhanced durability.
9. Utilizes the Atmega 16U2 component.
LabView Interface for Arduino
The LabVIEW Interface for Arduino (LIFA) empowers users to manage sensors and gather data through Arduino by leveraging the graphical programming environment of LabVIEW. LIFA utilizes open-source Arduino firmware to establish communication with LabVIEW, offering a straightforward yet robust API for various functionalities such as Digital IO, Analog Input, SPI, I2C, PWM, and more. Here are some fundamental features of LIFA:
– Analog Input: Capability to read an individual Analog Input Pin or the entire Analog Input Port.
– Digital Input and Output: Allows users to read or write an individual Digital Pin or the complete Digital Port.
– Pulse Width Modulation: Offers the ability to write an individual PWM Pin or the entire PWM Port.
– Built-In Sensor Support: LIFA includes support for built-in sensors.
– Stepper Motors Control: Enables control of up to 7 stepper motors with fully configurable step and direction control.
5. SPHERE GAP ADJUSTMENT
A sphere gap comprises two spherical electrodes separated by a gas-filled insulating gap. In Impulse Generators, Sphere Gaps play a crucial role in applying high-voltage impulses by connecting charged capacitors in series. In a single-stage Marx Impulse Generator, two capacitors are initially charged in parallel to a specified voltage. To retain this charge, a sphere gap serves as a switch. Upon breakdown, these parallel capacitors are connected in series, resulting in an output voltage at the terminals twice that of the capacitors’ initial charging voltage. Proper adjustment of the gap between the spheres is essential to ensure that when the Trigatron is triggered, a reliable breakdown of the gap occurs, thereby applying the impulse voltage to the connected testing equipment at the output terminals.
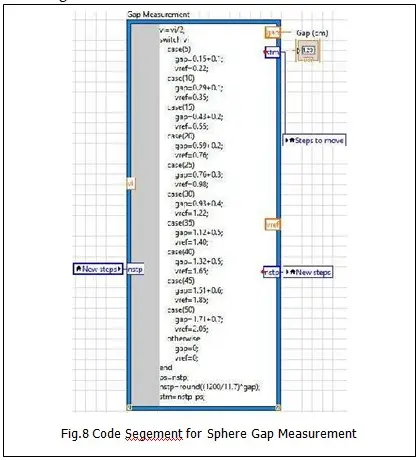
Gap Measurement
The sphere gap mechanism is uncomplicated and straightforward in its operation. Under standard temperature and pressure conditions, the breakdown voltage of air is 33kV/cm (disregarding the impact of humidity). I employed standard distances corresponding to various voltage ranges, and TABLE 1 provides the specific distances between spheres for different breakdown voltages.
LabView Code for Sphere Gap Measurement
The code snippet depicting the measurement of sphere gap is presented below in Figure 8.
Algorithm for Sphere Gap Adjustment
The fundamental algorithm governing the adjustment of the distance between sphere gaps operates through the following steps:
• The user inputs the desired impulse voltage into the primary computer.
• The main computer transmits a signal to the Arduino through USB based on the provided voltage value.
• Arduino compares the entered voltage value with the predefined distance range.
• Arduino determines the necessary distance between sphere gaps and generates a signal for the stepper motor (mechanically linked to the spheres), initiating a calculated rotation to achieve the specified distance.
• This established distance is maintained throughout the entire charging process, and post-discharge, the stepper motor returns to its initial position, reconnecting both spheres to ground level.
These sequential actions are illustrated in the block diagram below: [Include the block diagram for a visual representation.]

Stepper Motor
A stepper motor, as implied by its name, operates by moving in discrete steps rather than continuously rotating like traditional motors. Stepping motors occupy a distinctive position in the realm of motor control and find common usage in measurement and control applications. We opted for a stepper motor in our project because it allows us to command specific step movements, rotating incrementally by the designated number of steps before coming to a stop. Due to this inherent characteristic, stepper motors are widely employed in low-cost, open-loop position control systems, where feedback information about the position is not required. This eliminates the need for expensive sensing and feedback devices such as optical encoders, as the motor position is determined by tracking the number of input step pulses.
The advantages of stepper motors include being brushless, load-independent, suitable for open-loop positioning, possessing holding torque, and exhibiting excellent response characteristics.
There are two common types of stepper motors: the bipolar motor and the unipolar motor. While both types share similarities, the unipolar motor has a center tap on each winding. In our project, a two-phase four-wire bipolar stepper motor was chosen for its ability to provide high torque in adjusting the sphere gap distance. The schematic diagram is depicted in Figure 11. Unlike unipolar motors, bipolar motors lack center taps, causing current to flow through an entire winding at a time rather than just half of it. Consequently, bipolar motors generate more torque compared to unipolar motors of the same size, boasting approximately 30% more torque within the same volume.
Drive Circuit
Bipolar stepper motors lack a center tap in their construction, simplifying the motor design. However, this characteristic necessitates the use of a distinct type of driver circuit known as an H-bridge, named so due to its resemblance to the letter “H☂”. The direction of current through the coil can be reversed by closing the appropriate switches. Figure 12 illustrates a bipolar drive circuit.
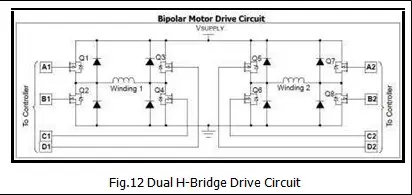
Subsequently, a sequencer is necessary to generate appropriate signals in a predetermined sequence for the H-bridges. In the illustrated Figure 12, two H-bridges are employed to regulate the two windings of the stepper motors.
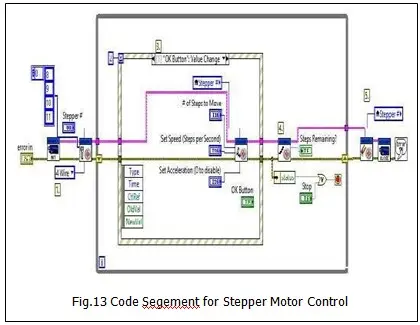
LabView Code for Sphere Gap Adjustment
The code segment for Stepper motor control is shown below in Fig.13:
6. CHARGING OF IMPULSE GENERATOR
Let’s delve into the specifics of each device utilized in this operation.
Auto Transformer
This constitutes the primary aspect of the charging phase. An autotransformer, characterized by having only a single winding, functions by using segments of the same winding for both primary and secondary purposes. The winding incorporates a minimum of three taps, facilitating electrical connections. While an autotransformer can be more compact, lighter, and cost-effective compared to a traditional dual-winding transformer, it lacks the ability to provide electrical isolation.
In my project, a 5 KVA autotransformer with a winding possessing a current rating of 15A has been employed.
Potential Transformer
A Potential Transformer (PT) is employed in electrical power systems to reduce the voltage to a safe level, suitable for feeding low-rated meters and relays. The relays and meters commercially available for protection and metering purposes are specifically designed to operate at lower voltages. The theory behind PT operation resembles that of a general-purpose step-down transformer. The primary winding of the PT is connected across the phases or ground, depending on the specific requirements. The input voltage is applied to the primary winding terminals, resulting in a proportional secondary voltage across the PT’s secondary terminals.
In an ideal scenario, when a rated burden is connected across the secondary, the ratio of primary to secondary voltages equals the turn ratio, and the two terminal voltages exhibit a precise phase opposition. However, in real transformers, there may be errors in both the voltage ratio and the phase angle between the primary and secondary voltages.
For our application, we incorporated a 220/9 voltage ratio potential transformer in the feedback loop. This PT serves to obtain feedback voltage from the autotransformer, allowing for accurate adjustments to the charging voltage.
Relay
A relay serves as an electrically controlled switch, with many relays employing an electromagnet to mechanically operate a switching mechanism. However, various operating principles can be utilized. Relays find application in situations where it is essential to regulate a circuit using a low-power signal, ensuring complete electrical isolation between the controlling and controlled circuits, or when a single signal needs to control multiple circuits. In our circuit, two relays were employed for specific functions:
1. The first relay is designed to open the charging circuit once the capacitors reach the desired value. This relay is a 30A 12V dc type.
2. The second relay is utilized to trigger the Trigatron when necessary, and it has a rating of 9A 12V dc.
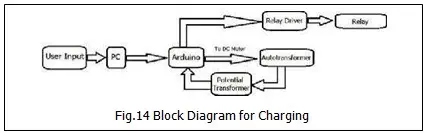
Algorithm for Charging Process
The fundamental algorithm for the charge control unit of the Impulse Generator (IG) is outlined as follows:
1. The user inputs the desired impulse voltage into the main computer.
2. The main computer transmits a signal to the Arduino via USB based on the user input.
3. The Arduino, following the adjustment of the sphere gap, initiates the movement of the autotransformer to incrementally raise the voltage on the primary side of the High-Voltage (HV) Transformer.
4. Continuous feedback of the voltage is obtained to ensure that the capacitors are charged to the specified voltage level.
5. Once the specified voltage is reached, it is disconnected from the circuit (with a brief delay accounting for the charging time constant) by sending a command signal to the 12V DC relay.
6. Following this process, the IG is prepared to deliver the desired impulse when the Trigatron is activated.
The corresponding functional block diagram is illustrated below: [Insert Diagram]
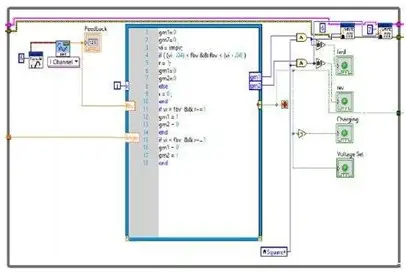
LabView Code for Capacitor Charging
The segment of code responsible for charging the capacitor is depicted in Figure 15 below.
7. IMPULSE APPLICATION AND DISCHARGING
Following the charging of capacitors and the disconnection of the auto transformer from the generator, we are prepared to administer the impulse to the testing equipment. The impulse is delivered through the utilization of a Trigatron. Upon the firing of the Trigatron, a double voltage emerges across the sphere gap, inducing its breakdown. This breakdown results in the charged capacitor being in series, thereby applying the impulse to the equipment. Subsequent to the impulse application, it becomes imperative to discharge the capacitor to remove any residual charge within the circuit. Grounding the capacitors is essential for this purpose. To accomplish this, the spheres are interconnected using the stepper motor already integrated into the control circuit. Once they are connected, firing the Trigatron once more is necessary to ground the capacitors and eliminate any remaining charge.
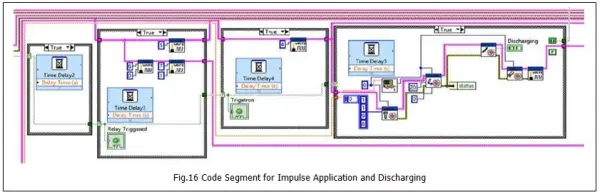
7.1 LabView Code for Impulse Application and Discharging
The LabView code depicted in Figure 16 is designed to apply the impulse and discharge the circuit.
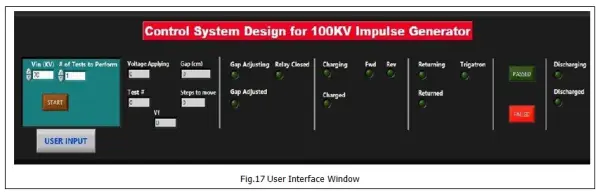
8. USER INTERFACE WINDOW
In Figure 17, the LabVIEW software displays a user interface window enabling the user to input parameters and observe the sequential progression of the entire process. The user interface window features individual LEDs corresponding to each stage of the process, providing a visual indicator of the current stage of the impulse generator. This allows the user to easily track and monitor the step-by-step advancement of the process.
- How does the system set the sphere gap distance?
The user inputs the desired impulse voltage on the PC; the PC sends the value to Arduino, which determines the required distance and commands the stepper motor to rotate the spheres to that distance. - Can the autotransformer voltage be controlled automatically?
Yes, a DC gear motor connected to a feedback-controlled autotransformer via a magnetic contactor sets the voltage level based on user input. - How are capacitors charged to the desired voltage?
Arduino moves the autotransformer to raise the HV transformer primary voltage while continuous PT feedback monitors charging until the desired capacitor voltage is reached, then a 12V DC relay opens the charging circuit. - Does the system discharge residual capacitor charge automatically?
Yes, after impulse application a stepper motor returns the sphere gap to ground and the Trigatron is fired again to discharge remaining charge. - What role does the Arduino Mega 2560 play?
Arduino receives user commands from the PC, controls sphere gap adjustment, autotransformer movement, charging relay, and triggers the Trigatron per the automation sequence. - How does LabVIEW integrate with the Arduino?
LabVIEW Interface for Arduino (LIFA) communicates with Arduino over USB, providing API functions for digital IO, analog input, PWM, and stepper motor control used in the project. - What protects the system during charging and triggering?
Relays are used to disconnect charging at target voltage and to trigger the Trigatron; selenium rectifier provides DC charging from the transformer. - How is the charging voltage feedback obtained?
A 220/9 potential transformer provides voltage feedback from the autotransformer for accurate charging control. - What type of stepper motor is used for gap adjustment?
A two-phase four-wire bipolar stepper motor is used for high torque and precise open-loop positioning. - What does the LabVIEW user interface display?
The LabVIEW UI allows parameter input and shows process progression with LEDs indicating each stage of the impulse generation sequence.