Summary of How to get started with TensorFlow Lite for Microcontrollers
This article is a beginner guide to building TinyML projects with TensorFlow Lite for Microcontrollers, covering idea selection, component choice (ESP32 + MPU6050 example), data collection, training a simple dense neural network in Colab, and deploying the model to an ESP32 using TensorFlowLite_ESP32. It includes Arduino code for sensor reading, visualization, data logging, thresholding, and steps to integrate model.h, necessary headers, and interpreter setup with op resolvers.
Parts used in the TinyML gesture detector project:
- ESP32 microcontroller
- MPU6050 sensor (3-axis accelerometer and 3-axis gyroscope)
- Arduino IDE (software)
- Adafruit_MPU6050 Arduino library
- TensorFlowLite_ESP32 Arduino library
- model.h (exported TFLite model file)
- USB cable for programming and serial monitoring
- Computer to run Colab and Arduino IDE
Want to build your own TinyML application? This is a detailed approach to getting started with TensorFlow Lite for Microcontrollers!

Story
Introduction
In the summer of 2022 I was selected to participate in the Google Summer of Code (GSoC) under TensorFlow. While trying to build my first project, I quickly realized that there weren’t many good beginner practical guides for using TensorFlow Lite for Microcontrollers. For this blog I hope to somewhat remedy that by introducing TFLite for Micro and how you can get started on your journey with the tool. As I plan to improve this blog or create more content in the future, please leave your feedback in the comments! Happy Hacking!
The tutorial in a nutshell
1. Decide on an idea
2. Decide on the components
3. Collect data and train a Machine Learning model
4. Build the application code
5. Conclusion
Before we go ahead, it’s good to learn some definitions.
1. TensorFlow: TensorFlow is a free, open-source software library for machine learning and artificial intelligence. It works well for backend and PC inference.
2. TensorFlow Lite: TensorFlow Lite is a set of tools that enables on-device machine learning by helping developers run their models on mobile, embedded, and edge devices.
3. TensorFlow Lite Micro/TinyML: TensorFlow Lite for Microcontrollers is a library designed to run machine learning models on microcontrollers and other devices with only a few kilobytes of memory. It doesn’t require operating system support, standard C or C++ libraries, or dynamic memory allocation.
1. Decide on an idea
Firstly, you’ll need to come up with an idea for a project. Say you want to build your own smart shoes that can track your daily activity or a smart water bottle that tracks how much water you have had throughout the day and automatically notifies you to drink more water.
Once you come up with an idea, try to answer this question: Is ML really needed here?
2. Decide on the components
Once you have a clear idea for your project, it’s time to figure out how to execute it. Say you want to build a smart glove that can detect complex gestures. You’ll either need flex sensors and an accelerometer or a camera.
This tutorial will demonstrate a simple gesture detector using an ESP32 microcontroller. The sensor of choice that I’m going to use is an MPU6050. It consists of a three-axis accelerometer and a three-axis gyroscope. The data from the accelerometer will be used to detect a simple shoot gesture.
3. Collect data and train a Machine Learning model
3.a Installing the Adafruit_MPU6050 library
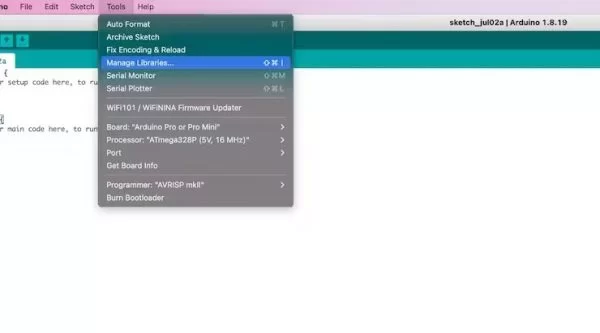
First you will need the Arduino IDE installed. Next, under the Tools section, click the Manage Libraries, search for Adafruit MPU6050, select the Adafruit MPU6050 library and click Install
3.b Wiring
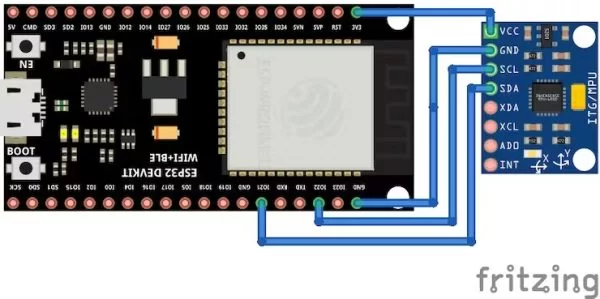
- Connect board VCC to ESP323V3
- Connect board GND to ESP32GND
- Connect board SCL to ESP32SCL (GPIO 22)
- Connect board SDA to ESP32SDA(GPIO 21)
3.c Basics of the Adafruit_MPU6050 library
The Adafruit_MPU6050 library is a library that allows you to interface with the MPU6050 sensor via a microcontroller’s i2c bus. The basics.ino file logs the accelerometer and gyroscope data onto the serial monitor.
//basics.ino

/* including header files */
#include <Adafruit_MPU6050.h>
#include <Adafruit_Sensor.h>
#include <Wire.h>

/* instantiates an object of the 'Adafruit_MPU6050' class */
Adafruit_MPU6050 mpu;

void setup(void)
{
    Serial.begin(115200);

    while (!Serial)
    {
        delay(10);
    }

    /* Try to initialize! */
    if (!mpu.begin())
    {
        Serial.println("Failed to find MPU6050 chip");
        while (1)
        {
            delay(10);
        }
    }

    mpu.setAccelerometerRange(MPU6050_RANGE_16_G);
    mpu.setGyroRange(MPU6050_RANGE_250_DEG);
    mpu.setFilterBandwidth(MPU6050_BAND_21_HZ);
    Serial.println("");
    delay(100);
}

void loop()
{
    /* Get new sensor events with the readings */
    sensors_event_t a, g, temp;
    mpu.getEvent(&a, &g, &temp);

    /* Print out the accelerometer values */
    Serial.print("AccelX:");
    Serial.print(a.acceleration.x);
    Serial.print(",");
    Serial.print("AccelY:");
    Serial.print(a.acceleration.y);
    Serial.print(",");
    Serial.print("AccelZ:");
    Serial.print(a.acceleration.z);
    Serial.print(", ");

    /* Print out the gyroscope values */
    Serial.print("GyroX:");
    Serial.print(g.gyro.x);
    Serial.print(",");
    Serial.print("GyroY:");
    Serial.print(g.gyro.y);
    Serial.print(",");
    Serial.print("GyroZ:");
    Serial.print(g.gyro.z);
    Serial.println("");
    delay(10);
}
3.d Choosing a threshold value
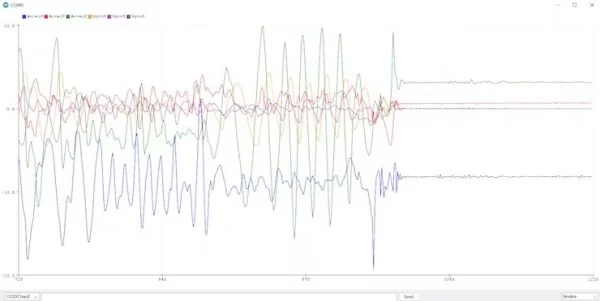
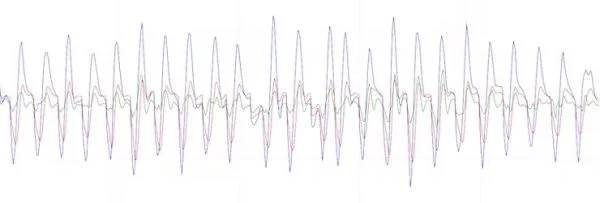
We only need the accelerometer data to train the model and also, we don’t want inference to run all the time. Open up the serial plotter and use the below code to figure out a threshold value above which the inference will be called.
The acc_visualize.ino file visualizes the accelerometer data from the MPU6050 sensor. Trying out the gestures and figuring out the threshold is done via this (we’ll be figuring out the threshold value through trial and error).
/* acc_visualize.ino */
#include <Adafruit_MPU6050.h>
#include <Adafruit_Sensor.h>
#include <Wire.h>

/* instantiates an object of the Adafruit_MPU6050 class */
Adafruit_MPU6050 mpu;

void setup(void) {
Serial.begin(115200);

while (!Serial) {
delay(10);
}

/* Try to initialize mpu! */
if (!mpu.begin()) {
Serial.println("Failed to find MPU6050 chip");
while (1) {
delay(10);
}
}

mpu.setAccelerometerRange(MPU6050_RANGE_16_G);
mpu.setGyroRange(MPU6050_RANGE_250_DEG);
mpu.setFilterBandwidth(MPU6050_BAND_21_HZ);
Serial.println("");
delay(100);
}

void loop() {
/* Get new sensor events with the readings */
sensors_event_t a, g, temp;
mpu.getEvent(&a, &g, &temp);

/* Print out the values */
Serial.print("AccelX:");
Serial.print(a.acceleration.x);
Serial.print(",");
Serial.print("AccelY:");
Serial.print(a.acceleration.y);
Serial.print(",");
Serial.print("AccelZ:");
Serial.println(a.acceleration.z);
delay(10);
}
3.e Logging data for the ML model
Now that you have a threshold value to work with let’s start logging the data
The log_data.ino file handles the logging of data on the serial monitor. Some notes about this file are:
1. The calibrate_mpu function runs in the setup part of the code and it takes in 10 different readings to average them
2. The detect_motion function reads one set of reading from the MPU, and if the sum of the absolute values of the accelerations is greater than a threshold value, it triggers the read_data function
3. The value for READINGS_PER_SAMPLE is also found using trial and error. It varies for different gestures.
4. The read_data function logs READINGS_PER_SAMPLE sets of accelerometer data to be used for training purposes.
//log_data.ino
#include <Adafruit_MPU6050.h>
#include <Adafruit_Sensor.h>
#include <Wire.h>

#define THRESHOLD 20
#define READINGS_PER_SAMPLE 40

Adafruit_MPU6050 mpu;

int count =1;
float x_initial, y_initial, z_initial;

void setup() {
  Serial.begin(115200);
  while (!Serial)
    delay(10);

  Serial.println("Adafruit MPU6050 test!");

  /* Try to initialize! */
  if (!mpu.begin(0x69)) {
    /* Serial.println("Failed to find MPU6050 chip"); */
    while (1) {
      delay(10);
    }
  }
  /* Serial.println("MPU6050 Found!"); */

  mpu.setAccelerometerRange(MPU6050_RANGE_8_G);
  mpu.setGyroRange(MPU6050_RANGE_500_DEG);
  mpu.setFilterBandwidth(MPU6050_BAND_21_HZ);
  delay(100);
  calibrate_mpu();

}

void loop() {
  detect_motion();

}

void read_data(){

  for(int i =0;i<40;i++){
  sensors_event_t a, g, temp;
  mpu.getEvent(&a, &g, &temp);

  Serial.print(a.acceleration.x );
  Serial.print(",");
  Serial.print(a.acceleration.y );
  Serial.print(",");
  Serial.println(a.acceleration.z);
  delay(10);
  }
  Serial.println("");
  Serial.println("--------");
  Serial.println(count);
  Serial.println("--------");
  count++;
}

void calibrate_mpu(){
  float totX, totY, totZ;
  sensors_event_t a, g, temp;


  for (int i = 0; i < 10; i++) {
    mpu.getEvent(&a, &g, &temp);
    totX = totX + a.acceleration.x;
    totY = totY + a.acceleration.y;
    totZ = totZ + a.acceleration.z;
  }
  x_initial = totX / 10;
  y_initial = totY / 10;
  z_initial = totZ / 10;
  Serial.println("Calibrated");
}

void detect_motion(){
   sensors_event_t a, g, temp;
  mpu.getEvent(&a, &g, &temp);
  if( abs(a.acceleration.x - x_initial) +abs(a.acceleration.y - y_initial) + abs(a.acceleration.z - z_initial) > 20){
    read_data();
  }
  else{
    delay(5);
  }
}
Once you get data from the serial monitor, copy-paste them into a .csv file
You’ll need to create two files:
- Shoot.csv: Accelerometer data of the shoot gesture
- Noshoot.csv: Accelerometer data of random gestures
3.f training the model
Open up this colab notebook, run the cells and download the model.h file from the sidebar.
The model architecture:
Experimented with different hyperparameters like the number of hidden layers, units, dropout, activation functions, and batch size. I also tried different optimizers, loss functions and finally settled on this.
I didn’t use a CNN as the fully connected layers gave good enough accuracy.
from tensorflow.keras import regularizers
model = tf.keras.Sequential()
model.add(tf.keras.layers.Dense(10, activation='relu')) # relu is used for performance
model.add(tf.keras.layers.Dense(10, activation='relu',kernel_regularizer= regularizers.L1(l1=1e-4)))
model.add(tf.keras.layers.Dense(NUM_GESTURES, activation = 'softmax')) # softmax is used, because we only expect one gesture to occur per input
model.compile(optimizer=tf.keras.optimizers.Adam(), loss='mse', metrics=['mae'])
history = model.fit(inputs_train, outputs_train, epochs=300, batch_size=1, validation_data=(inputs_validate, outputs_validate))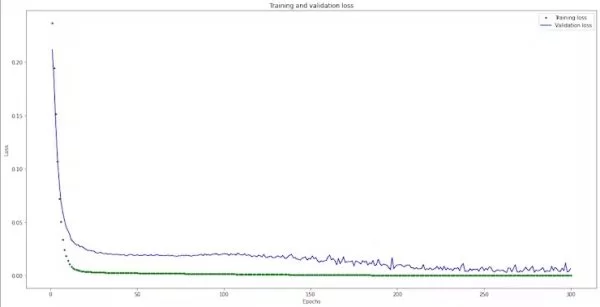
The output of the model is of a 2D tensor: [[probability of class 1, probability of class 2]]
Where,
- Class 1: Unknown gesture
- Class 2: Shoot gesture
4. Build the application code
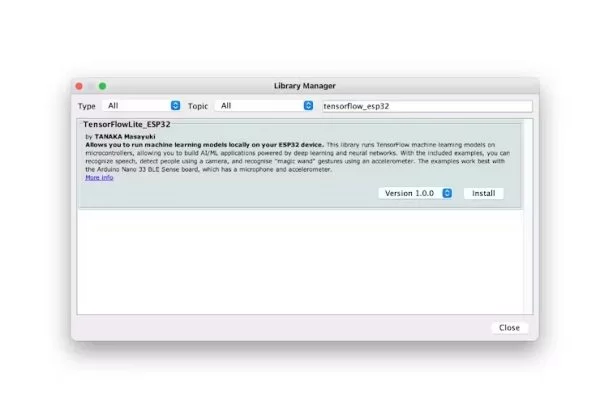
4.a Installing the TensorFlow_ESP32 library
Under the Tools section, click the Manage Libraries, search for TensorFlowLite_ESP32, and select the TensorFlowLite_ESP32 library and click Install
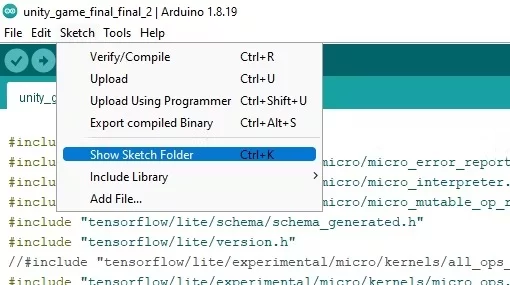
4.b Adding model.h file
Under the Sketch section, Click ShowSketchFolder and add the model.h file in this folder.
4.c Header Files
#include <TensorFlowLite_ESP32.h>This library allows you to run machine learning models locally on your ESP32.
#include "tensorflow/lite/experimental/micro/micro_error_reporter.h"This line imports the class that can log errors and output to help with debugging.
#include "tensorflow/lite/experimental/micro/micro_interpreter.h"This line imports the TensorFlow Lite for Microcontrollers interpreter, which will run our model.
#include "tensorflow/lite/experimental/micro/kernels/all_ops_resolver.h"The line imports the class that allows the interpreter to load all the operations available to TensorFlow Lite Micro.
#include "tensorflow/lite/experimental/micro/micro_mutable_op_resolver.h"This line imports the class that allows the interpreter to load only the necessary operations used by our model.
A quick comparison between the resolvers:
Micro Ops Resolver
/* Code */
static tflite::MicroMutableOpResolver micro_mutable_op_resolver;
micro_mutable_op_resolver.AddBuiltin(
tflite::BuiltinOperator_FULLY_CONNECTED,
tflite::ops::micro::Register_FULLY_CONNECTED());

/* Info about sketch size */
Sketch uses 290794 bytes (22%) of program storage space. Maximum is 1310720 bytes.
Global variables use 90392 bytes (27%) of dynamic memory, leaving 237288 bytes for local variables. Maximum is 327680 bytes.
All Ops Resolver
/* Code */
static tflite::ops::micro::AllOpsResolver resolver;

/* Info about sketch size */
Sketch uses 376026 bytes (28%) of program storage space. Maximum is 1310720 bytes.
Global variables use 91752 bytes (28%) of dynamic memory, leaving 235928 bytes for local variables. Maximum is 327680 bytes.
The difference between the resolvers is that AllOps Resolver, by default, contains all the operations available to TFLite Micro. In contrast, we must register the operations necessary while using the Micro Ops Resolver. The benefit of using a MicroOpsResolver is reduced sketch size compared to the AllOpsResolver.
#include "tensorflow/lite/experimental/micro/kernels/micro_ops.h"This line imports the class that contains all the operations needed by the resolver.
#include "tensorflow/lite/schema/schema_generated.h"Line of code imports the schema that defines the structure of TensorFlow Lite FlatBuffer data, used to make sense of the model data in sine_model_data.h
#include "tensorflow/lite/version.h"This line of code imports the current version number of the schema, so we can check that the model was defined with a compatible version.
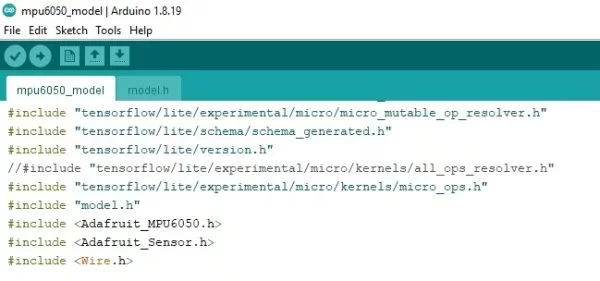
#include "model.h"This line of code allows our main model to access the model.h file. The IDE view is attached below. I’ll explain it better in the below sections.
#include <Adafruit_MPU6050.h>
#include <Adafruit_Sensor.h>
#include <Wire.h>
These lines of code import the “Adafruit_MPU6050” library into the project. I chose this library for the tutorial as, from my experience, this library is very understandable.
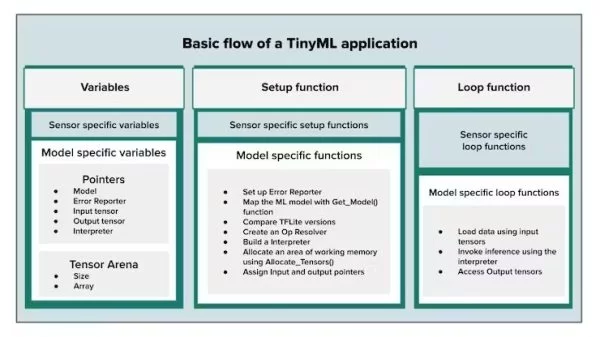
The Checklist:
a. Variables
- Declare Pointers
- Declare Tensor_arena array
b. Setup Function
- Set up Error Reporter
- Map the ML model with Get_Model() function
- Compare TF Lite versions
- Create an Op Resolver
- Build an interpreter
- Allocate an area of working memory using Allocate_tensors()
- Assign input and output tensors
c. Loop Function
- Load data using the input tensors
- Invoke inference using the interpreter
- Access output tensors
Source: How to get started with TensorFlow Lite for Microcontrollers
- What microcontroller is used in the tutorial?
The tutorial uses an ESP32 microcontroller. - What sensor is used to detect gestures?
The MPU6050 sensor (3-axis accelerometer and 3-axis gyroscope) is used. - How is the MPU6050 connected to the ESP32?
Connect VCC to ESP32 3V3, GND to ESP32 GND, SCL to GPIO22, and SDA to GPIO21. - Which Arduino library is needed to interface with the MPU6050?
The Adafruit_MPU6050 library is required and installed via the Arduino IDE Library Manager. - How do you decide when to run inference?
Use a threshold on summed absolute accelerometer deviations; when it exceeds the chosen threshold, trigger data capture and inference. - How is training performed for the gesture model?
Collect accelerometer samples into Shoot.csv and Noshoot.csv, use a Colab notebook to train a dense neural network, then export model.h. - Which Arduino library is used to run the TFLite model on ESP32?
Install the TensorFlowLite_ESP32 library via the Arduino IDE Library Manager. - What resolver options are compared for the interpreter?
The tutorial compares AllOpsResolver and MicroMutableOpResolver, noting MicroMutableOpResolver reduces sketch size by registering only needed ops. - What are the main steps in setting up the interpreter in setup()?
Set up an error reporter, map the model via Get_Model(), check TF Lite versions, create an op resolver, build the interpreter, allocate tensors, and assign input/output tensors. - What does the loop() function do in the application?
Load sensor data into input tensors, invoke the interpreter for inference, and read output tensors.