Summary of PIC16F84 Based Morse Code Reader
Summary: This article describes a stand-alone PIC16F84-based Morse code decoder that copies and displays CW in real time to aid learning copy speed. It uses an electret microphone amplifier front end, an NE567 PLL tone decoder, a PIC16F84 microcontroller for adaptive timing and symbol decoding, and an HD44780-compatible LCD for display. The design is battery powered, robust to interference, and implemented with point-to-point wiring; firmware uses dual running-average buffers for fast code-speed adaptation.
Parts used in the PIC16F84 Based Morse Code Reader:
- Electret microphone
- Transistor (common emitter amplifier) Q1
- Resistors (including 15Kohm bias resistor, 10Kohm variable resistor)
- Coupling capacitors and feedback capacitor
- NE567 PLL tone decoder
- LEDs (tuning/debug LED and receiver tuning aid LED)
- PIC16F84 microcontroller (preprogrammed option available)
- Crystal (4.9152MHz) or RC oscillator components (resistor and capacitor for RC)
- Hitachi HD44780-compatible LCD display (e.g., OPTREX DCM-117A)
- Four AA batteries (power source)
- Perf-board for point-to-point wiring
- Adhesive backed copper tape (grounding)
- 14-pin (2x7) plug and socket (LCD-to-CPU interconnect)
- Three-pin header/socket (front-end to CPU connection)
- Miscellaneous items (wires, connectors, packaging)
So you want to become a HAM, or you’ve got one of those no-code licences, but like me feel somewhat lacking,… not having obtaining that age old badge of proficiency that differientiated the HAM from other radio operators. However, like thousands and thousands of others, you have trouble learning the code. The problem for most people is the non-real time nature of the process, i.e., writing down the last character while listening to, and decoding the signature of the next character. Furthermore, when you make a mistake, the entire process collapses as your mind tries to perform error correction, trying to fill in the missing blanks, causing you to miss even more characters.
One way out of this delimma is to remove the burden of writing down the characters altogether during the process of building up your code speed. But to do this you need a device that copies and displays the code in parallel with you, which is what the stand-alone device described in this article is designed to perform.
The decoder is designed for code speeds ranging from about 6 words per minute (WPM) to greater than 36 WPM. The rate adaptive algorithm responds quickly to code speed changes, so you can copy both halves of a QSO, even when the parties transmit at different rates.
 The Hardware

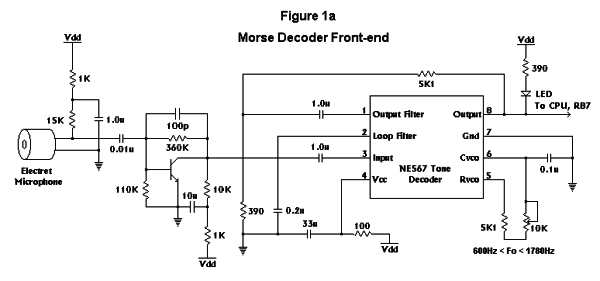
The schematic of the decoder is shown in figures 1a and 1b. It consists of four major pieces, all powered from a set of four (4) AA cells. The first piece, the front-end, is composed of an electret microphone and a common emitter transistor amplifier. This building block provides a wireless hookup to your radio receiver or code practice oscillator. The 15Kohm resistor biasing the electret may have to be changed to a different value, depending on the requirements of the electret you use. In addition to providing gain, the transistor amplifier also acts as a first level bandpass filter. Its band edges are determined by the size of the coupling capacitors, and the feedback capacitor between Q1’s base and collector terminals.
The second functional block is a narrowband PLL based tone detector, consisting of a tunable NE567 PLL tone decoder. There’s nothing radical here, the circuit is right out of the manufacturers data sheet, and employs hysteresis for chatter prevention to, in effect, debounce the decoded signal. The small signal, narrowband detection capability of this block enables one to easily discriminate one signal from another, even when the signal you are copying is substantially smaller that the adjacent channel interference, as long as there is 100Hz or so frequency separation between them. The output of the detector is a one-zero pattern replicating the DIT-DAH sequence of the received signal. This output drives both an input to the PIC16F84 microcontroller and an LED which is used as a receiver tuning aid. More on that later.
The third functional block is the PIC16F84 microcontroller (CPU). Its function is to measure the duration of the one-zero input string from the tone decoder, and translate the pattern into DITs, DAHs, symbol spaces, character spaces, or word spaces. The CPU also perfoms input signal debounce, just in case the front-end missed something. This feature was one I found absolutely essential for the robust operation of the decoder under varying signal conditions.
The CPU also has the task of code speed adaptation, which it performs by performing a running average on the various components of the signal in real time. The symbol averages are then used to compute time threshold levels for correct symbol interpretation. As each of the symbols are received, a “code word” is assembled and used to lookup/convert to its ASCII equivalent character for display. The CPU also drives an LED in synchronism with the input. While this feature was used initially as a debug aid, it also serves as a tuning aid, and verifies that the CPU is receiving what the front-end sent. Finally, the CPU interfaces to the LCD line display, sending ASCII characters to it and monitoring LCD status.
The final building block is the LCD display. I used a surplus display that uses an Hitachi HD44780 LCD controller based interface. You can purchase a similiar OPTREX unit through DigiKey Electronics, P/N DCM-117A, for about $12.00, or Hitachi display I used from me for $8.00, while my limited supply lasts.
In the prototype implementation of the CPU, figure 1a, I used a crystal to generate the CPU clock since I had a sizeable stash of crystals in my junk box. But one could just as easily use the RC oscillator configuration since the PIC16F84 spends most of its time sitting around anyway, and could easily do the job running at 1MHz.
Construction
I built my decoder as two separate pieces, and recommend this approach for two reasons.
1) It allows you to distance the CPU and LCD away from your receiver, minimizing digital noise coupling the the receiver.
2) It keeps the CPU and LCD clock noise away from the sensitive front-end of the electret amplifier and PLL.
The front end was constructed using point-to-point wiring on a 2.0″ by 2.5″ piece of perf-board. I wrapped the edges with adhesive backed copper tape to provide a convenient place to ground components. The 10Kohm variable resistor off pin 5 of the NE567 provides frequency adjustment capability so you can tune it to the frequency of a code practice oscillator, or to a comfortable pitch to copy signals off the airwaves. A three (3) wire interface connects the front-end to the CPU/LCD assembly, carrying the signal, power and ground.
The CPU was also point-to-point wired on a 2″ by 2.5″ perf-board. I decided to interconnect the CPU and LCD using a 14 pin (2 * 7) plug and socket arrangement I made up for easy connect and disconnect. I used machined pin and collet type sockets and pins for this connection. A three pin header socket was used to make the connection to the front-end consisting of power, ground, and the decoder output.
All the parts used in this design are readily available through many suppliers. The total cost of the unit is less than $40.00, depending on how you choose to package the assemblies. Subtotals for the functional blocks are roughly: $4.00 for the front-end parts, $12.00 for the LCD display, and $15.00 for a preprogrammed PIC16F84 from the author, and $3.00 for miscellaneous items.
If you choose to order a preprogrammed PIC16F84 from me, please specify -HS for the 4.9152MHz crystal controlled version, or -RC for the RC oscillator version. Send $15.00 for the CPU plus $3.00 S&H to:
Lawrence Foltzer
P.O. Box 488
Occidental, Ca. 95465
Your order will be sent US Mail. Continental USA orders only.
The PIC16F84 Assembler/Machine Code
The firmware for this project is shown in Listing 1. This code was written in Microchip’s native assemby language, and only took 365 instruction to implement. To help follow the flow, read the pseudocode at the end of the listing. You will find other important design details at the end of the listing also.
 The heart of the code is two running average buffers that keep tabs on the length of the four previous DIT and DAH interval samples. With these short buffers, speed adaptation appears almost instantanous. But I must confess that I didn’t start out with this approach. In my first implemetation, I averaged DITs and DAHs in the same buffer, since over time there would roughly be an equal number of DITs and DAHs, and the average, therefore, would be (2 DITs long) right in the middle and be the perfect symbol discriminator. But when you copy sequences like “he is 55 …..”, the symbol decision threshold becomes corrupted quickly unless the buffer depth is quite large. But a larger buffer means a slow code speed adaptation rate, so I quickly abandoned that approach in favor of the dual buffer approach.
The three subroutines at the end of the code drive the LCD display interface. Perhaps you will find uses for them in other PIC related projects.
Listing 1
;**********************************************************************
;       Filename:       picmrsrc.asm
;       Date:   Wednesday, December 30, 1998 10:28
;       File Version:
;       Author: Lawrence Foltzer
;       Size:           365 bytes
;**********************************************************************
        list    p=16F84 ; list directive to define processor
        #include        <p16F84.inc>        ; processor specific variable definitions

        __CONFIG        _CP_OFF & _WDT_OFF & _PWRTE_ON & _HS_OSC
; timing based on 1.12MHz RC oscillator configuration using 5.1Kohm + 100pf
For more detail: PIC16F84 Based Morse Code Reader
- What is the purpose of the device?
The device copies Morse code in real time and displays characters to help build copy speed without writing during reception. - What are the major functional blocks of the decoder?
Front-end electret microphone amplifier, NE567 PLL tone decoder, PIC16F84 microcontroller, and HD44780-compatible LCD display. - What code speeds can the decoder handle?
It is designed for speeds from about 6 WPM to greater than 36 WPM. - How does the decoder adapt to different code speeds?
The PIC16F84 performs running averages on recent DIT and DAH intervals (dual buffers) to compute time thresholds for symbol interpretation. - How is the front-end connected to the CPU/LCD assembly?
With a three-wire interface carrying signal, power, and ground. - What power source does the unit use?
Four AA cells supply the unit. - Can the PIC16F84 use a crystal or RC oscillator?
Yes; the prototype used a crystal but the RC oscillator configuration can be used instead. - What does the NE567 tone decoder provide?
It provides narrowband PLL tone detection with hysteresis, outputting the DIT-DAH one-zero pattern to the PIC and driving an LED for tuning. - How is the hardware constructed to minimize noise?
The design separates the front-end from the CPU/LCD assembly and uses point-to-point wiring, copper tape grounding, and separate enclosures to reduce digital noise coupling. - Is the firmware available and what language is it in?
Yes; firmware is provided in PIC16F84 assembly language (Microchip assembler) and uses about 365 instructions.