Summary of Maximizing Wi-Fi Capabilities with the Explorer 16 Development Board
This guide explains how to add Wi‑Fi to a Microchip Explorer 16 Development Board using the MRF24WB0MA Wi‑Fi PICtail/PICtail Plus, details required hardware and software, and walks through MPLAB project setup, importing Microchip TCP/IP stack and header files, and configuring the TCPIP stack (web server demo, network, wireless, security, filesystem, and sockets) via the TCPIP Configuration Wizard.
Parts used in the Microchip Explorer 16 Wi‑Fi Project:
- Explorer 16 Development Board (PIC24FJ128GA010 100-pin PIM) (DM240001)
- MRF24WB0MA Wi‑Fi PICtail/PICtail Plus Daughter Board (AC164136-4)
- PC running Microsoft Windows for MPLAB IDE and tools
- MPLAB Integrated Development Environment (IDE)
- MPLAB C Compiler for PIC24 MCUs (C‑30)
- Microchip TCP/IP Stack (from www.Microchip.com/MAL)
- TCPIP Configuration Wizard (part of Microchip Solutions package)
- Demo application and header files from Microchip Solutions download
As society progresses, the necessity for wireless communication is evolving from a mere luxury to an essential requirement. Wi-Fi, extending beyond conventional internet communication, finds myriad applications. This guide delineates the functionalities inherent in the Microchip Explorer 16 Development Board for Wi-Fi operations. It also details the configuration steps required to establish Wi-Fi communication on the Explorer 16 Development Board, accompanied by an examination and outline of a specific application.
Introduction
Wireless technology has transformed the contemporary lifestyle, reshaping how individuals navigate their daily routines. The shift toward remote management for various tasks is facilitated by wireless communication, simplifying an array of activities—from purchasing movie tickets on a mobile device to remotely controlling household power systems. Beyond these commonly recognized applications, wireless communication serves numerous unseen purposes, enabling control of diverse electronic devices. Wi-Fi, also referred to as the IEEE 802.11 standard for controlled communication at 2.4GHz, plays a pivotal role in this landscape.
In this instructional guide, we’ll explore utilizing the Microchip Explorer 16 Development Board to create a Wi-Fi-enabled device. Developing such a device involves multiple considerations, including user-specific application factors and adherence to the IEEE 802.11 standard. This tutorial will delve into the hardware requirements for constructing this device and outline the essential software needed to operate it effectively.
Hardware Options & Set up
The primary essential component required is the Microchip Explorer 16 Development Board. This development board serves as a cost-effective and efficient tool to assess the functionalities and performance of Microchip’s latest PIC24 Microcontroller, the dsPIC33 Digital Signal Controller (DSC) families, and the new 32-bit PIC32MX devices. It serves as a versatile demonstration and development board for both 16-bit and 32-bit components. Furthermore, it can be expanded to support TCP/IP using add-ons such as the Ethernet PICtail Plus, Fast 100Mbps Ethernet PICtail Plus, or the 802.11b Wi-Fi PICtail/PICtail Plus daughter board. The available configurations of this development board vary, depending on the required transceiver module.
For Wi-Fi 802.11 Media Access Control layer communication, the following hardware devices are necessary:
– Explorer 16 Development Board (PIC24FJ128GA010 100-pin PIM) (Microchip part number DM240001)*
– MRF24WB0MA Wi-Fi PICtail/PICtail Plus Daughter Board (Microchip part number AC164136-4)
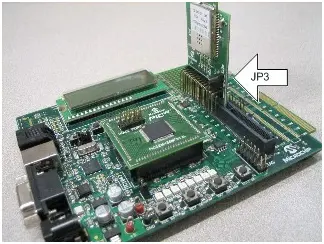
Upon receiving the hardware from Microchip, the Development Board is accompanied by a CD containing essential resources. These resources encompass user guides specific to the Explorer 16 Development Board, data sheets for various PIMs, and demo application codes tailored for both the development board and the respective PIM. To debug wireless functionalities using the Explorer 16, connect the PICtail as illustrated in Figure 1, aligning header J2 on the PICtail to the top slot of connector J5 (Explorer 16) on the demo boards. It’s important to note that if jumper JP3 is present, it needs to be shorted between pins 1 and 2 when utilized on this development platform. Once the hardware is configured, programming your board with the preferred demo project becomes feasible.
Hardware Specifications
The included CD accompanying the development board comprises user guides tailored for the Explorer 16 Development Board, assorted data sheets for various PIMs, and specific demo application codes designed for both the development board and the corresponding PIM. Detailed specifications for these hardware components are also available on the Microchip website. For instance, the DM240001 user guide can be accessed at http://ww1.microchip.com/downloads/en/DeviceDoc/Explorer%2016%20User%20Guide%2051589a.pdf, and the MRF24WB0MA Wi-Fi PICtail/PICtail Plus Daughter Board details are accessible at http://ww1.microchip.com/downloads/en/DeviceDoc/51912A.pdf.
Software Options
To establish a Wi-Fi device using Microchip products, several free downloads from Microchip are necessary. Initially, obtaining the latest MPLAB Integrated Development Environment (IDE) is crucial. MPLAB IDE, a complimentary, integrated toolkit designed for embedded application development using Microchip’s PIC® and dsPIC® microcontrollers, operates as a 32-bit application on MS Windows®. It boasts user-friendliness and encompasses various free software components for swift application development and robust debugging capabilities. Additionally, MPLAB IDE serves as a unified graphical interface for Microchip’s and third-party software and hardware development tools. Transitioning between these tools is seamless, while upgrading from the free software simulator to hardware debugging and programming tools is effortlessly facilitated because MPLAB IDE maintains a consistent user interface across all tools.[2] Furthermore, due to our utilization of the PIC24FJ128GA010 PIM, downloading the MPLAB® C Compiler for PIC24 MCUs becomes imperative. This compiler is a comprehensive ANSI compliant C compiler tailored for Microchip’s PIC24 family of 16-bit devices. MPLAB C exists as a 32-bit Windows® console application and serves as an integral component of Microchip’s MPLAB Integrated Development Environment (IDE). It allows source-level debugging in conjunction with the MPLAB REAL ICE™ Emulator, MPLAB ICD 2 In-Circuit Debugger, and MPLAB SIM Simulator.
The Compiler Features are
Now that you’ve equipped yourself with the necessary tools for platform development, there’s one more crucial hardware component to download: the MRF24WB0MA transceiver module. This module supports Microchip’s TCP/IP licensed stack, which serves as a backbone for embedded network applications. It manages most of the essential interactions between the physical network port and your application. The stack encompasses modules for various commonly used application layers, including HTTP (for web page serving), SMTP (for email transmission), SNMP (for status and control provision), Telnet, TFTP, Serial-to-Ethernet, and more. Furthermore, the stack comprises efficient implementations of TCP and UDP transport layers alongside other supporting modules such as IP, ICMP, DHCP, ARP, and DNS. You can download the Microchip TCP/IP stack at: www.Microchip.com/MAL. Remember to save the file in C:\ when prompted for the download location.
Programming the Device
To initiate programming of the device, the initial step involves launching MPLAB. This can be accomplished by either clicking on the desktop icon or navigating through the start menu: All Programs -> Microchip -> MPLAB IDE. Following this, click on the Project tab, proceed to Project Wizard, and a subsequent window will appear. Click ‘Next’ to progress. At this point, you’ll encounter the window: [description continues here].
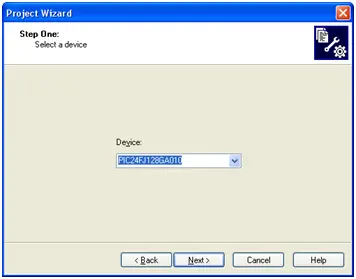
Below, navigate to select the specific PIC Microcontroller model you intend to utilize. In this tutorial, we employed the PIC24FJ128GA010. Click on “Next” to proceed.
Now you will see this window:
The configuration of this window holds significant importance as it determines the functioning of the previously downloaded C‐30 Compiler. To proceed, navigate to the Toolsuite Contents and select “Browse.” The browse option is pre-set to guide you to the appropriate path for the .exe file. For each Toolsuite content, locate the respective .exe file enclosed in parentheses and click “OK.” After ensuring that all four Toolsuites are directed to the correct paths and selecting the option “Store tool locations in project,” proceed by clicking “Next.” Then, navigate to the designated path at C:\Example. At this stage, the software will generate a folder housing your MPLAB project. Finally, click “Next” to proceed.
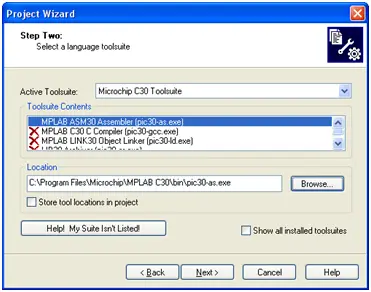
This next step is the most difficult. You will now be prompted with the dialog box:
The configuration of this window holds significant importance as it determines the functioning of the previously downloaded C‐30 Compiler. To proceed, navigate to the Toolsuite Contents and select “Browse.” The browse option is pre-set to guide you to the appropriate path for the .exe file. For each Toolsuite content, locate the respective .exe file enclosed in parentheses and click “OK.” After ensuring that all four Toolsuites are directed to the correct paths and selecting the option “Store tool locations in project,” proceed by clicking “Next.” Then, navigate to the designated path at C:\Example. At this stage, the software will generate a folder housing your MPLAB project. Finally, click “Next” to proceed.
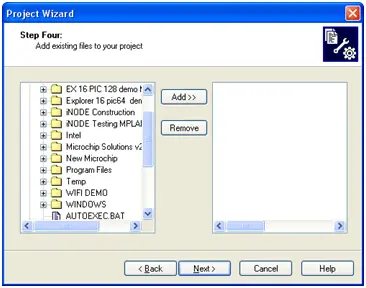
We now need to acquire the necessary header files. To do this, go to the directory C:\Microchip Solutions v2011‐10‐18\Microchip\Include. Select all the .h files located there and include them in the project.
Next, go to the directory C:\Microchip Solutions v2011‐10‐18\Microchip\Include\TCPIP Stack. Choose all the .h files in this directory and add them to the project.
Lastly, include the special configuration file into the project. Navigate to C:\Microchip Solutions v2011‐10‐18\TCPIP\Demo App\Configs and select the TCPIP MRF24WB.h file. Add this file to your project.
By following these steps, you have successfully constructed your TCP/IP stack along with the demo application code.
Configuring the Stack
To begin, ensure that the MPLAB project you’ve previously established is open. The forthcoming adjustments will involve modifications to the configuration files, automatically updating your project. Before executing any demo application code, it’s essential to correctly configure a few files. Within the TCPIP Stack download, there exists a TCPIP Configuration Wizard. Navigate to the Start Menu -> All Programs -> Microchip Solutions v2011-10-18 -> TCPIP Stack, and launch the TCPIP Configuration Wizard. Our goal is to modify the TCPIP Stack to enable webpage serving. Upon launching, you’ll encounter the following window:
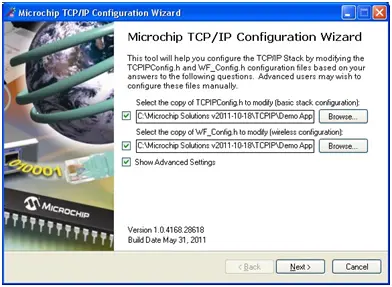
Navigate to the “Select the Copy of TCPIPConfig.h to modify” section and browse to the location C:\Microchip Solutions v2011‐10‐18\TCPIP\Demo App\Configs. Choose the TCPIP MRF24WB.h file. Then, in the subsequent window labeled “Select the Copy of WF_Config.h to Modify,” navigate to C:\Microchip Solutions v2011‐10‐18\TCPIP\WiFi Console and select the WF_Config.h file. Proceed by clicking on the Next button. This action will prompt the appearance of the following window:
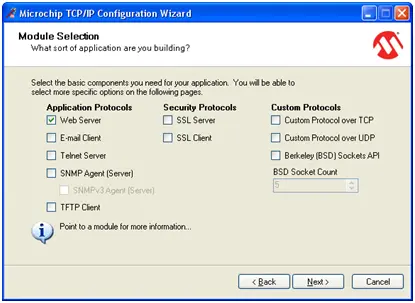
This stage involves setting up the configuration tailored to the particular application you aim to develop. The Web Server demo application offers a model for constructing a personalized HTTP application employing the HTTP2 server, enabling access and control of various other demo features via a web interface. Choose the Web Server option and proceed by selecting Next. In the “Module Selection” dialog box for configuration, opt for all boxes except the “Serial to Ethernet Bridge” module, then click Next. Subsequently, you’ll encounter the “Module Selection – Support Modules” dialog box where the chosen modules will align with the requirements of your specific application.
• DHCP Client: Enables device to acquire network configuration from a DHCP Server.
• DHCP Server: Allows device to function as a DHCP Server for a single node.
• IP Gleaning: Offers an alternative method to DHCP for configuring private networks.
• ICMP Client: Permits the device to send pings to remote nodes.
• ICMP Server: Allows the device to respond to ping requests.
• Announce Service: Facilitates the Ethernet tool’s discovery by sending a UDP announcement packet.
• NetBIOS Name Service: Enables the device to respond to NETBios name queries.
• Remote Reboot Service: Allows remote device rebooting by sending a special UDP Packet.
• SNTP Client: Ability to fetch the current time from a pool of global SNTP servers.
• Dynamic DNS Client: Enables IP updates to dynamic DNS.
• AutoIP Client: Enables support for Auto IP.
Please select the designated boxes in the diagram and proceed by clicking “Next.”
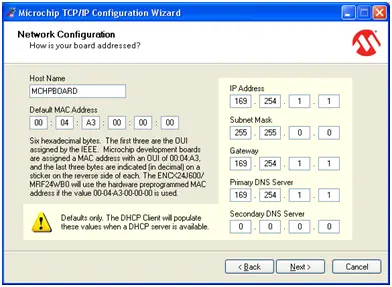
The subsequent dialog box will be the Network Configuration profile. The Host Name corresponds to your NETBios ID, which can remain as the default “MCHPBOARD.” Click “Next” to proceed with all the default settings.
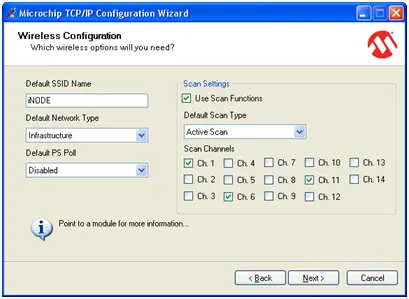
Presently, you’ll encounter this interface. Within it, you have the ability to alter your device’s host name in the Default SSID Name segment. This designated name represents the Wi-Fi Network you aim to connect with. The Active Scan feature enables your device to react to probe requests and broadcast a beacon every 100 milliseconds. Notably, channels 1, 6, and 11 are the typical channels where commercial Wi-Fi routers function. Proceed by clicking “Next.”
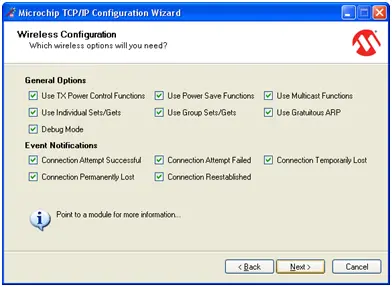
Presently, a dialog window will appear, showcasing the Wireless configuration options. Within this interface, you have the opportunity to refer to a Microchip module for definitions regarding these options. For the purposes of this demonstration application, it is advisable to proceed by selecting all available options. Simply click “Next” to continue.
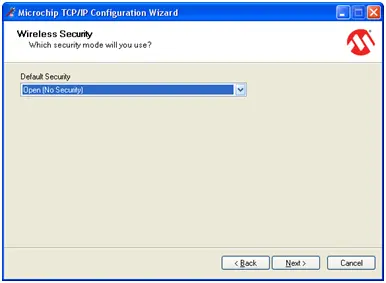
Next, it’s time to set up security for your Wi-Fi device. When configuring custom HTTP servers, it’s typical to incorporate WEP or WPA security measures. However, for the sake of simplicity in this tutorial, we’ll opt for the No Source security option. Click on the “Next” button to proceed.
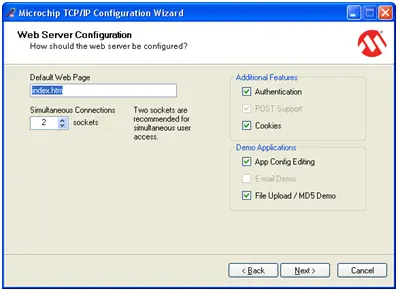
At this stage, you’ll set the web server location’s destination. You can establish this page as the default setting. Please proceed by clicking on “Next.”
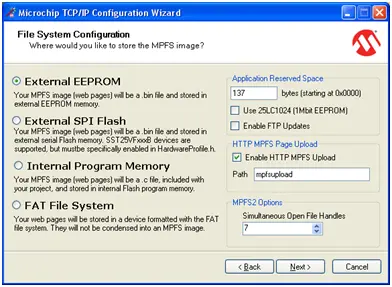
Next, you’ll be required to set up the file system, which relies on your preferred storage location for the web page in .bin format. You have the option to designate a specific reserved space within various memory locations. Proceed by clicking “Next.”
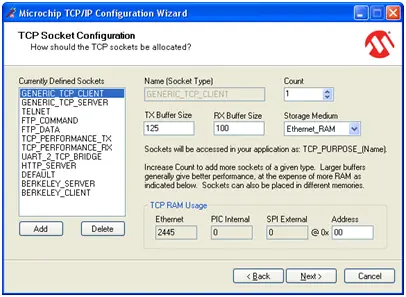
Next, you’ll be required to set up the TCP Socket information. This will remain configured with its default settings. Proceed by selecting “Next.”
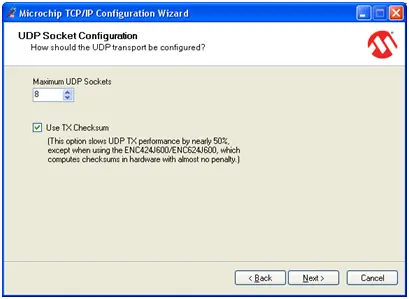
Configure the UDP Socket settings by opting for the default configurations. Afterward, proceed by clicking “Next,” followed by “Finish.”
- What hardware is required to enable Wi‑Fi on the Explorer 16 Development Board?
The Explorer 16 Development Board with the PIC24FJ128GA010 100‑pin PIM (DM240001) and the MRF24WB0MA Wi‑Fi PICtail/PICtail Plus (AC164136-4) are required. - Which software tools must be downloaded to build a Wi‑Fi application?
Download MPLAB IDE, the MPLAB C Compiler for PIC24 MCUs, and the Microchip TCP/IP Stack. - How is the MRF24WB0MA PICtail connected to the Explorer 16 board?
Align header J2 on the PICtail to the top slot of connector J5 on the Explorer 16; short jumper JP3 between pins 1 and 2 if present. - Where should the Microchip TCP/IP Stack files be saved during download?
The guide instructs saving the TCP/IP Stack download to C: when prompted. - Which header files need to be added to the MPLAB project?
Add all .h files from C:Microchip Solutions v2011-10-18MicrochipInclude and from C:Microchip Solutions v2011-10-18MicrochipIncludeTCPIP Stack, plus TCPIP MRF24WB.h from the Demo App Configs. - How do you modify the TCPIP Stack configuration for the demo web server?
Launch the TCPIP Configuration Wizard, select TCPIP MRF24WB.h and WF_Config.h, choose the Web Server demo, select modules (all except Serial to Ethernet Bridge), then proceed through network, wireless, security, filesystem, and socket defaults. - What wireless security option is used in the tutorial web server demo?
The tutorial selects No Security for simplicity. - Which network features can be enabled via the Configuration Wizard?
Options include DHCP Client, DHCP Server, IP Gleaning, ICMP Client/Server, Announce Service, NetBIOS Name Service, Remote Reboot, SNTP Client, Dynamic DNS Client, and AutoIP Client. - What default host name is used in the Network Configuration profile?
The default NETBios host name is MCHPBOARD. - How are web pages provided to the device file system?
Set the web server location and choose a file system memory location to store the web page in .bin format during Configuration Wizard steps.