Summary of Wireless controlled lightdimmer using PIC12F629
Summary: This project adds an IR RC5-controlled dimmer into a lamp shade so the lamp can be switched normally and additionally dimmed with a TV remote. It supports soft-start to the last start-up level, adjustable maximum/minimum/start-up levels via specific remote buttons while powering on, and reset. The provided BAS and HEX examples are modifiable; note RC5 remote behaviors vary by device and some buttons/systems send no codes.
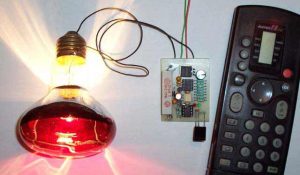
Parts used in the Wireless controlled lightdimmer:
- PIC12F629 microcontroller (firmware .BAS/.HEX)
- IR receiver module compatible with RC5 protocol
- Triac or solid-state dimming switch suitable for 230V AC lamp control
- Zero-cross detection or mains sensing circuitry
- Optoisolator or isolation components for microcontroller to mains interface
- Resistors and capacitors for microcontroller and timing circuits
- LEDs (red and green) for status/feedback
- Power supply components to run the PIC (regulator, smoothing capacitor)
- Wiring and lamp holder/electrical enclosure suitable for in-shade installation
The meaning from this design is to build it in -i.e. a shaded lamp- and to switch this lamp on and off the normal way, just like it was switched before the dimmer was build in, then you could by exception dimming the lamp more or less with your TV remote control.
When you switch the power on there will follow a soft-start till the lamp burns at the previously adjusted dim level.
With the ‘0’ button in TV mode you can dim the lamp, turn more and less bright.
The remote control should send more then one RC5-signal per button-press seeing that the first one is ignored, this does imply that when the remote button is pressed a short time, there nothing happens.
With the P+ and P- button from a system at choice you can adjust the maximum and minimum dim-levels and with the ‘1’ button the start-up brightness.
The next time when the 230V power is switched on the lamp starts up at the adjusted dim-level.
(Re)adjust the dim-levels:
(only necessary when changing the maximum-, minimum- or start-up- level)
First you should select an unused system on your remote control, i.e. SAT, AMP, VCR2 or DCC mode.
Adjust maximum level: Keep, while switching the power on, the P+ button from the remote control pressed and wait until the lamp burns on desired maximum level.
Adjust minimum level: Keep, while switching the power on, the P- button from the remote control pressed and wait until the lamp burns on desired minimum level. Recommended is to adjust the minimum dim level not to “lamp off” level, because then it’s easy to forget to switch the power off and use unnecessary power.
Adjust start-up level: Keep, while switching the power on, the ‘0’ button from your remote control pressed and wait until the lamp burns on desired level.
Re-adjust the default values (reset): Keep, while switching the power on, the MUTE button from the remote control pressed.
During adjusting the dim-levels, the dim-level changes slower then normal to make adjusting easier.
When letting the button loose and the adjustment is ok, the red- en green LED blinks for a while.
With the -for the dimmer reserved- system selected on the remote control, the P+ (dim-level up) / P- (dim-level down) and button ‘0’ (up/down turn by turn) works too.
Button ‘1’ dims directly to the adjusted start-up level.
Which system on the remote control is choosen doesn’t matter, the ‘0’ button works always in the TV-mode too.
Above described applies to the here downloadable .BAS and .HEX examples, but you can ofcourse modify it to your own wishes.
Keep in mind that a remote control does not always send that what you expected.
The volume from TV, SAT, VCR1 and VCR2 are all the same.
Just as the volumegroup from TAPE, TUNER, CD, etc.
And the ‘0’-‘9’ buttons from system TAPE for example send nothing at all.
See the lists: RC5 system codes and RC5 command codes
For more detail: Wireless controlled lightdimmer using PIC12F629
- How do I dim the lamp with the remote?
Use the TV-mode and press 0 to step dim up or down; P+ and P- also adjust dim levels when the reserved system is selected. - How do I set the maximum dim level?
While switching the power on, keep the P+ button on the remote pressed until the lamp reaches the desired maximum. - How do I set the minimum dim level?
While switching the power on, keep the P- button on the remote pressed until the lamp reaches the desired minimum. - How do I set the start-up brightness?
While switching the power on, keep the 0 button on the remote pressed until the lamp reaches the desired start-up level. - How do I reset to default values?
While switching the power on, keep the MUTE button on the remote pressed to re-adjust default values. - Does the dimmer remember the last start-up level?
Yes, on next 230V power-on the lamp performs a soft-start to the previously adjusted start-up dim level. - Why might a remote button not work for this dimmer?
Some remote systems or buttons do not send RC5 codes or send different codes; also the dimmer ignores the first RC5 signal so very short presses may do nothing. - Can I use different remote systems for setup?
Yes; select an unused remote system like SAT, AMP, VCR2 or DCC to (re)adjust levels so you do not interfere with other equipment.