


Summary of Real TIme Clock Using PIC18F452
This article details the design of a Real-Time Clock (RTC) using a PIC18F452 microcontroller and DS1307 RTC chip. The project leverages the built-in I2C bus of the PIC for simplified interfacing, eliminating the need for custom I2C code. The system displays time on a 16x2 LCD and is programmed using MPLAB IDE with the C18 compiler.Parts used in the Real Time Clock Using PIC18F452:
- DS1307
- PIC18F Development board
- Breadboard
- Connecting wires
- 16x2 LCD

PIC is advance microcontroller series. In PIC microcontroller I2C(Inter-Integrated Circuit) Bus is available on board. RTC used in this project is DS1307 which needed I2C interface to read and write data from and to RTC. Because I2C bus is on board in PIC microcontroller Interfacing becomes easy. There will no need to write separate code for I2C bus.
Components Required:
- DS1307
- PIC18F Development board
- breadboard
- connecting wires
- 16x2 LCD
Step 1: Construction
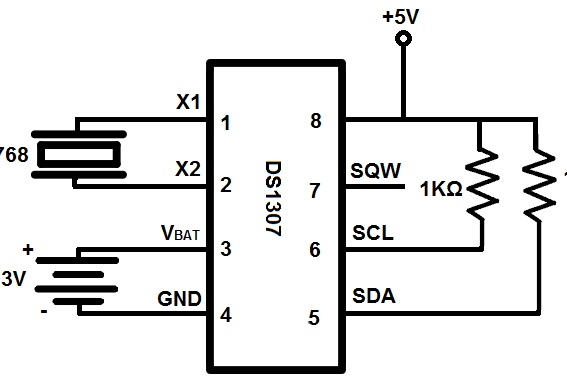
The circuit is designed in two separate parts. Fig. 1 Shows the RTC DS 1307 IC connection. This connection is done by using zero PCB. The connection is same as shown in Fig. 3.
I used PIC18F452 Development Board which i designed few months ago using Screen print technique for pcb design. The SCL pin of RTC is connected to pin 18 and SDA pin is connected to pin 23 of PIC microcontroller. LCD 16x2 is interfaced in following way.
PIN OF LCD PIN OF PIC18F452
- D7 - RD7
- D6 - RD6
- D5 - RD5
- D4 - RD4
- RS - RB5
- RW - RB4
- E - RB3
Step 2: Working Video
Step 3: Code
The code is written in MPLAB IDE and C18 compiler is used to to compiler the code. PICKIT 2 is used to burn the code on PIC18F452 IC. Please read the README file which available in the attachment before proceed.
Click here to download this code.
For any query please write at [email protected]
click here to like on facebook
Source: Real TIme Clock Using PIC18F452
Quick Solutions to Questions related to Real Time Clock Using PIC18F452:
- Why is the PIC18F452 chosen for this RTC project?
The PIC18F452 has an I2C bus available on board which makes interfacing with the DS1307 easy without writing separate I2C code. - How are the SCL and SDA pins connected?
The SCL pin connects to pin 18 and the SDA pin connects to pin 23 of the PIC microcontroller. - What interface does the DS1307 RTC require?
The DS1307 needs an I2C interface to read and write data from and to the RTC. - Which software tools are used to compile and burn the code?
MPLAB IDE with the C18 compiler is used to write the code, and PICKIT 2 is used to burn it onto the IC. - How is the 16x2 LCD interfaced with the PIC18F452?
D7 connects to RD7, D6 to RD6, D5 to RD5, D4 to RD4, RS to RB5, RW to RB4, and E to RB3. - Is a separate PCB required for the RTC connection?
No, the RTC DS1307 IC connection is done using a zero PCB as shown in the project description.
Related projects
Precision Temperature Monitoring in Boiling Water with PIC Microcontroller
ABSTRACT In the industrial setting, accurately measuring the temperature of boiled water is a crucial undertaking. This paper presents the design and...
Home Automation & Security · PIC18F452Dual programmable keypad code lock using PIC18F452
Open electrical doors with your secret code only! Here are the technical specifications: Up to two keypads may be connected to drive...
Motors & Robotics · PIC18F452Weather station using PIC18F452 Microcontroller
Weather station with pressure reading, relative humidity, indoor & remote outdoor temperature display. Both Celsius or Fahrenheit & mbar/hPa or mm Hg...
Clocks & TimersAdaptive Alarm Clock: Build a Smart, User-Centric wake-Up system
Project Overview The goal of this ambitious undergraduate project was to develop a novel alarm clock capable of analyzing a person's unique...
Clocks & TimersDesigning Your Ideal Alarm Clock: An Introduction to PIC18
Within this laboratory session, you'll employ the C language to create an alarm clock, delving into the implementation of "C" programs on...
Clocks & TimersBuilding your Dream Alarm Clock Using the PIC18
Objective: In this laboratory session, your objective is to create an alarm clock using the C programming language. You will gain proficiency...

Muhammad Bilal
I am a highly skilled and motivated individual with a Master's degree in Computer Science. I have extensive experience in technical writing and a deep understanding of SEO practices.