Summary of IoT Microcontroller Development Kit
This project is an open-source, affordable IoT microcontroller development kit based on the CC2650MODA, matching the Adafruit Feather form factor. It provides BLE, 15 GPIOs, JTAG, LEDs, buttons, current-measure jumper, optional light sensor, and multiple power options. Firmware uses TI tools (Code Composer Studio, TI-RTOS, SimpleLink SDK, Sensor Controller Studio) and supports existing TI BLE examples with board file remapping and Sensor Controller tasks for peripherals like an I2C light sensor.
Parts used in the Microcontroller Development Kit:
- Texas Instruments LAUNCHXL-CC2650 SimpleLink CC2650 BLE Zigbee 6LoWPAN LaunchPad
- Texas Instruments BOOSTXL-CC2650MA SimpleLink BLE BoosterPack
- OSH Park Custom fabricated PCB
- CC2650MODA module (on custom PCB)
- TPS73133DBVR Power Regulator
- 10-pin JTAG debug cable
- XDS110 Debugger (on CC2650 LaunchPad)
- Micro USB cable
- Soldering iron (generic)
- Light sensor (on revisions 2.0 and above)
Our team developed an affordable microcontroller, which is open source and designed specifically for Internet of Things applications.
Things used in this project
Hardware components
- Texas Instruments LAUNCHXL-CC2650 SimpleLink CC2650 BLE Zigbee 6LoWPAN LaunchPad
- Texas Instruments BOOSTXL-CC2650MA SimpleLink BLE BoosterPack
- OSH Park Custom fabricated PCB
Software apps and online services
- Texas Instruments Code Composer Studio
- Texas Instruments TI-RTOS
- Texas Instruments SimpleLink SDK
- Texas Instruments Sensor Controller Studio
Hand tools and fabrication machines
- Soldering iron (generic)
1. Introduction
This microcontroller development kit is an affordable and compact programmable device designed to support Internet of Things (IoT) applications. It is an open-source reference design that utilizes the CC2650MODA as the processor, offering the same dimensions and pinout as the Adafruit Feather. Its primary purpose is to assist in creating IoT projects with ease.
1.1 Features
The board includes the following features:
- An indicator LED for power and a programmable LED for user control.
- Jumpers that can be used to disable the LEDs if needed.
- A reset button for the microcontroller unit (MCU) and a programmable button for user interaction.
- Pin headers that match the form factor of the Adafruit Feather.
- 15 general-purpose input/output (GPIO) pins.
- A JTAG connector for programming and debugging purposes.
- A jumper for measuring current.
- A light sensor (available on revisions 2.0 and above).
- Bluetooth Low Energy capability.
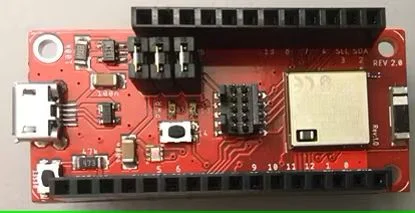
1.2 Board Pictures
The provided images depict a fully assembled version of Rev2.0, as well as both sides of an empty printed circuit board (PCB).
2. Hardware
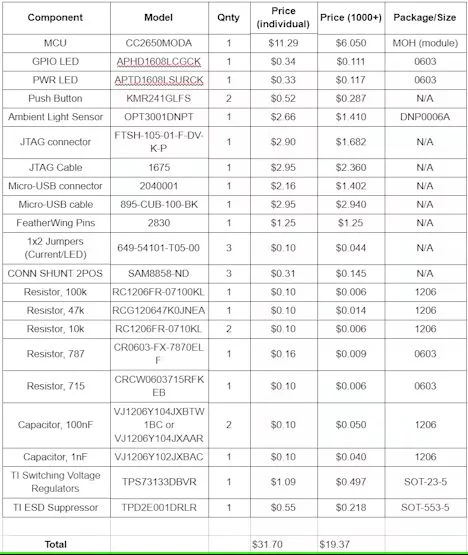
2.1 Bill of Materials
The comprehensive list of materials required for Rev2.0 can be located in the subsequent table.
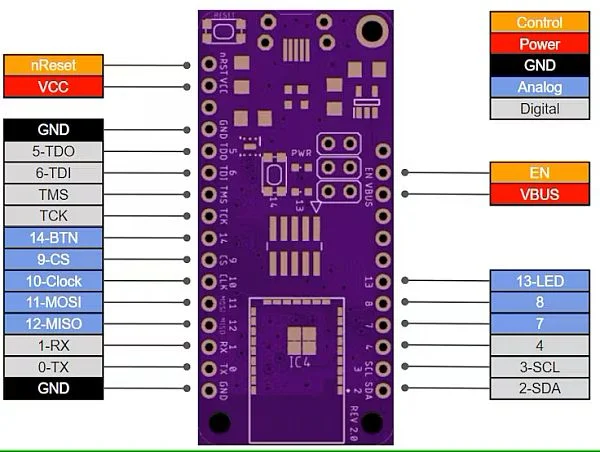
2.2 Pin Map Diagram
The Pin Map Diagram for the custom CC2650MODA board is illustrated in the following figure.
2.3 Block Diagram
The provided diagram visually represents the block diagram of Rev2.0.
You can locate the block diagram specifically for the CC2650MODA in its datasheet, which is accessible through the link provided in the Resources section of version 5.0.
2.4 Board Revisions
Throughout the development of this reference design, three significant board revisions were created: Rev1.0, Rev1.1, and Rev2.0. However, it was discovered that the power regulator on all three revisions had malfunctioned. To address this issue, an extraneous GND signal was eliminated from one of the power regulator pins, resulting in the creation of Rev1.2 and Rev2.1. Although Rev1.1 through Rev2.1 have identical pinouts, Rev1.2 and Rev2.1 were never physically assembled.
The following table provides an overview of the major board revisions and the specific changes made between each version:
Please be aware that any software designed for Rev1.1 is compatible with all subsequent revisions.
2.5 CC2650MODA MCU
The CC2650MODA incorporates a robust ARM® Cortex®-M3 processor, capable of operating at a clock speed of up to 48 MHz. It is equipped with 128KB of In-System Programmable Flash and supports 2-Pin cJTAG and JTAG Debugging. The presence of the Ultra-Low-Power Sensor Controller enables compatibility with TI’s Sensor Controller Studio software. Additionally, the processor features a 2.4-GHz RF transceiver that is suitable for use with Bluetooth Low Energy (BLE) technology.
The selection of this MCU for the development kit was based on several factors, including the presence of an integrated antenna and its compatibility with Bluetooth Low Energy. Other considerations that influenced this decision included the availability of 15 GPIO pins and support for the I2C protocol. Detailed information about the CC2650MODA can be accessed in the linked datasheet provided in the 5.0 Resources section.
2.6 Power
There are multiple options available to power the board. One method is to connect a USB cable, which will provide 5V to the TPS73133DBVR Power Regulator accessible through the VBUS header pin. The Power Regulator can handle inputs up to 5.5V and will output 3.3V to the VCC header pin.
If you wish to bypass the power regulator entirely and use an external power source and regulator, you can remove the power jumper and optionally connect the EN pin to GND. In this case, you would need to supply a voltage ranging from 1.8V to 3.8V directly to the VCC header pin. By connecting the EN pin of the power regulator to GND, the regulator will be disabled, and reverse current protection will be activated.
Another option is to supply power through the JTAG connector, which connects to the VCC power signal. However, it is important to note that external power, whether from JTAG or another source, should not be simultaneously provided to the board while it is also connected to USB power.
2.7 Compatibility with Adafruit Products
The pin headers on the board are specifically designed to be compatible with the form factor of the Adafruit Feather. Depending on the number of GPIO pins needed, certain Adafruit Featherwing products can be stacked and used in conjunction with this board. It is important to verify the GPIO pin requirements for the desired FeatherWing device and ensure that the communication protocol it uses is supported by the CC2650MODA MCU.
Furthermore, it is essential to ensure that the FeatherWing will receive proper power when stacked on the board. The onboard TPS73133DBVR power regulator can deliver a maximum of 150 mA to the CC2650MODA and its peripherals.
3. Device Setup
3.1 Required Hardware and Software
Hardware
- One personalized circuit board
- One CC2650 Launchpad accompanied by an XDS110 Debugger or an alternative debugger
- A 10-pin JTAG debug cable or other suitable wires to establish connections between the necessary JTAG and power pins
- A Micro USB cable
Software
- Code Composer Studio (CCS)
- Sensor Controller Studio (SCS)
- TI-RTOS for CC2650 (tirtos_cc13xx_cc26xx-2_21_00_06 or a more recent version)
- Bluetooth Low Energy software stack (BLE-STACK-2-2-1 or a newer release)
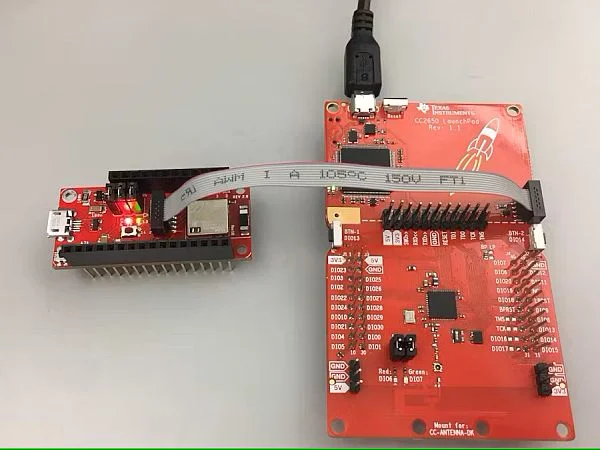
3.2 Hardware Setup
Figure 6 displays the proper connection between the custom board and the CC2650 LaunchPad. Follow the instructions below to set up the hardware:
- Use the 10-pin JTAG cable to establish a connection between the JTAG connector on the CC2650MODA custom board and the XDS110 output pins on the CC2650 LaunchPad.
- Make sure to remove any necessary jumpers that isolate the XDS110 from the onboard CC2650 on the LaunchPad.
- Check that the custom board has its own power source since not all TI LaunchPads provide power.
- Connect the USB cable to both the LaunchPad and the computer.
4. Software
This section provides instructions on how to execute standalone applications on the custom board incorporating the CC2650MODA module. To test the functionality of a Bluetooth Low Energy connection between a smartphone and the custom board, users can run the BLE simple_peripheral application (located at C:\ti\simplelink\ble_sdk_2_02_01_18\examples\cc2650lp\simple_peripheral\ccs) in CCS. This can be done by editing the relevant board files mentioned in Section 4.3. Since all device firmware is stored and executed internally on the CC2650 wireless MCU, other TI BLE sample applications can be run on the custom board as long as the project is configured to correctly map the external peripheral I/O connections.
4.1 Downloading and Running TI BLE Sample Applications
For guidance on how to build and download sample applications using Code Composer Studio, please consult the CC26X0 SimpleLink™ Bluetooth® Low Energy Software Stack 2.2.X. You can find a link to this document in section 5.0 Resources.
4.2 Running Provided Example Applications on Custom Board
To utilize the provided software examples in Section 4.4 and program the Custom Board, follow these steps:
- Download the desired.zip file from GitHub and extract its contents.
- Import the extracted files into Code Composer Studio.
- The default location for project folders in Code Composer Studio is: C:\Users<User Name>\workspace_v7.
- Ensure proper hardware setup by following the instructions in section 3.2 Hardware Setup. This includes correctly connecting the Custom Board and XDS110 debugger to your computer.
- Once the device is connected, build the project and click the Debug button in Code Composer Studio. Then, press the Play button.
- If any output is expected, it should now be visible in the console, indicating that the program is running.
- After confirming that the program is running successfully, you can disconnect the board from the CC2650 launchpad. Even after resetting and powering it, the board will continue running the program.
To import Example 4.4.5, which involves the I2C Light Sensor, follow these additional steps:
- Unzip the downloaded contents from GitHub.
- Locate the default location for Sensor Controller Studio projects, which is: C:\Users<User Name>\Documents\Texas Instruments\Sensor Controller Studio\projects.
- Move the unzipped contents to the default location mentioned above.
- Open Sensor Controller Studio and navigate to the Task Testing tab.
- Click the Connect button, followed by the Run Initialization Code button. Finally, click the Run Task button.
- This will start the program, and the data from the light sensor should be displayed on the Graph tab.
Note: If you unplug the Custom Board from the computer after programming it with Sensor Controller Studio, it will not retain the program instructions necessary to read data from the light sensor. For more detailed information, refer to the Sensor Controller Studio Guide in section 5.0 Resources.
4.3 Required Board-File Changes
To modify the GPIO pin mapping in the existing board files, you need to make changes in three main files: board.h, CC2650DK_5XD.h, and CC2650DK_5XD.c. Please note that the names of the last two files may vary depending on the project they were initially imported from, but they will be similar to “<processor name>.h” and “<processor name>.c”.
You can find examples of these files in the attached software examples.
In the board.h file, you will come across several #define statements related to buttons, LEDs, UART, and other components. The crucial lines that need to be modified to change the GPIO mapping are:
/* These #defines allow us to reuse TI-RTOS across other device families */
#define     Board_LED0              Board_DK_LED1
#define     Board_BUTTON0           Board_KEY_SELECT
#define     Board_UART0             Board_UART
To correctly map the GPIO lines, the following lines in the CC2650DK_5XD.h file need to be modified accordingly:
/* Leds */
#define Board_LED_ON                1
#define Board_LED_OFF               0
#define Board_DK_LED1               IOID_13
/* Button Board */
#define Board_KEY_SELECT            IOID_14
/* UART Board */
#define Board_UART_RX               IOID_1
#define Board_UART_TX               IOID_0
/* SPI Board */
#define Board_SPI0_MISO             IOID_12
#define Board_SPI0_MOSI             IOID_11
#define Board_SPI0_CLK              IOID_10
#define Board_SPI0_CSN              IOID_9
To initialize the GPIO lines, you would use the following lines in the CC2650DK_5XD.c file:
const PIN_Config BoardGpioInitTable[] = {
 Board_LED0 | PIN_GPIO_OUTPUT_EN | PIN_GPIO_LOW | PIN_PUSHPULL|
PIN_DRVSTR_MAX,
 Board_KEY_SELECT | PIN_INPUT_EN | PIN_PULLUP | PIN_HYSTERESIS,
 Board_UART_TX | PIN_GPIO_OUTPUT_EN | PIN_GPIO_HIGH |
    PIN_PUSHPULL,
 PIN_TERMINATE
};
Please note that in the Resource Explorer within Code Composer Studio, you can find the following section:
Software\TI-RTOS for CC2650\Development Tools\CC2650 Development Kit (5XD)\ If the GPIO pins are correctly remapped, any of the existing software examples can be adapted and used on this board.
4.4 Software Examples
You can find the following examples on the team’s GitHub page.
4.4.1 Blink LED
This example demonstrates the blinking of the green LED and printing messages to the CCS console when the LED is turned on or off.
Please note that when running the example through the debugger, the LED may blink at a faster rate compared to when the board is power reset or the reset button is pressed.
4.4.2 Button LED
In this example, the green LED is toggled when the programmable button is pressed, and the message “Hello World” is printed to the CCS console.
4.4.3 GPIO Test
This example builds upon the Blink LED example. The program cycles through each pin (IOID_X) and toggles it on and off, moving to the next pin (IOID_X+1) in the sequence. Additionally, the name of the pin being toggled is printed on the CCS console.
4.4.4 UART Echo
This example is a ported version of the existing UART Echo example found in the Resource Explorer. After the task initialization is completed, the green LED will be turned on. To view the echoed characters on the computer, you need to connect the Rx and Tx GPIO pins to the RXD and TXD pins on the XDS110 Debugger.
To determine the COM port to which the board is connected, you can use the device manager in Windows. In a serial monitoring program like PuTTY, select the appropriate COM port and configure the settings as follows: baud rate of 9600, 8 data bits, 1 stop bit, no parity, and no flow control.
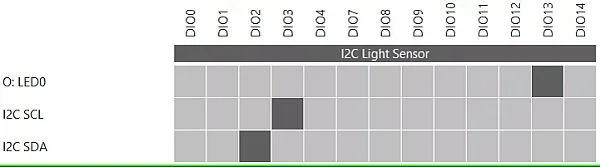
4.4.5 I2C Light Sensor (Sensor Controller Studio)
To execute this example, Sensor Controller Studio must be utilized. The example is designed to measure the digital value from the light sensor and exhibit it on the graph displayed within the Task Testing tab. Based on the existing I2C light sensor example for the SensorTag, the following lines were appended to the Event Handler Code at line 28 to enable LED toggling at specific light levels:
gpioClearOutput(1);
if (value < 200){
gpioSetOutput(1);
} 
- What is the processor used in the development kit?
The kit uses the CC2650MODA module, which includes an ARM Cortex-M3 core and a 2.4 GHz RF transceiver. - Can I run TI BLE sample applications on the custom board?
Yes, TI BLE sample applications can run on the custom board if the project is configured to map the external peripheral I/O correctly. - How do I power the board using USB?
Connect a USB cable to provide 5V to the TPS73133DBVR regulator via the VBUS header; the regulator outputs 3.3V to VCC. - Can I bypass the onboard power regulator?
Yes; remove the power jumper and optionally connect EN to GND, then supply 1.8V to 3.8V directly to VCC. - Is the board compatible with Adafruit FeatherWing accessories?
Yes, the pin headers match the Adafruit Feather form factor; verify GPIO and power requirements before stacking FeatherWings. - What development tools are required to program the board?
Code Composer Studio, Sensor Controller Studio, TI-RTOS for CC2650, and the TI BLE software stack are required. - How do I connect the custom board to the CC2650 LaunchPad for programming?
Use a 10-pin JTAG cable between the custom board JTAG connector and the XDS110 output pins, remove any LaunchPad jumpers isolating its onboard CC2650, and connect USB to the LaunchPad and computer. - Will software for Rev1.1 work on later revisions?
Yes, software designed for Rev1.1 is compatible with all subsequent revisions. - How do I run the I2C light sensor example?
Place the Sensor Controller Studio project in the default projects folder, open SCS, connect, run initialization code, then run the task to view light sensor data on the Graph tab. - How many GPIO pins does the board expose?
The board exposes 15 general-purpose input/output (GPIO) pins.