


Summary of Shrieker using PIC16F676 Microcontroller
Summary: A simple PIC16F676-based shrieker generates square-wave tones from 10,000 Hz to about 22,600 Hz selectable by six binary switches. The power button applies Vcc to the PIC to start it; the chosen switch combination (bits 32..1) sets an input value 0–63. Frequency = 10,000 Hz + input*200 Hz. Output drives a speaker through a capacitor; speaker is rated to 7 kHz but worked. Measured personal hearing limits: left ear 14,600 Hz, right ear 13,200 Hz.Parts used in the Shrieker using PIC16F676:
- PIC16F676 microcontroller
- Momentary power button (provides Vcc to PIC)
- Six SPST switches (binary inputs)
- Speaker
- Series coupling capacitor to speaker
- Power supply/battery
- Wiring/PCB or breadboard
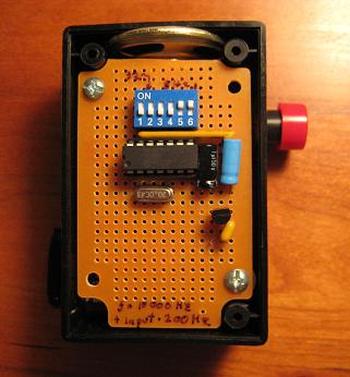
It's a simple project. The program doesn't do much.
The button actual provides power to the PIC, so
pressing it starts the boot up. Six pins read the inputs of
six switches. This determines the frequency. After that,
the PIC just generates a square wave of that frequency
on one of its pins that goes right to the speaker with a
capacitor to round the edges some.
The speaker was only rated to 7000 Hz, but seems to
work fine.
With all switches in the off position, the frequency is
10,000 Hz. The switches function as binary inputs, most
significant digit on the right: 32, 16, 8, 4, 2, 1, so the
input can vary from 0 to 63.
frequency = 10,000 Hz + input*200 Hz
So the frequency range is 10kHz - 22.6kHz
The results?
My left ear can hear 14,600 Hz, my right 13,200 Hz.
For more detail: Shrieker using PIC16F676 Microcontroller
- What frequency range does the shrieker generate?
The shrieker generates tones from 10,000 Hz up to about 22,600 Hz based on switch input. - How is the frequency selected?
Six binary switches form a value 0 to 63; frequency = 10,000 Hz + input*200 Hz. - How does the button function in the circuit?
The button supplies power to the PIC; pressing it starts the microcontroller boot up. - What output waveform does the PIC produce?
The PIC generates a square wave at the selected frequency on its output pin. - Is the speaker adequate for high frequencies?
The speaker is rated to 7,000 Hz but was reported to work for the higher tones in this project. - Which microcontroller is used?
The project uses a PIC16F676 microcontroller. - How are the switch bits ordered?
The switches represent bits with the most significant bit on the right: 32, 16, 8, 4, 2, 1. - What frequencies could the author personally hear?
The author heard 14,600 Hz in the left ear and 13,200 Hz in the right ear.
Related projects
30 volts Panel Volt Meter Using PIC MCU
This is a simple application of internal 10-bit ADC(analog to digital converter) of PIC16F676 microcontroller.you can use this circuit to measure up...
Sensors & Temperature · PIC16F676Temperature Indicator using PIC microcontroller
Hi friends, today we will see how to make temperature indicator using PIC microcontroller. The basic aim of this project is make...
Clocks & Timers · PIC16F676Gear Clock using PIC16F676 Microcontroller
I can't take credit for the design of this one. I bought the gear as a clock a few years ago. It...
Audio, Sound & RadioAudio Spectrum Analyzer
We developed an audio spectrum analyzer as our final project for ECE 4760. This analyzer presented a histogram-style representation of audio signals....
Audio, Sound & Radio · PIC12F675Audio CRO using PIC12F675 Microcontroller
This project is a miniature Audio CRO. For those not familiar with the abbreviation "CRO," it means "Cathode Ray Oscilloscope" and this...
Audio, Sound & RadioBuild a musical EKG with the Freescale FRDM-KL05
Short Introduction: I have been following the Battle of the DreamBoards Championship with interest and I enjoyed the variation of functionality features...

Ibrar Ayyub
I am an experienced technical writer holding a Master's degree in computer science from BZU Multan, Pakistan University. With a background spanning various industries, particularly in home automation and engineering, I have honed my skills in crafting clear and concise content. Proficient in leveraging infographics and diagrams, I strive to simplify complex concepts for readers. My strength lies in thorough...