


Summary of Details of PIC ICSP and how to use it for pic microcontrollers.
PIC ICSP lets you program PIC microcontrollers on-board via a 6-pin connector without removing the chip. A programmer (e.g., PicKit2/3) connects to VPP/MCLR, VCC, GND, PGD (data), PGC (clock), and PGM (LVP enable), and is controlled by IDE software like MPLAB X to send the hex file. Circuits range from a full protected reset circuit to a minimal 10k MCLR pull-up for breadboards. VPP raises MCLR to ~13.5V to enter programming; newer devices may generate this internally for low-voltage programming.Parts used in the PIC ICSP project:
- PIC microcontroller (e.g., 16F877, 18F2550)
- ICSP programmer (e.g., PicKit2, PicKit3)
- 6-pin ICSP connector (Molex/Dupont)
- 10k resistor (MCLR pull-up)
- Diode (optional for VPP protection)
- Zener diode or protection diode D2 (to stop high volts to 5V)
- Fast diode D1 (for fast shutdown when 5V off)
- PGM pull-down resistor (optional for LVP)
- 5V power supply (bench PSU or programmer power)
- Wiring or PCB traces for VPP, VCC, GND, PGD, PGC, PGM
Note: ICSP stands for In Circuit Serial Programming.
All you need is a programmer that provides the ICSP connector (usually a six pin molex/dupont connector) which you plug into your target board. For example PicKit2/Pickit3 uses the ICSP connections shown in the diagrams below. .
 The programmer is controlled from the PC using an IDE and for the PicKit2/3 this will be MPLAB X IDE. This program loads up your hex file (that you want to burn into the PIC device) and sends commands to the programmer to do that job via the ICSP signals that you connect to your PIC device (see below).
Note: Older programmers that are labelled Serial or Parallel both send serial data to the PIC microcontroller through the PIC ICSP circuit. The 'Serial' or 'Parallel' description refers only to the interface used from the PC to the PIC ICSP circuit. Modern programmers such as the PicKit2/3 use a USB port. Again, a USB programmer is merely refering to the PC interface and the output at the ICSP connector is exactly the same as all the others.
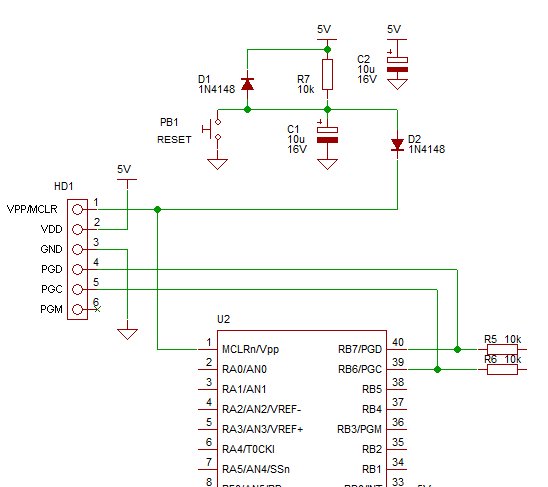
Here a PIC ICSP and full reset circuit :
Note: This is for the 16F877 and other 40 pin chips that have the same pinout for the ICSP connector e.g. 18F2550 (or at least MCLR at top left and PGD and PGC at top right).
Notes on the above circuit:
The PIC ICSP reset circuit is an over the top over-protected circuit that you would use if you were being ultra cautious or producing a developed PCB design. It stops high volts going back to the 5V power line (D2), has a fast shut down when 5V is off (D1) - allows fast rest from power Off-to-On and has a defined rise time for a delayed reset start.
The PGM pull-down resistor (can be connected to PGM pin - note shown here) is not really needed as you can always program the device using a high volt ICSP programmer (see below for more on LVP Low Volt Programming using PGM). If the LVP mode is not turned off then the pin is not usable as normal I/O it can only be used for PGM signal.
Simplified PIC ICSP Connection
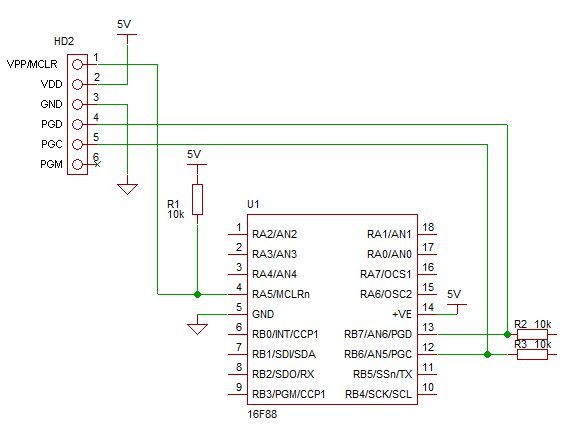
Here is a simplified ICSP connection for lab development:
Note: When you develop a board quickly e.g. on a solderless breadboard you only really need a 10k pullup from MCLRn to 5V - sometimes you will program that pin as an input in which case the reset is handled internally. With the 10k only; When programming, Does it put high voltage against the 5V? - Yes, however - the lab bench PSU will be fine (since there is (13V-5V)/10k ~ 10/10k = 0.1mA flowing)! - Put a diode in if you really want (you do loose 0.6V though).
Alternatively turn off the PSU and power the chip from the PicKit3 (the power setting is in MPLAB X IDE).
PIC ICSP Signals
PIC ICSP provides 6 connections from the pic ICSP programmer to your board as follows :
| 1. VPP (or MCLRn) | Programming voltage (usually 13V). |
| 2. Vcc | Power (usually 5V). |
| 3. GND | Ground (zero volts). |
| 4. PGD - Data | usual port and connection RB7. |
| 5. PGC - Clock | usual port and connection RB6. |
| 6. PGM - LVP enable | usual port and connection RB3/RB4. |
 Note: With the connections made in this order on the connector it will not matter if the connector is placed the wrong way round as GND and VCC are then applied to clock and data. If VCC and GND had been at opposite ends of the connector then there would be a problem.
same way as the standard PicKit2/3 = good!
VPP Signal (Signal a programming action)
Vpp connects to the reset input of the pic microcontroller labelled MCLR. During programming or verify this signal is raised to the programming voltage (13.5V) - or VCC+3.5V. This signals to the microcontroller that programming/verification is about to start and for older parts, supplies current.
Note: Older pic micros used this line to directly power the programming circuit that updates the Flash memory. So this connection had to supply some current. With the newer parts that allow LVP (Low Volt programming) the programming voltage is generated internally so the Vpp signal from the pic ICSP is only used as an indicator i.e. it doesn't have to supply current.
For more detail: Details of PIC ICSP and how to use it for pic microcontrollers.
Quick Solutions to Questions related to PIC ICSP:
- What does ICSP stand for?
ICSP stands for In Circuit Serial Programming. - What are the six ICSP signals and their functions?
VPP/MCLR for programming voltage, VCC for power, GND for ground, PGD for data, PGC for clock, and PGM for LVP enable. - Do I need to remove the PIC from the board to program it?
No, ICSP allows programming without removing the chip from the development or production board. - Can I use a USB programmer for ICSP?
Yes, modern programmers like PicKit2/3 use USB to connect to the PC but output the same ICSP signals. - Is a full reset protection circuit required for development boards?
No, for quick development a simple 10k pull-up on MCLR is usually sufficient. - Does VPP apply high voltage to 5V when programming with only a 10k pull-up?
Yes, it applies high voltage but the current is small (~0.1 mA) so a bench PSU is usually fine. - What is the purpose of PGM and do I always need its pull-down resistor?
PGM enables Low Voltage Programming (LVP); the pull-down is not really needed if using a high-voltage ICSP programmer. - Can the PIC be powered by the programmer instead of the PSU?
Yes, you can turn off the PSU and power the chip from the PicKit3 using the power setting in MPLAB X IDE.
Related projects
PIC16F877 Driving LCD in 4-Bit Mode using PIC16F877 with Proteus Simulation
Introduction This microcontroller project shows how a PIC16F877 can drive an LCD display using 4-bit mode inside a Proteus simulation.The project demonstrates...
Beginner Tutorials · PIC18F4550PICDEM FS USB CDC Evaluation Board using PIC18F4550 with Proteus Simulation
Introduction The PICDEM FS USB CDC Evaluation Board is a practical microcontroller project built around the PIC18F4550, designed to demonstrate USB communication...
Beginner TutorialsPIC12CE518 I2C EEPROM using PIC12CE518 with Proteus Simulation
Introduction This microcontroller project demonstrates how to write and read data using the internal I2C EEPROM of the PIC12CE518 and visualize the...
Beginner TutorialsPico Timer Project using Pico with Proteus Simulation
Introduction Timers are one of the most important features in embedded systems because they allow microcontrollers to perform tasks at precise intervals...
Beginner Tutorials · PIC16F84APIC Stepper Motor Controller using PIC16F84A with Proteus Simulation
Introduction Stepper motors are widely used in embedded systems and DIY electronics projects where precise position control is required. This PIC Stepper...
Beginner TutorialsWhat is a TVS diode? Working principle and parameters of TVS diode
TVS (Transient Voltage Suppressor) diode is a component specially used for protecting circuits. It can absorb excessive voltage pulses in an instant...

Ibrar Ayyub
I am an experienced technical writer holding a Master's degree in computer science from BZU Multan, Pakistan University. With a background spanning various industries, particularly in home automation and engineering, I have honed my skills in crafting clear and concise content. Proficient in leveraging infographics and diagrams, I strive to simplify complex concepts for readers. My strength lies in thorough...