


Summary of A pic programmer circuit based on AN589 using pic microcontoller
This article discusses a parallel port PIC programmer circuit based on Microchip's AN589 application note. It highlights the circuit's simplicity for providing ICSP connections but notes its obsolescence due to modern USB-only computers, recommending PicKit programmers instead. The author details several modifications made to the original design, including voltage regulation, power protection, and component upgrades like changing resistors and logic chips.Parts used in the Parallel Port PIC Programmer:
- LM317 voltage regulator
- Power supply steering diode
- 3pin 100mA LM78L05
- ICSP connector
- LED
- 74HCT244 chip
- Standard 10k resistors
- Parallel port cable
Note: This page is left on site for legacy information that is applicable to older computers. These days PCs and laptops have only a USB interface so a parallel programming circuit is not useful. instead you should be using a PicKit3 (or maybe PicKit2) programmer which interfaces to the MPLAB X IDE and works well.
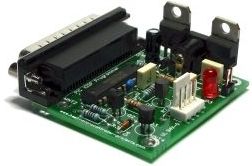 It is really quite a simple circuit and its main objective is to provide ICSP connections to your pic microcontroller.
Note: That the PGM signal is not provided - it's not really necessary anyway as you can turn off PGM mode by programming the chip. For first use of a chip you will need to pull the PGM line low as PGM is enabled by the manufacturer.
PIC Programmer Circuit diagram
Disclaimer : If you build this circuit you must double check each connection to the parallel port cable to avoid damage to your computer. This includes checking for shorts between each pin at the parallel port on your circuit. For initial testing it is best if you use a spare (old computer). Building this project is your own responsibility and I can not be held responsible for any damage to your computer.
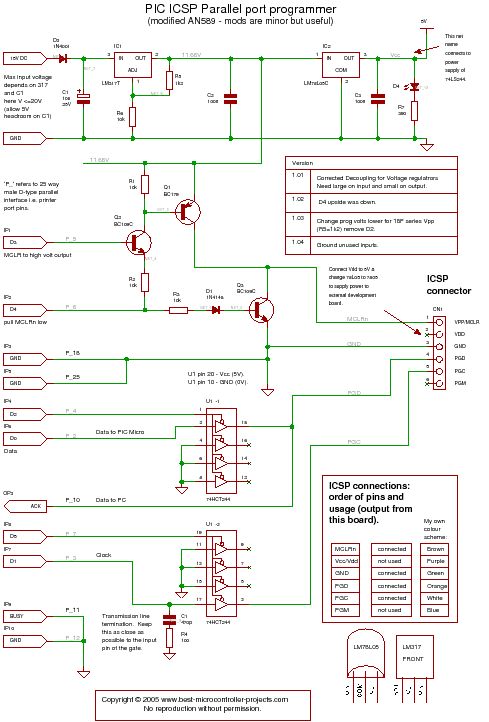
Modifications
It has a few modifications that are useful and easy to do:
-
- Transmission line termination - lets it work over a long cable.
- LM317 voltage regulator to get 11.6 volts and protect the circuit
- Power supply steering diode (stops you reverse connecting the supply).
- Changed LM340-5 to 3pin 100mA LM78L05.
- ICSP connector.
- An LED to show that power is applied.
- Changed 74LS244 to 74HCT244 because I had one handy!
- Standard 10k resistors instead of 2k - just easier if they are all the same.
For more detail: A pic programmer circuit based on AN589
Quick Solutions to Questions related to Parallel Port PIC Programmer:
- Why is this circuit not recommended for modern use?
Modern PCs and laptops only have USB interfaces, making parallel programming circuits useless compared to PicKit3 or PicKit2. - What is the main objective of this circuit?
The main objective is to provide ICSP connections to your pic microcontroller. - Is the PGM signal provided in this design?
No, the PGM signal is not provided because it is not really necessary as you can turn off PGM mode by programming the chip. - How do I handle the first use of a chip with this programmer?
For first use, you will need to pull the PGM line low as PGM is enabled by the manufacturer. - What modification allows the circuit to work over a long cable?
Transmission line termination was added as a modification to let it work over a long cable. - What voltage does the LM317 regulator provide in this project?
The LM317 voltage regulator is used to get 11.6 volts and protect the circuit. - Which resistor values were changed from the original design?
Standard 10k resistors were used instead of 2k resistors to make them all the same and easier to source. - What safety warning is given regarding building this circuit?
You must double check each connection to avoid damage to your computer, including checking for shorts between pins at the parallel port.
Related projects
Calculator Test using PIC24FJ64GA006 with Proteus Simulation
Introduction The Calculator Test using EASYHDL is a practical microcontroller project built on the PIC24FJ64GA006 and simulated in Proteus. This project demonstrates...
Programmers & ICSPPID Controlled Oven using TMS320F28027PT with Proteus Simulation
IntroductionThis project demonstrates a PID controlled oven implemented using a PICCOLO TMS320F28027PT microcontroller and verified through Proteus simulation.It is a practical microcontroller...
Programmers & ICSPPICCOLO Motor Controller Sample Design using TMS320F28023PT with Proteus Simulation
IntroductionThis project demonstrates a PICCOLO motor controller sample design implemented using the TMS320F28023PT Piccolo microcontroller and tested through Proteus simulation. It focuses...
Programmers & ICSP · PIC16F84APIC Musical Doorbell using PIC16F84A with Proteus Simulation
IntroductionThis microcontroller project demonstrates a musical doorbell built around a PIC16F84A and a simple piezo sounder.Using two push buttons, the system allows...
Programmers & ICSP · PIC16F877AEPE PIC/LCD Demo using PIC16F877 with Proteus Simulation
IntroductionThe EPE PIC/LCD Demo is a classic microcontroller project that demonstrates how a PIC16F877 can fully control a PG12864F graphical LCD.Designed as...
Programmers & ICSP · PIC16F628ADHT11 Low Cost Humidity Sensor using PIC16F628A with Proteus Simulation
IntroductionThis microcontroller project demonstrates how to interface a low-cost DHT11 temperature and humidity sensor with a PIC16F628A using a Proteus simulation environment.The...

Ibrar Ayyub
I am an experienced technical writer holding a Master's degree in computer science from BZU Multan, Pakistan University. With a background spanning various industries, particularly in home automation and engineering, I have honed my skills in crafting clear and concise content. Proficient in leveraging infographics and diagrams, I strive to simplify complex concepts for readers. My strength lies in thorough...