


Summary of Development system for PIC and AVR microcontrollers
This article describes a custom PIC and AVR microcontroller development system built on breadboards to address limitations in existing solutions. The design features two protoboards arranged 180 degrees apart, creating sufficient space for a 40-pin microcontroller. The author plans future versions with movable boards to support various DIP or Arduino chips and includes integrated USBASP and PICKIT2 programmers. Inspiration was drawn from Dominik Leon's peripheral board designs.Parts used in the Custom Development System:
- Two protoboards
- 40-pin microcontroller
- USBASP programmer
- PICKIT2 programmer
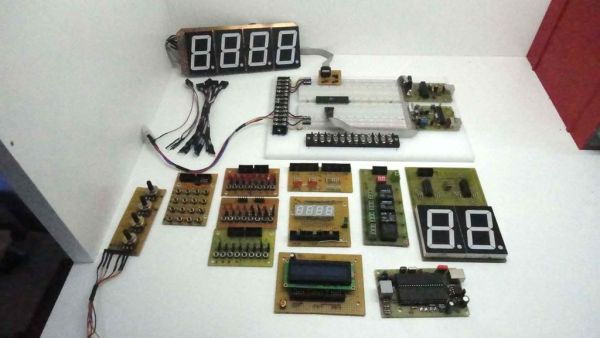
Step 1: More space free
In this development system, I put two protoboards turned 180 degrees from each other. The space that is left to just enough space to insert a 40-pin microcontroller. But I'm planning to create a version with movables protoboards to insert any type of microcontroller DIP or perhaps the arduino. I also attach USBASP and PICKIT2 to the boards.
USBASP programmer can be download here:
Step 2: Being Inspired
I was inspired to create this version of the system development after seeing the system created by Dominik Leon, where the design of peripheral boards can be downloaded from his site.
For more detail: Development system for PIC and AVR microcontrollers
- Why did the author create this system?
None of the tested systems for PIC and AVR microcontrollers satisfied the author. - How are the protoboards arranged?
The two protoboards are turned 180 degrees from each other. - What is the purpose of the space between the boards?
The space is just enough to insert a 40-pin microcontroller. - What is the plan for future versions?
The author plans to create a version with movables protoboards to insert any type of microcontroller DIP or perhaps the arduino. - Which programmers are attached to the boards?
USBASP and PICKIT2 are attached to the boards. - Where can the USBASP programmer be downloaded?
The text states it can be downloaded via a link provided in Step 1. - Who inspired this project?
The author was inspired by a system created by Dominik Leon.
Related projects
Calculator Test using PIC24FJ64GA006 with Proteus Simulation
Introduction The Calculator Test using EASYHDL is a practical microcontroller project built on the PIC24FJ64GA006 and simulated in Proteus. This project demonstrates...
Programmers & ICSPPID Controlled Oven using TMS320F28027PT with Proteus Simulation
IntroductionThis project demonstrates a PID controlled oven implemented using a PICCOLO TMS320F28027PT microcontroller and verified through Proteus simulation.It is a practical microcontroller...
Programmers & ICSPPICCOLO Motor Controller Sample Design using TMS320F28023PT with Proteus Simulation
IntroductionThis project demonstrates a PICCOLO motor controller sample design implemented using the TMS320F28023PT Piccolo microcontroller and tested through Proteus simulation. It focuses...
Programmers & ICSP · PIC16F84APIC Musical Doorbell using PIC16F84A with Proteus Simulation
IntroductionThis microcontroller project demonstrates a musical doorbell built around a PIC16F84A and a simple piezo sounder.Using two push buttons, the system allows...
Programmers & ICSP · PIC16F877AEPE PIC/LCD Demo using PIC16F877 with Proteus Simulation
IntroductionThe EPE PIC/LCD Demo is a classic microcontroller project that demonstrates how a PIC16F877 can fully control a PG12864F graphical LCD.Designed as...
Programmers & ICSP · PIC16F628ADHT11 Low Cost Humidity Sensor using PIC16F628A with Proteus Simulation
IntroductionThis microcontroller project demonstrates how to interface a low-cost DHT11 temperature and humidity sensor with a PIC16F628A using a Proteus simulation environment.The...

Ibrar Ayyub
I am an experienced technical writer holding a Master's degree in computer science from BZU Multan, Pakistan University. With a background spanning various industries, particularly in home automation and engineering, I have honed my skills in crafting clear and concise content. Proficient in leveraging infographics and diagrams, I strive to simplify complex concepts for readers. My strength lies in thorough...