


Summary of EPE PIC/LCD Demo using PIC16F877 with Proteus Simulation
Summary: The EPE PIC/LCD Demo shows how a PIC16F877 fully controls a PG12864F graphical LCD using MPASM firmware and Proteus VSM. It demonstrates text, graphics, animations, custom characters, page switching, and waveform rendering, with a push-button to cycle demos. The project is modular, simulation-ready, and useful for learning embedded display interfacing and low-level firmware techniques.Parts used in the EPE PIC/LCD Demo:
- PIC16F877 microcontroller
- PG12864F graphical LCD module
- Push-button switch
- Crystal oscillator
- Resistors
- Capacitors
- Power supply connections
Introduction
The EPE PIC/LCD Demo is a classic microcontroller project that demonstrates how a PIC16F877 can fully control a PG12864F graphical LCD.
Designed as a hands-on learning example, this project shows how text, graphics, animations, and custom symbols can be generated directly from firmware.
It is especially useful for anyone learning embedded systems, graphical LCD interfacing, and Proteus simulation without needing physical hardware.
Using MPASM and Proteus VSM, the project explores real-world LCD control techniques in a clear, visual way.
This makes it an excellent reference for DIY electronics, display drivers, and low-level firmware development.
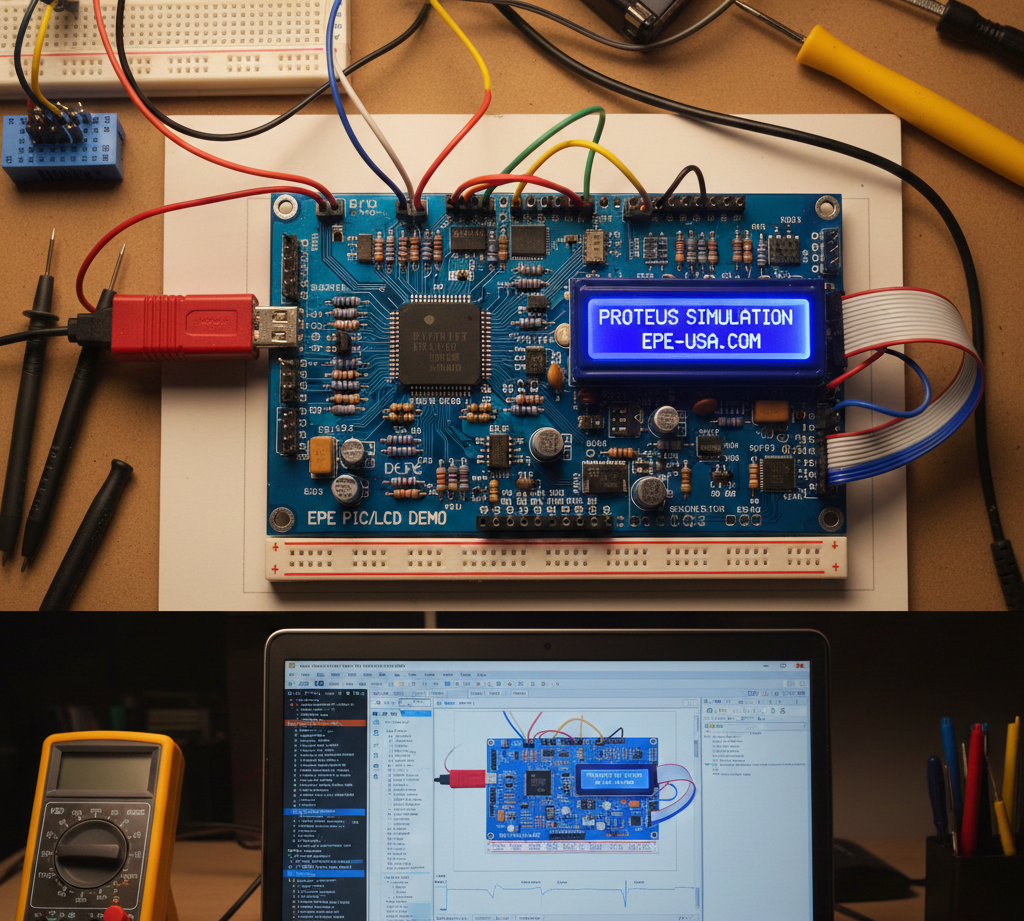
How the Project Works (Overview)
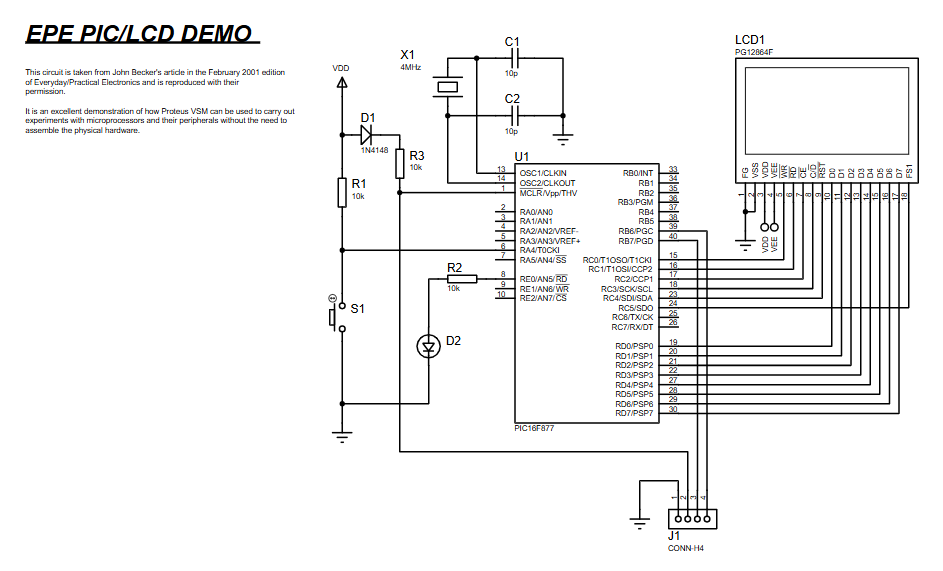
The PIC16F877 communicates with the PG12864F graphical LCD using parallel data lines and dedicated control signals.
The firmware initializes the LCD, sets up text and graphics memory areas, and then cycles through multiple demonstration routines.
Each demo highlights a different LCD capability such as pixel-level drawing, cursor control, page switching, waveform rendering, and animation.
A push-button input allows the user to move between demos during runtime.
All timing, display updates, and screen effects are handled entirely by the microcontroller firmware.This PIC16F877 LCD Proteus demo shows how a PIC16F877 microcontroller interfaces with a graphical LCD using Proteus simulation. The PIC16F877 LCD Proteus demo is ideal for learning embedded systems and LCD interfacing.
Block Diagram / Workflow Explanation
Power-Up & Initialization
PIC16F877 configures ports and LCD control pins
LCD is reset and display mode is selected
LCD Configuration
Text area and graphic area addresses are set
Character generator (CG RAM) is initialized
Demo Execution Loop
Firmware runs multiple display demonstrations sequentially
Button input determines when to move to the next demo
Graphic & Text Rendering
Data is written directly to LCD memory
Pixels, symbols, text, and animations are generated
Continuous Operation
Demos repeat in a loop for continuous visualization
Key Features
Full graphical LCD control using PIC16F877
Text and graphics rendering on PG12864F display
Multiple built-in LCD demonstrations
Custom character generation (CG RAM usage)
Pixel-level drawing and bit manipulation
Page switching and display panning
Animated waveforms and graphics
Button-controlled demo navigation
Designed for Proteus VSM simulation
Components Used
PIC16F877 microcontroller
PG12864F graphical LCD module
Push-button switch
Crystal oscillator
Resistors and capacitors
Power supply connections
Applications
Learning graphical LCD interfacing
Embedded systems education and training
Firmware development practice with MPASM
Display driver prototyping
LCD animation and visualization demos
Simulation-based electronics learning
Reference design for PIC-based display projects
Explanation of the Code (High-Level)
The firmware is written in MPASM assembly language and structured into reusable subroutines.
Initialization routines configure ports, LCD modes, and memory addressing.
Dedicated routines handle command writing, data writing, screen clearing, and cursor positioning.
Each demo routine showcases a specific LCD capability, such as drawing shapes, scrolling pages, or rendering waveforms.
EEPROM data and CG RAM are used to create custom symbols and animations.
The modular design makes it easy to extend or modify the demos.
Source Code
Download; CONVERTED TASM PIC16F877 C:\PIC\GEPE456.ASM TO MPASM C:\ASMCNV\GEPE456.ASM 01-22-2001 22:15:32
list p=16F877,r=dec
;GEPE456.ASM 07SEP00 - JOHN BECKER - EPE LCD GRAPH DEMO 2 (MAIN DEMOS)
#DEFINE PAGE0 BCF H'03',5;STATUS bit 5
#DEFINE PAGE1 BSF H'03',5;STATUS bit 5
INDF EQU H'00' ;page 0, 1, 2, 3
OPSHUN EQU H'01' ;page 1, 3
PCL EQU H'02' ;page 0, 1, 2, 3
STATUS EQU H'03' ;page 0, 1, 2, 3
Complete Source Code
Proteus Simulation Behavior
In Proteus VSM, the PIC16F877 runs exactly as real hardware would.
The graphical LCD displays text, symbols, and animations in real time.
Pressing the simulated switch advances through different LCD demos.
Waveforms, scrolling graphics, and custom characters are clearly visible, making the simulation ideal for learning and debugging.
(FAQs)
Conclusion
The EPE PIC/LCD Demo using PIC16F877 is a powerful learning project that demonstrates professional-level graphical LCD control using a classic PIC microcontroller.
It combines low-level firmware techniques with rich visual output, making it ideal for embedded systems practice.
Whether used for simulation, education, or experimentation, this project provides strong insight into how graphical displays are driven at the hardware level.
Complete File
EPE PIC/LCD Demo using PIC16F877 with Proteus Simulation
- Can this project run entirely in Proteus?
Yes, it is specifically designed for Proteus VSM simulation. - Which microcontroller is required?
The project uses a PIC16F877 microcontroller. - What type of LCD is used?
A PG12864F graphical LCD is used. - Is the code written in C or Assembly?
The firmware is written in MPASM assembly language. - Can I modify the demos?
Yes, the demo routines are modular and easy to extend. - Does this project support custom graphics?
Yes, it uses CG RAM for custom characters and symbols. - Can this be adapted to real hardware?
Yes, the same circuit and code can be used with physical components. - Is this suitable for beginners?
It is best suited for learners with basic PIC and assembly knowledge.
Related projects
PIC16F877 Driving LCD in 4-Bit Mode using PIC16F877 with Proteus Simulation
Introduction This microcontroller project shows how a PIC16F877 can drive an LCD display using 4-bit mode inside a Proteus simulation.The project demonstrates...
Motors & Robotics · PIC16F877AEfficient Sun-Following Robot: A Solar Tracker with Microcontroller Control
Abstract The impending global challenge of dwindling non-renewable fuel resources underscores the urgency of transitioning towards renewable energy alternatives like solar power....
Motors & Robotics · PIC16F877APitt Robotics Club’s Guide to PIC16F877A Programming
The tutorials assume a foundational understanding of programming and electronics. If you're new to programming, it's advisable to grasp the basics of...
Programmers & ICSPCalculator Test using PIC24FJ64GA006 with Proteus Simulation
Introduction The Calculator Test using EASYHDL is a practical microcontroller project built on the PIC24FJ64GA006 and simulated in Proteus. This project demonstrates...
Programmers & ICSPPID Controlled Oven using TMS320F28027PT with Proteus Simulation
IntroductionThis project demonstrates a PID controlled oven implemented using a PICCOLO TMS320F28027PT microcontroller and verified through Proteus simulation.It is a practical microcontroller...
Programmers & ICSPPICCOLO Motor Controller Sample Design using TMS320F28023PT with Proteus Simulation
IntroductionThis project demonstrates a PICCOLO motor controller sample design implemented using the TMS320F28023PT Piccolo microcontroller and tested through Proteus simulation. It focuses...

Ibrar Ayyub
I am an experienced technical writer holding a Master's degree in computer science from BZU Multan, Pakistan University. With a background spanning various industries, particularly in home automation and engineering, I have honed my skills in crafting clear and concise content. Proficient in leveraging infographics and diagrams, I strive to simplify complex concepts for readers. My strength lies in thorough...