Description
Featured in Electronics Weekly Gadget Freak (15/08/2008)
The Control board for this project is now available in kit form or fully assembled and tested.
Please visit the Picprojects on-line shop for more details
This project provides an simple F1 motor racing style 5 light race start sequence with a fixed or random delay that you can use on a real race track, kart circuit or even your slot-car circuit.
Operation is simple; when the start button is pressed all the LED clusters are off. They then illuminate sequentially until all five LED clusters are on. After a timed interval that can be either fixed or random depending on requirements the LEDs extinguish, signalling the start of the race. Once the LEDs have extinguished simply press the start button again to initiate another race start sequence.
The latest version of firmware allows all the timings and the random delay to be customised to suit individual requirements. We’ve also added an output that can be used to trigger timing software or operate a relay, sounder or other device when the start lights extinguish.
New from August 2012 is the ability to abort the start countdown sequence. This feature has been requested by a number of people since the project was first published.
With the new ‘abort’ feature, pressing the start button again at anytime during the countdown will immediatly set the outputs to a fixed pattern indicating the start has been aborted. This fixed pattern remains displayed until the start button is pressed and held for over 1 second at which point the controller resets ready for a new start. The feature can be disabled at the time of purchase if it is not required.
This page presents a complete application using 52mm (2″ inch) diameter LED clusters, but the software in the PIC microcontroller has been written to allow it to operate electro-mechanical relays, large arrays of LEDs, low voltage lamps, or even simply small 3/5/8 or 10mm LEDs.
Start sequence
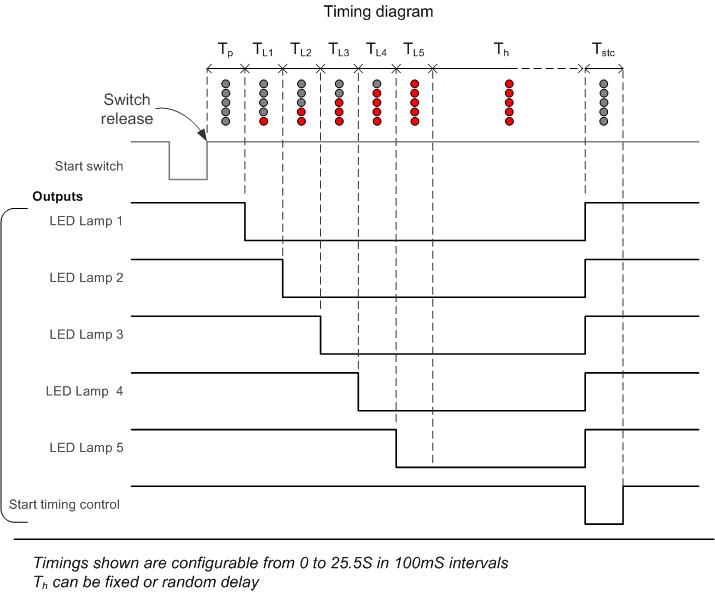
When the start switch is pressed and released the first output turns on followed by the next four outputs. Default timings set the interval between each LED turning on at 1 second but this can be customised.
After the fifth output has been on for 1 second, the controller starts a random delay that will last anywhere from 0 to 4 seconds at which point all outputs are turned off. Again the duration of the random delay can be changed to suit requirements, or it can be set to a fixed period.
Once a start sequence has completed, simply press the start button again to initiate another start.
Timing and Modes
August 2012
Update: This kit is now shipping with Firmware V4 which supports an ‘abort start’ function.
The ‘abort start’ function is very simple to operate, using the same switch used to trigger the start countdown sequence.
After the switch has been released to trigger the start sequence it can be pressed again at any time during the countdown to abort the start.
If the start is aborted a fixed pattern is immediatley displayed on the light outputs. This can only be cleared by holding the start switch down again for over 1 second resetting the controller ready for a new start.
If this feature isn’t required you can request to have it disabled when ordering a kit or programmed PIC.
Timing and mode options are held in the PICs EEPROM. These values can be set when the PIC is programmed. If you have access to a PICkit2 programmer the values can also be re-configured by the end user. PICs supplied in the kit will have default timings set. If you want customized timings you can provide us with a list of time values for each parameter shown in the timing data and we will pre-program them into the PIC supplied with the kit.
Modes and Timing and abort-function details ![]()
Display modes
The outputs can operate in either bar or dot mode.
| Timing DataThe timing diagram shows all the parameters that can be configured. These can be set from 0 to 25.5 seconds in 100mS intervalsDefault timings and mode supplied in the kit.
0 ; light mode value, 00 bar, >00 dot This gives 5 lights illuminating in bar mode at 1 second intervals with a 0-4 second random delay at the end. Start gate output is active for 0.5S Abort function is enabled and displays ‘0-0-0’ pattern on light outputs |
 |
![]() For step-by-step guide to editing and reprogramming the EEPROM timing data see here
For step-by-step guide to editing and reprogramming the EEPROM timing data see here
Circuit description
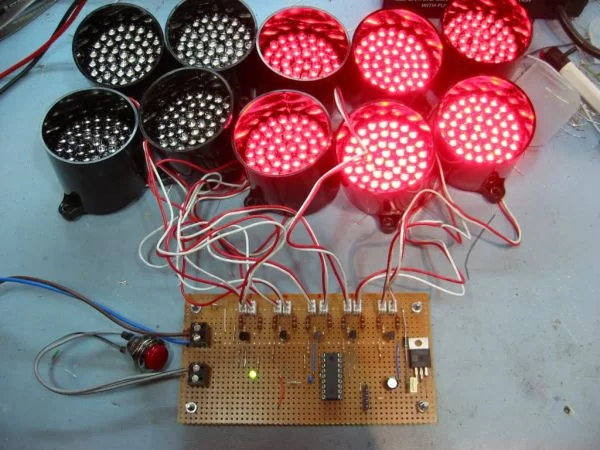
The circuit described on this page is designed around Kingbright’s 52mm LED cluster module which comprises 50 red LEDs in a waterproof housing with a brightness in excess of 16000mcd. In the original version of this project each LED cluster was directly driven and all those LED’s required a hefty current with the ten LED cluster version requiring a power supply capable of delivering over 2amps at 12V DC.
The input power to the board can be fed from either the DC Jack or 2-way screw terminal block. These connectors are wired in parallel to give a choice of connection. The positive supply is fed to the rest of the board via D1 which provides protection against a reversed power connection to the board. D1 is a Schottky diode and is used in preference to a standard diode because of its a low forward voltage drop of around 0.25 volts. A 78L05 voltage regulator provides the 5 volt supply for the PIC and a ULN2003A interfaces the PIC outputs to the LED modules. LED1 is connected across the output of the 78L05 to provide a power-on indication.
For more detail: F1 Gantry Race Start Lights using PIC16F684
About The Author
Ibrar Ayyub
I am an experienced technical writer holding a Master's degree in computer science from BZU Multan, Pakistan University. With a background spanning various industries, particularly in home automation and engineering, I have honed my skills in crafting clear and concise content. Proficient in leveraging infographics and diagrams, I strive to simplify complex concepts for readers. My strength lies in thorough research and presenting information in a structured and logical format.
Follow Us:LinkedinTwitter