http://www.bubblesoftonline.com/pocket/pocket.html
{ed: Tony moved on, the web site is closed, but all the files are here:
- pocket.zip file containing all the files required to build the kit, install the Win32 application, setup the unit, and program chips. Also includes source code. This will extract to make the install disk:
- Installation disk. This installs on a windows workstation and contains:
- Files that will be installed on the client workstation. Includes the source code for the bootloader and the programmer itself
Also available are Unix tools for the Pocket Programmer by Brandon Fosdick}
HOT! Tony Nixons Pocket Programmer. The Pocket Programmer is a stand alone serial programmer that can program most of the PICmicro®MCU range of microprocessors. (12C6xx, 16Cxxx, 16Fxxx, 18Cxxx) It works from a single 18VDC supply or with 2 X 9 volt batteries. Combine this with 64K of on board EEPROM which can store upto 32 HEX files and you have a truely portable programmer / patcher.
This unit is a must for field work!
Here is the schematic from the pdf file as a huge gif or png. The source code for this programmer is open so that the user can customize it for their own purposes or read it to learn how a PIC can program a PIC. Customise the software yourself if you like. PLEASE consider sharing your modifications…
Features:
- Supports most of the PICmicro®MCU range of microprocessors. (12C6xx, 16Cxxx, 16Fxxx, 18Cxxx)
- Comes with source code
- Stand alone – needs no PC to program devices {ed: the download format is documented and simple so support for many operating systems should be forthcoming Brandon Fosdick is starting a Linux version of the GUI at http://terrandev.com/~bfoz/pocket/}
- Battery or plug pak operated
- Stores up to 32 programs
- In Circuit Serial Programming (ICSP) port
- True Margining programmer: Verifies programs with user programmable 2V – 6V supply
- In built code dissassembler displays code in mnemonic format
- Code can be modified before programming
- Can program via bootloader software
- Simple menu driven commands (SELECT CHIP, PROGRAM, VERIFY, BLANK, READ, FILE MANAGER, etc…)
- PC Interface for transferring files, etc… (windows source/binary and unix source)
- Customizable chip data {ed: I hope people who add to the chip data files will share with others}
The original kit did have a few SMT components, but the pads were oversized and so it is not as hard as you might think. Took about 2 hours to put together. The assembly instructions in pdf format (cached 20010523135942) and CSS HTML 20010904105856 and everything else is installed by the Win32 specific install program in the download .zip file (cached 20010523135942). The biggest problem was that the board did not have a solder mask or component placement silkscreen.
Andrew Sorriaux sent some pictures of his version.
New Kit !
With Tony’s blessing, http://www.piclist.com, in cooperation with http://www.olimex.com, is producing a new kit with an easy to assemble board (no SMT, with solder mask and component silkscreen) and all parts (except the ZIF socket) for $70. (we are looking for a good, low cost, ZIF socket… please let us know if you know of one). Some possible sources include:
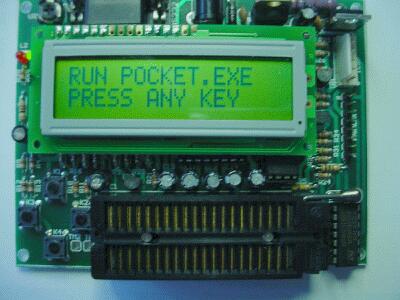
The boards are excellent! Olimex.com has done their normal great job! The clear silkscreen and parts list (see below) makes assembly a snap. Pin one is clearly marked on the silkscreen for all polarized components. The PIC16F876 comes pre-programmed so the unit is ready to go when you power it on. Just do a complete check of the parts for correct orientation and give the PCB another look over and check for possible shorts and joints that have not been soldered before you apply power and switch it on. The LCD is probably still blank, so turn the contrast pot away from the RS232 socket to make the display visible. When turned on without operational data available, the Pocket will display this message.
RUN POCKET.EXE
PRESS ANY KEY
Turn off the power, download pocket.zip from
http://www.bubblesoftonline.com/pocket/pocket.zip, run the setup program, edit pocket.dat so that it contains the number of the com port you will use
and run pocket.exe from your installation directory. Read through the help to discover how to set up and calibrate the programmer and then how to use it. DO NOT USE A NULL MODEM CABLE TO CONNECT THE POCKET TO YOUR PC! The correct connector wiring is straight through: Pin 1 to pin 1 etc…
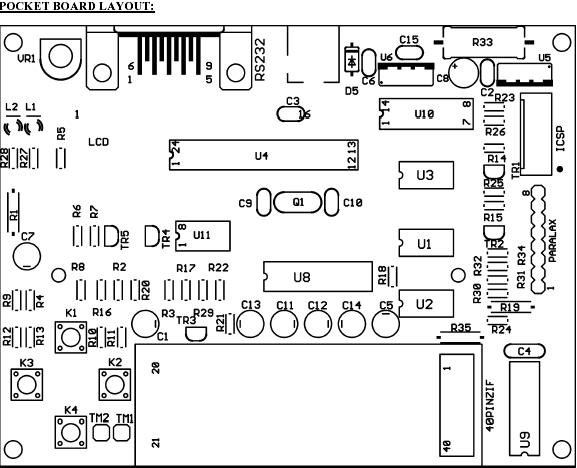
| Component |
Description and notes | |
| R1 | – 82 ohm 1/4W 5% | |
| R33 | – 100 ohm 2W 5% | |
| R27,R28 | – 220 ohm 1/8W 5% | |
| R12,R13,R14,R15,R16, | ||
| R17,R23 | – 1K 1/8W 5% | |
| R30 | – 1.5K 1/8W 5% | |
| R29 | – 2.7K 1/8W 5% | |
| R3,R4,R5,R25,R26,R31, | ||
| R32,R34 | – 4.7K 1/8W 5% | |
| R18 | – 6.8K 1/8W 5% | |
| R19 | – 10K 1/4W 5% | |
| R20,R21,R22,R24 | – 10K 1/8W 5% | |
| R2 | – 18K 1/8W 5% | |
| R10,R11 | – 22K 1/8W 5% | |
| R6 | – 33K 1/8W 5% | |
| R8,R9 | – 47K 1/8W 5% | |
| R7 | – 82K 1/8W 5% | |
| R35 | – 470K 1/4W 5% | |
| VR1 | – 5K TRIMMER | |
| C9,C10 | – 22pF 25VDC NP0 10% | |
| C4 | – 10nF 25VDC 10% | |
| C2,C3,C6,C15 | – 100nf 25VDC 20% | |
| C5 | – 1uF 25VDC 20% | |
| C1 | – 2.2uF 25VDC 20% | |
| C11,C12,C13,C14 | – 4.7uF 25VDC 20% (for MAX232: originally 1uF) | |
| C7 | – 10uF 16VDC 20% | |
| C8 | – 47uF 16VDC 20% | |
| Q1 | – quartz resonator 4MHz | |
| L1 | – green LED 3 mm | |
| L2 | – red LED3 mm | |
| D5 | – 1N4004 (or 1N4001) | |
| TR5,TR4 | – BC337-40 | |
| TR1,TR2,TR3 | – BC327-40 | |
| U10 | – 74LS06 | |
| U9 | – 74HC126 | |
| U5 | – LM7805 | |
| U6 | – LM7808 | |
| U1,U2,U3 | – 24LC256/P on DIL8 sockets | |
| U11 | – LM358 | |
| U8 | – MAX232 | |
| U4 | – PIC16F876-04/P on DIL28 socket | |
| LCD | – LCD DISPLAY 16×2 | |
| LCDdistance | – 2x10pin female distance connector | |
| LCD1 | – 1x6pin male connector to LCD pins 1-6 | |
| LCD2 | – 1x4pin male connector to LCD pins 12-14 | |
| PWR-JACK | -Plug in power supply jack | |
| 40PINZIF | – ZIF socket 40 pins or 4 pcs 1x20pin female row sockets | |
| PARALAX | – 8pin male connector | |
| ICSP | – 6pin male connector | |
| RS232 | – DB9 9 pin female connector | |
| K1, K2, K3, K4 | – push buttons | |
Assemble the unit by matching the parts to the parts list above and then inserting them into the space for each part as labeled on the PCB.
If you are satisfied that all is well, apply power and switch it on. The LCD is probably still blank, so turn the contrast pot away from the RS232 socket to make the display visible. When turned on without operational data available, the Pocket will display this message.
RUN POCKET.EXE PRESS ANY KEY
If the display has not responded with that message then you have done something wrong. Please go over you work again and make sure that 5 volts appears on the correct power pins on each chip.
Turn off the power, download the software from http://www.bubblesoftonline.com/pocket/pocket.zip or http://www.piclist.com/images/com/bubblesoftonline/www/http/pocket/pocket.zip, run pocket.exe from your installation directory and open the help file. Read through it to discover how to set up and calibrate the programmer and then how to use it.
How to wire up a suitable serial connection for the PC: With a male to femail DB9 serial connector, just wire pin 1 to pin 1, 2 to 2, etc… Do NOT use a “Null modem cable” Since this will swap pin 2 with 3 etc… and cause the RS232 drivers on the Pocket to possibly burn out.
For more detail: True USB GQ-4X Programmer