


Summary of LED Interfacing with PIC Microcontroller: Embedded C program with circuit using pic microcontoller
This article explains how to interface eight LEDs with a Microchip PIC 16F877A microcontroller using the Mikro C compiler. It details an embedded C program that toggles PORT B to create a blinking effect with a one-second delay, suitable for beginners exploring microcontroller basics on Windows platforms.Parts used in LED Interfacing with PIC Microcontroller:
- Microchip PIC 16F877A microcontroller
- Eight LEDs connected to PORT B
- Mikro C compiler
- Windows XP or Windows 7 platform
- .HEX file generation tool
- Burning/programming tools for PIC
How to interface LED with Microchip’s PIC microcontroller? How to connect LEDs to a PIC microcontroller? LED interfacing is the stepping stone for microcontroller development. This is a simple embedded program for PIC 16F877A to interface LEDs, suitable for beginners who wish to study basics of embedded microcontroller programming. The program is developed through Micro C compiler, one of the best solutions for embedded programming in PIC family. It is compatible for Windows XP and Windows 7 platforms and comes with internal burning tools. This PIC circuit is a beginner circuit, do this PIC project to explore the world of microcontrollers.
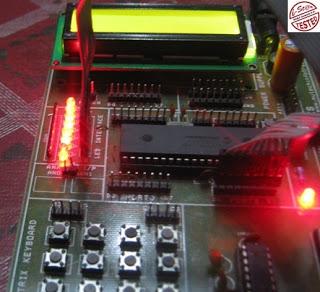
Algorithm for implementing this PIC project
- Specify the output port [here PORT B is used to connect LEDs, So TRISB=0×00; comment is used for specifying the output port]
- Start infinite loop [while(1){} is used here]
- Pass 0×00 value to the output port [PORTB=0×00;]
- Provide a delay. The inbuilt delay function, that is delay_ms(); gives some delay. You can change the duration of LED blinking by giving any value to the calling field of this function. For example delay_ms(1000); will give 1 second delay.
- Pass 0xFF value to the output port [PORTB=0xFF;]
- Provide a delay [delay_ms(1000);]
- Repeat the loop.
LED interfacing embedded C Program for PIC microcontroller
void main()
{
TRISB=0×00;
while(1)
{
PORTB=0×00;
delay_ms(1000);
PORTB=0xFF;
delay_ms(1000);
}
}
The while loop will execute infinitely. So all 8 LEDs connected to PORT B starts blinking with 1 sec delay. This program is tested and verified under i-St@r laboratory.
Read further: Loops in C programming
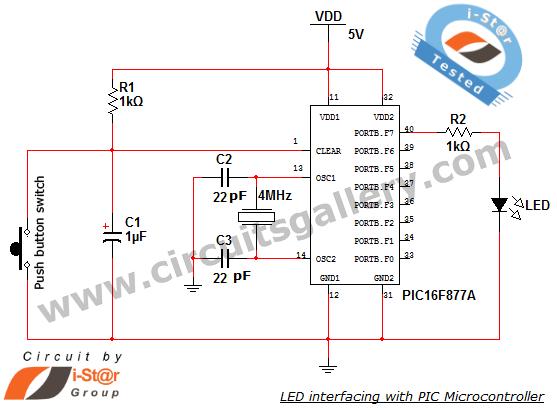
Circuit diagram of PIC project
What is Next?
Now we want to build a .HEX file for this program and then burn it in to our PIC microcontroller..! Dig further
For more detail: LED Interfacing with PIC Microcontroller: Embedded C program with circuit
-
How to specify the output port for connecting LEDs?
Specify the output port by setting TRISB=0×00. -
What function is used to provide a delay in the program?
The inbuilt delay_ms() function is used to provide a delay. -
How can you change the duration of LED blinking?
You can change the duration by giving any value to the calling field of the delay_ms function. -
Which compiler is recommended for this embedded programming project?
Mikro C compiler is described as one of the best solutions for embedded programming in the PIC family. -
On which operating systems is the Mikro C compiler compatible?
The compiler is compatible with Windows XP and Windows 7 platforms. -
What value is passed to the output port to turn all LEDs off?
The value 0×00 is passed to the output port to turn all LEDs off. -
What value is passed to the output port to turn all LEDs on?
The value 0xFF is passed to the output port to turn all LEDs on. -
Where was this specific program tested and verified?
The program was tested and verified under i-St@r laboratory.
Related projects
PIC16F877 Driving LCD in 4-Bit Mode using PIC16F877 with Proteus Simulation
Introduction This microcontroller project shows how a PIC16F877 can drive an LCD display using 4-bit mode inside a Proteus simulation.The project demonstrates...
Programmers & ICSP · PIC16F877AEPE PIC/LCD Demo using PIC16F877 with Proteus Simulation
IntroductionThe EPE PIC/LCD Demo is a classic microcontroller project that demonstrates how a PIC16F877 can fully control a PG12864F graphical LCD.Designed as...
Motors & Robotics · PIC16F877AEfficient Sun-Following Robot: A Solar Tracker with Microcontroller Control
Abstract The impending global challenge of dwindling non-renewable fuel resources underscores the urgency of transitioning towards renewable energy alternatives like solar power....
Communication & Interfacing · PIC18F4520CAN FD Node based on a PIC18 Microcontroller
The introduction sets the stage for an embedded systems project that involves developing a Embedded C CAN FD project using the MCP2517FD...
Communication & InterfacingLAN9662 Gigabit Switch: Optimized for Industrial Ethernet
Introduction It should come as little surprise therefore that one element of what is now more commonly referred to in some circles...
Communication & InterfacingPIC Microcontroller: Fundamentals & Applications for Students
Introduction Microcontrollers are the key components in the embedded systems market. A variety of embedded systems was formed and developed after the...

Ibrar Ayyub
I am an experienced technical writer holding a Master's degree in computer science from BZU Multan, Pakistan University. With a background spanning various industries, particularly in home automation and engineering, I have honed my skills in crafting clear and concise content. Proficient in leveraging infographics and diagrams, I strive to simplify complex concepts for readers. My strength lies in thorough...