For long time, UART is the only and best way to interface with PC. It is easy to adapt and handle. Though some devices (like: GSM modem etc.) have UART on themselves, but for interfacing with PC, there is only one thing now and that is USB
Introduction
The purpose of this article is to explain how to interface a PIC microcontroller to a PC via the USB port. Although the concepts are universal, the examples are specifically for use with MikroElektronika’s ‘MikroC Pro for PIC’. PIC18F2550 and PIC18f4550 are famous for their USB Module. To stay ahead you can start with their datasheets.
 The most difficult part of this project is exactly what is required to get the PIC microcontroller to communicate with the USB port. The two most important things that absolutely have to be correct are the microcontroller configuration, and the USB device descriptor. If even the smallest thing is incorrect about either of these, communication will not occur.
USB Speed
The original USB 1.0 specification, defined data transfer rate of 1.5 Mbit/s “Low Speed” and 12 Mbit/s “Full Speed”. The 12 Mbit/s data rate was intended for higher-speed devices such as disk drives, and the lower 1.5 Mbit/s rate for low data rate devices such as joysticks. The USB 2.0 specification has 480 Mbit/s data transfer rate, which is also known as “High Speed”. The new USB 3.0 specification has up to 5 Gbit/s data transfer rate, known as “Super Speed”.
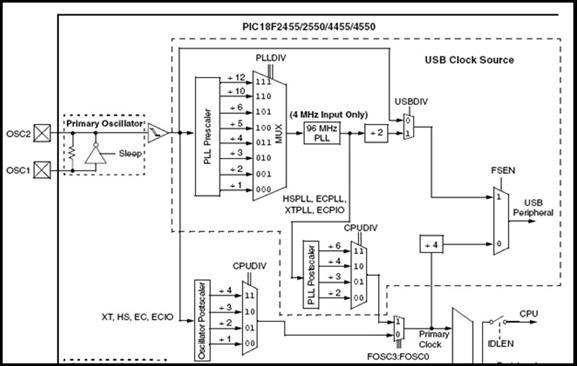
P18F2550/4550 supports low speed (1.5 Mb/s) and Full Speed (12 Mb/s). So the first thing you have to know is how to set desired clock for USB.
Clock setting
I’ll show you how to configure ‘Full Speed’ i.e. 12 Mb/s. When you use mcu for USB connectivity, it must have either a 6 MHz or 48 MHz clock for USB operation, depending on whether Low-Speed or Full-Speed mode is being used. The first thing you can do is, use a 48MHz crystal (for full speed). But there are two drawbacks:
For more detail: PIC USB HID (Human Interface Device) Interfacing
