A good power supply is an essential subject to the microcontroller’s base project; it’s like a heart that gives a life to our microcontroller. Sometimes we take it for granted the important of having an adequate power supply to our microcontroller project and this can lead to the unexpected result or behavior from the circuit. In this tutorial we will learn the principal of powering our microcontroller and how we could provide the microcontroller circuit with a good and yet simple power supply.
I Need More Power
“Mr. Scotty, I Need More Power” one of the famous phrase in the Star Trek movie; as the captain of the starship USS Enterprise want to increase the starship wrap speed. The same principal also applies to our microcontroller when we drive the microcontroller with higher clock speed in order to increase the execution time speed, we certainly need more power. Therefore we have to consider wisely and balancing between the speed and the power consumption. The following graph is the example of some popular microcontrollers with their operating voltage and frequency (for detail please refer to their respectively datasheet).
From the above graph, we should always select the save operating area when we powering our microcontroller, for example using 4.5 Volt will be the safest operating voltage for all of the operating frequency range allowed by the microcontroller or when we use the clock speed up to 10 Mhz than a 3 volt power source will satisfied for all microcontroller’s types listed above.
Next to the voltage is the amount of current needed to make the microcontroller to work properly. Nowadays most modern microcontroller only needs a tiny direct current (in micro ampere order) to operate as introduced by Microchip with their nanoWatt PIC microcontroller families or Atmel with their pico-technology AVR microcontroller families. This type of microcontrollers makes them suitable for used as the portable devices in the remote area where the power is limited to the portable power source such as battery or the solar cell.
One of the important things to be considered when designing your microcontroller’s base project is the maximum direct current (DC) allowed to pass through the microcontroller’s Vcc to Gnd pins; by looking at the microcontroller’s electrical specification on the datasheet this DC maximum current is typically around 90mA to 200mA; remember this is the maximum value; which mean when we reach this value the microcontroller will likely become permanently damage.
This maximum current is the sum of the microcontroller operating current and the entire load we put together on the microcontroller’s ports I/O. The following is the pictures of typical load connection to the microcontroller’s port I/O (the electrical specification is taken from Microchip PIC16F886 and Atmel AVR ATMega168P datasheet).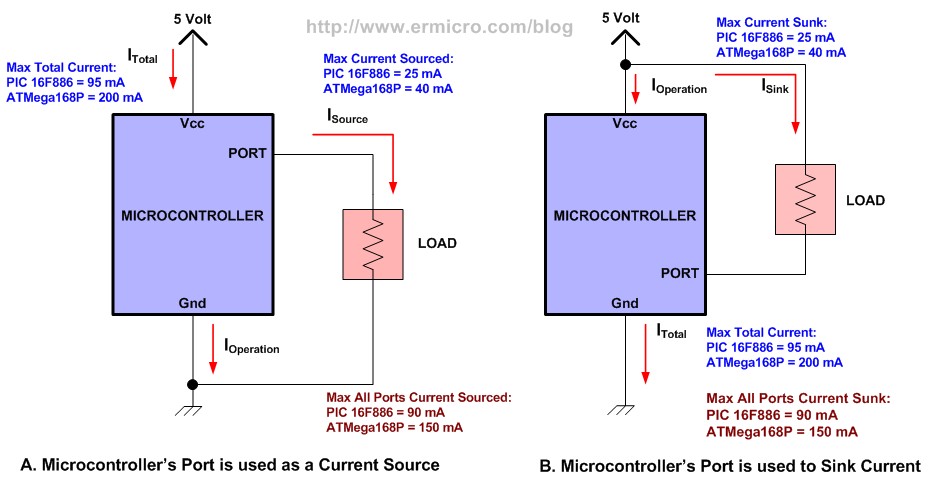
You should always refer to the Microcontroller electrical specification datasheet when you start to connect devices to the I/O ports as it varies among the microcontroller’s types. I would like to show you some example; you would easily found in the microcontroller’s project schematic where people will hookup a bunch of LEDs to the microcontroller’s I/O ports as the following picture:
For more detail: Powering Your Microcontroller’s Base Project