Summary of Addressable LEDs (WS2812) on ChipKIT
This article introduces the PICxel library, a new MPIDE library for controlling addressable LEDs (WS2812, WS2811) with PIC32 microcontrollers like the Digilent chipKIT. It guides users through installing MPIDE, adding the PICxel library, connecting the LEDs to the chipKIT board, and running a demo program. Important cautions about power requirements and using a resistor on the data line are highlighted. The tutorial enables users to easily create LED patterns using chipKIT microcontrollers.
Parts used in the PICxel LED Control Project:
- Digilent chipKIT microcontroller (UNO32 or UC32)
- Mini-USB cable
- Addressable LEDs (WS2812 or WS2811 strips)
- Computer with MPIDE software installed
- PICxel library for MPIDE
- Resistor (~470 ohm, recommended by Adafruit)
There has not been a simple addressable LED library for PIC32 microcontrollers until now! The PICxel library is an MPIDE library that handles the timing required to use addressable LEDs (WS2812, WS2811) or more commonly known as Adafruit Neopixels. Going through through a couple steps will allow your to get started with the PICxel library.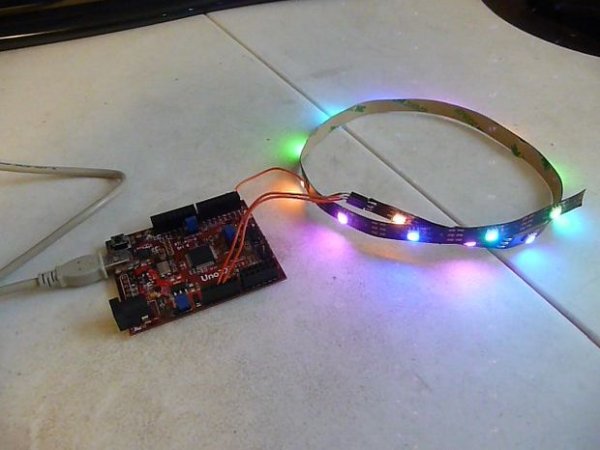
What you will need:
- Digilent chipKIT (UNO32 or UC32)
- mini-USB cable
- addressable LEDs (WS2812 or WS2811) I soldered female headers to the strip
- a computer with MPIDE (covered later)
- the PICxel library (also covered later)
What this will cover:
- downloading and installing MPIDE
- installing PICxel library
- opening the demo
- compiling and uploading the demo
WARNING – I am not responsible for damage caused to your LEDs by not heeding the following warnings!
- 10 -15 LEDs at low brightness can be ran off of the microcontroller directly but either high intensity or higher numbers of LEDs can cause too much current draw for the microcontroller and an external power supply is required.
- Adafruit strongly suggests adding a resistor about 470 ohm between the microcontroller data line and the LED data pin. I also strongly agree but haven’t used a resistor out of convenience and/or laziness.
- Adafruit has the Adafruit Neopixel Uberguide that is a complete and detailed source for all possible questions and concerns dealing with addressable LEDs.
Step 1: Get and Install MPIDE

- Installing MPIDE is very simple. Simply download the compressed directory for your OS from here.
- extract the contents to a location of your choosing (I like to extract the package to the C: drive and right-click “create shortcut”. Then drag and drop the shortcut to the Windows start menu.
- Clicking on the shortcut from the start menu will open MPIDE like any other program
Further details on installing and using MPIDE can be found here.
Step 2: Get PICxel Library and Install Into MPIDE
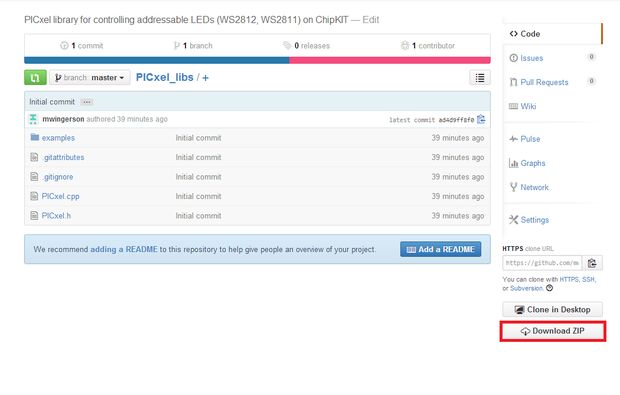
The the PICxel library is available on Github. Downloading it is very simple.
- Click this link
- Open MPIDE
- Go to File -> preferences
- Take note of the “sketchbook location”
- Close MPIDE
- extract the PICxel library compressed file to the libraries folder in the “sketchbook location”
- if there is not a directory named “libraries” then create a folder named “libraries” (the folder name must be exactly “libraries”.
- Copy the PICxel-master folder into the libraries folder
- Rename the PICxel-master folder to “PICxel”
- Now the library is installed in MPIDE
Step 3: Running the Demo

Now that the PICxel library is added to MPIDE we can run the demo and start having fun!
- Open MPIDE
- Go to File -> sketchbook -> libraries -> PICxel -> PICxel_demo
- The demo will open in the MPIDE text editor
Step 4: Connecting LEDs and ChipKIT
Once again, the demo in its current state is set to use less than full brightness. This is safe for 15 LEDs but for anymore then please consult the Adafruit NeoPixel Uberguide or build and use one of these: https://www.instructables.com/id/ChipKIT-Proto-Shie…
- Connect the ground wire from the LED strip to the GND terminal on the chipKIT
- Connect the 5V wire from the LED strip to the 5V0 terminal on the chipKIT
- Connect the data wire to PIN 0 of the chipKIT
The order of which the LEDs are connected is important to reduce the chance of damaging the LEDs.
Step 5: Setup and Upload the Demo to the ChipKIT
We need to setup MPIDE so that it knows which chipKIT board and what serial port it is on to program the microcontroller correctly.
- Open MPIDE
- Go to Tools -> Board -> chipKIT -> chipKIT UNO32 (or UC32)
- Go to Serial Port -> Comm port assigned to the chipKIT when plugged in
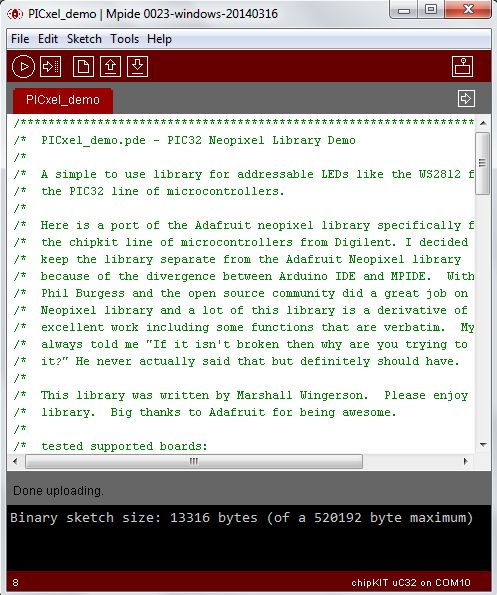
- Go to File -> Upload to board to compile and upload the program to the board.
- If “Done uploading” is displayed on the grey bar then your chipKIT has programmed successfully
- If not then you probably chose the wrong comm port in step 3. Try a different serial port and try again.
Step 6: Celebrate!
Now you can create awesome LED patterns using chipKIT!
Thanks for checking out my project.
I will be updating the PICxel library soon with added features.