
Summary of WIFI plant monitoring system based on Arduino MEGA and ESP8266
Summary: This article demonstrates a basic IoT plant monitoring experiment using an Arduino MEGA and an ESP8266 v01 to send sensor data over WiFi. It measures ambient temperature and humidity, soil moisture and temperature, and illuminance, and explains required hardware, power and level-shifting considerations for reliable ESP8266 operation.
Parts used in the Internet of Things plant monitoring experiment:
- Arduino MEGA 2560
- USB cable
- DHT22 sensor
- ESP8266 v01 WiFi module
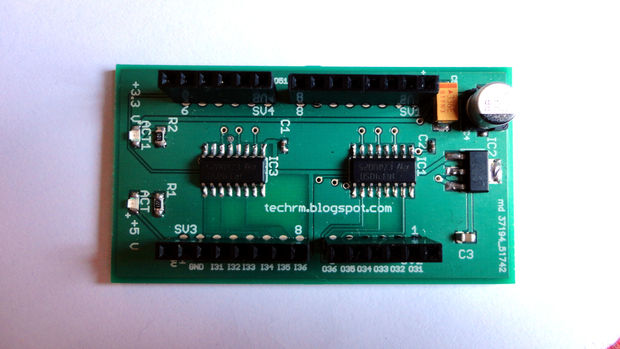
- Bi-directional logic level translator (TechRM or equivalent)
- LD-33V voltage regulator (3.3V, 1A)
- Waterproof thermistor
- YL-69 Analogue soil moisture sensor
- Photoresistor
- Set of Dupont cables
- Breadboard MB-102
- Three 10k Ohm resistors
Today we are going to show you our first experiment on the Internet of Things. For this purpose, we decided to use an Arduino MEGA instead of an Arduino UNO. That’s because Arduino MEGA has more than one serial port and this fact allows us to use the ESP8266 and the serial monitor at the same time.
As written in the title, we’ll see how to monitor some of the most important plant growth factors*. These parameters are:
- Ambient temperature and humidity
- Soil moisture and temperature
- Illuminance
Monitoring this parameters occurs via Internet thanks to the famous and cheap ESP8266 v01 wifi module.
Techrm’s channel is available here. If you are lucky, you’ll see it working.
As usual, let’s list what we need to follow the tutorial:
- Arduino MEGA 2560
- USB cable
- DHT22 (more info about this sensor)
- ESP8266 v01
- Bi-directional logic level translator (we use our own by TechRM)
- LD-33V voltage regulator (3,3V-1A)
- Waterproof thermistor
- YL-69 Analogue soil moisture sensor
- Photoresistor
- Set of Dupont cables
- Breadboard MB-102
- Number 3 10k Ohm Resistors
NOTE: The ESP8266 wifi module works on 3.3V power supply but the Arduino serial ports work on 5V. That’s why using a logic level translator between the ESP8266 and the wifi module is required. We have used our own logical level translator which has been very efficient on testing but you can use another one, for example: SparkFun Logic Level Converter – Bi-Directional
We built a limited number of them and anyone interested on purchasing our devices can find them on Tindie. We’ll be thankful for feedback.
Another essential thing is the voltage regulator. Since the ESP8266 requires more than the 35mA supplied by the Arduino 3.3V source, you have to connect the 5V to the voltage regulator and take advantage of the larger amount of Ampere supplied by this power source.
*Even if we are going to explain how to monitor those parameters, following our explanation you’ll be able to change sensors and monitor whatever you want.
For more detail: WIFI plant monitoring system based on Arduino MEGA and ESP8266
- Why use Arduino MEGA instead of Arduino UNO?
Because Arduino MEGA has more than one serial port, allowing use of the ESP8266 and the serial monitor simultaneously. - What plant parameters are monitored in this project?
Ambient temperature and humidity, soil moisture and temperature, and illuminance. - Which WiFi module is used to send sensor data over the Internet?
The ESP8266 v01 WiFi module is used. - Do I need a logic level converter between Arduino and ESP8266?
Yes, because the ESP8266 uses 3.3V signals while Arduino serial ports use 5V, so a bi-directional logic level translator is required. - Why is an external voltage regulator necessary for the ESP8266?
Because the ESP8266 requires more current than the Arduino 3.3V source (which provides about 35 mA), so a 3.3V regulator with higher amperage (LD-33V 1A) is used. - Can I change sensors and monitor other parameters using this setup?
Yes, the explanation allows changing sensors to monitor different parameters. - Which soil moisture sensor is used in the tutorial?
The YL-69 analogue soil moisture sensor is used. - What humidity and temperature sensor is used?
The DHT22 sensor is used for ambient temperature and humidity.