Features
Features are summarized herebelow, and can be seen in the wavewatch13 (updated 15/05/2015).
-
Up to two channels (A&B) at 44100Hz sampling frequency,
-
Time range from 10µs to 500ms,
-
Channel gain adjustment with voltage estimation based on online tuning,
-
Channel Enable/disable, offset with dedicated marking
-
Channel triggering source and level selection
-
Automatic and single shot triggering mode, with start/stop control
-
User friendly markers with time and voltage measurement
-
Smooth display with user friendly Grid and scale markings,
-
Mouse responsive GUI combined with keyboard shortcuts,
Download
All the files are available on the Github Repository https://github.com/bansonfr/WaveWatch
Manual
WaveWatch is quite straightforward to use. Features are illustrated in the demonstration video, and are detailed in this section.
The bottom menu allows to control WaveWatch features.
Channel State
-
Clicking on ‘ChA’ or ‘ChB’ enables or disables channel displays.
-
“Gain” changes gain level on channel A & B,
Time Menu
-
“Time” adjusts time scale, from 10µs to 0.5s,
-
Period is indicated in ms.
Triggering Controls
-
Triggering source can be change from ChA to ChB, “Trigx” toggles triggering.
-
adjust triggering point by clicking “Trig”, independantly on channel A & B,
-
triggering mode is either “Auto” or “Single” (see below),
-
“Start” or “Stop” acquisition,
-
State of the triggering is given:
-
Running : Acquisition ongoing,
-
Stopped : Acquisition stopped, screen is frozen,
-
Ready : Ready to acquire at next triggering (Single shot mode),
-
Like in a HW scope, triggering allows display to be synchronised on the input signal, to help readability. It can be made on Channel A and Channel B.
-
In “Auto” mode, screen is refreshed as soon as trig is reached. Display is continuously updated.
-
In “Single” mode, screen is updated only on user request, which is initiated by pressing “start”. As soon as trig is reached, on acquisition is made, and scope is stopped.
-
In “Auto” mode, pressing “stop” freezes the acquisition, and pressing “start” resumes it. Usefull to make a screenshot of a signal.
Auto mode is relevant for steady signals, and Single mode is usefull to track undesired or spurious events.
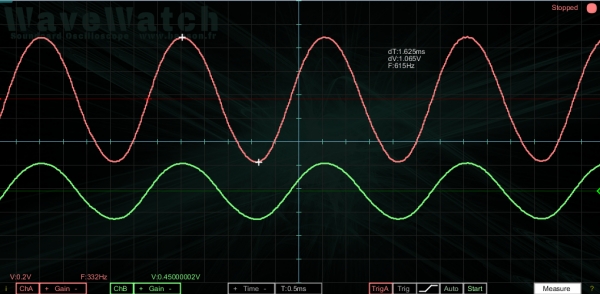
Measurement
-
Measurement Cursors are activated by clicking “Meas”,
Making a measurement is fairly simple:
-
press the “Meas” button,
-
place the first marker by clicking on signal,
-
place the second marker by clicking on signal again,
-
Time and Voltage Deltas are displayed below the cursor during measurement.
help and shortcuts
-
“i” and “?” show respectively credits and keyboard shortcuts, in a popup window.
For more detail: Wavewatch, a soundcard oscilloscope and waveform generator