Summary of How to Use Interrupts in PIC16F877A Microcontroller
This tutorial explains how to implement external interrupts on the PIC16F877A microcontroller. It defines interrupts as mechanisms for handling urgent tasks while the processor executes other code, using a mobile call example. The guide outlines necessary materials and specifies that only pin RB0/INT (Pin 33) supports external interrupts. It assumes prior knowledge of MPLABX programming and LCD interfacing.
Parts used in the PIC16F877A Interrupt Project:
- PIC16F877A Perf Board
- 16x2 LCD Display
- Push Button
- Connecting Wires
- Bread Board
- PicKit 3
In this tutorial we will learn how to use an External Interrupt in PIC Microcontroller and why/where we will need them. This is a part of the sequence of PIC Tutorials in which we started learning PIC Microcontrollers from scratch; hence this tutorial assumes that you are familiar with how to program a PIC MCU using MPLABX and how to interface an LCD with PIC. If not please fall back to their respective links and read them trough, for I will be skipping most of the information that was already covered there.
Materials Required:
- PIC16F877A Perf Board
- 16×2 LCD Display
- Push Button
- Connecting Wires
- Bread Board
- PicKit 3
What are interrupts and where to use them:
Before getting into how to program PIC microcontroller interrupts, let us understand what an Interrupt actually is and where we would need to use them. Further, there are lots of types of interrupts in Microcontroller and PIC16F877A has about 15 of them. Let us not confuse them all into our head for now.
So! what is an interrupt in Microcontrollers?
As we all know microcontrollers are used to perform a set of pre-defined (programmed) activates which triggers the necessary outputs based on the input. But, while your Microcontroller is busy with executing one piece of code there might be an emergency situation where other piece of your code needs immediate attention. This other piece of code that needs immediate attention should be treated as an interrupt.
For example: Let us consider that you are playing your favourite game on your mobile and the controller (assumption) inside your phone is busy throwing all the graphics that is needed for you to enjoy the game. But, suddenly your girlfriend calls to your number. Now, the worst thing to happen is your mobiles controller to neglecting your girlfriends call since you are busy playing a game. To prevent this nightmare from happening we use something called interrupts.
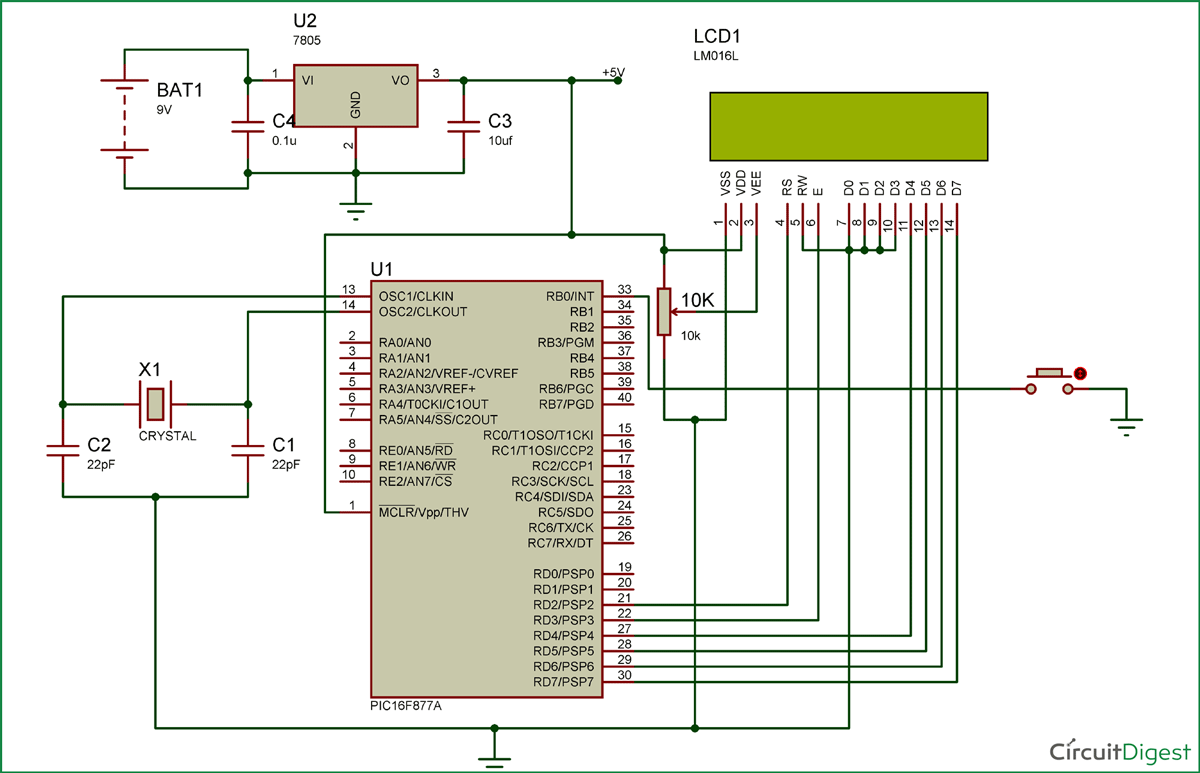
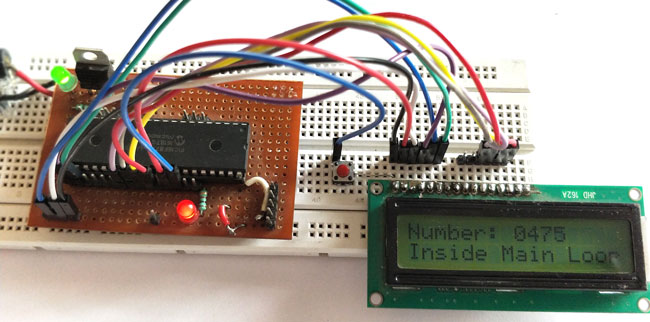
The circuit diagram for using PIC16F877 interrupts is given in the above image. You simply have to connect the LCD to the PIC as we did in interfacing LCD tutorial.
Now to connect the interrupt pin, we should look at the datasheet to know which pin of the PIC is used for External interrupt. In our case in PIC16F877A the 33rd pin RBO/INT is used for external interrupt. You cannot use any other pin other than this pin. The Pin connection for this circuit diagram is shown in the table below.
for more detail: How to Use Interrupts in PIC16F877A Microcontroller
- What is an interrupt in a microcontroller?
An interrupt is a piece of code that needs immediate attention when the microcontroller is busy executing another task. - Which pin is used for external interrupts on the PIC16F877A?
Only the 33rd pin labeled RBO/INT can be used for external interrupts. - Can any pin be used for external interrupts on this chip?
No, you cannot use any other pin other than the RBO/INT pin. - How many types of interrupts does the PIC16F877A have?
The PIC16F877A has about 15 different types of interrupts. - Does this tutorial cover MPLABX programming basics?
No, this tutorial assumes you are already familiar with programming a PIC MCU using MPLABX. - Do I need to know how to interface an LCD before reading this?
Yes, the article assumes familiarity with interfacing an LCD with a PIC. - Why are interrupts necessary during game execution?
Interrupts prevent the controller from neglecting urgent events like incoming calls while processing graphics.