Summary of USB NEC Infra-Red Transmitter and Receiver
This project builds a USB-connected PIC-based NEC Infra-Red transmitter and receiver that decodes and sends NEC protocol IR commands via a PC terminal. It uses a PIC18F14K50 with JAL firmware to translate IR into address/command bytes or repeat messages, and can transmit NEC messages (including repeats) with visible LEDs and optional receiver mute during transmission.
Parts used in the USB NEC Infra-Red Transmitter and Receiver:
- PIC microcontroller PIC18F14K50
- 12 MHz crystal
- Ceramic capacitors: 2 × 100 nF, 1 × 220 nF, 2 × 18 pF
- Electrolytic capacitor 47 µF/16V
- Infra Red Receiver TSOP4838
- Resistors: 2 × 33 kΩ, 1 × 4.7 kΩ, 1 × 1 kΩ, 3 × 330 Ω, 1 × 22 Ω
- LEDs: 2 × Infra Red, 1 × Amber, 1 × Green, 1 × Red
- Transistor BC640
- Jumper (optional for Unmute)
- USB connector
- Breadboard or PCB and wiring
This project is a spin-off of another project I am working on and since there is a Remote Control 2017 contest on Instructables I thought I post this project. So if you like this project, please vote for it. Thanks.
As you may know, I am a big fan of the Microchip 8-bit PIC controllers, see:
http://www.microchip.com/design-centers/8-bit
I use the JAL programming language since it looks like Pascal (which I also like). The JAL compiler and the libraries can be downloaded from: http://www.justanotherlanguage.org/downloads (scroll down for the latest released version).

Normally I write all code myself as to completely understand what I am doing but for this project I needed to connect the PIC to the USB port of the PC and so I needed a JAL USB serial driver for this PIC controller. I used the USB serial driver in the JAL download package which seems to work fine. Since this USB serial driver was written for one specific PIC I used that PIC which is the PIC18F14K50. This controller has much more functionality than I need for this project, so I am currently in the process of getting this USB driver working on a simpler PIC version, the PIC16F1455, which is also cheaper.
So what is this project all about? With the device mentioned in this Instructables you can send and receive Infra Red Remote Control commands from and to your PC via the USB port using the popular NEC Infra-Red protocol. In this way you can monitor Infra-Red commands and you can control any device that uses the NEC Infra-Red Remote Control protocol. The project decodes and translates Infra-Red messages into an address byte and a command byte or into a repeat message. The address is – of course – used to address a certain device like a TV or a Radio where the command byte indicates the function that needs to be performed like Volume Up, Volume Down. Next to decoding these messages, they can also be transmitted via Infra-Red using this device.
Step 1: Some Info About the NEC Infra-Red Protocol
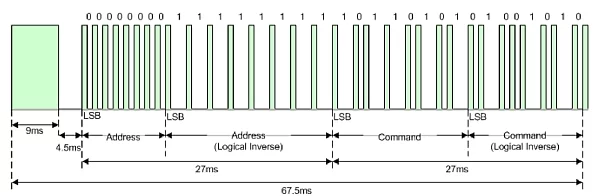
A short introduction to this protocol. The NEC Infra Red Remote Control protocol is used in many devices and Remote Controls that you can buy. It modulates an Infra Red signal on a carrier of 38 kHz and uses pulse distance encoding for encoding a logical ‘1’ and a logical ‘0’. The protocol uses a simple check to see if the message is OK by sending both the address and the command byte and an inverted version of both in one and the same message and checking if they are the same after reception. When a button is pressed on the Remote Control it sends a complete Infra Red message with address and command once. Keeping the button pressed will result in sending a shorter repeat message without address and command information. The repetition time of the transmitted messages while keeping the button pressed is fixed.
More information on the NEC Infra Red protocol can for example be found on:
https://sibotic.files.wordpress.com/2013/12/adoh-n…
Step 2: Required Components
You need to have the following components for this project:
- PIC microcontroller PIC18F14K50, see:
https://www.win-source.net/embedded-microcontrolle… - Crystal 12 MHz
- Ceramic capacitor: 2 * 100nF, 1 * 220 nF, 2 * 18pF
- Electrolytic capacitor 47 uF/16V
- Infra Red Receiver TSOP4838, see:
https://www.win-source.net/optical-sensors-photo-d… - Resistors: 2 * 33k, 1 * 4k7, 1 * 1k, 3 * 330 Ohm, 1 * 22 Ohm
- LEDs: 2 * Infra Red, 1 Amber, 1 Green, 1 Red
- Transistor BC640, see:
https://www.win-source.net/transistorsbjt-single-b… - Jumper (optional)
- USB Connector
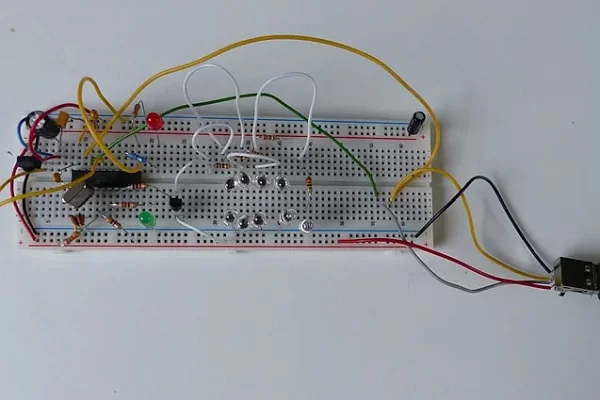
See the schematic diagram on how to connect the components. I used a breadboard for this project as you can see in the picture and in the video. The circuit gets its power from the USB port of the PC.
Step 3: The Software and the Operation of the Device
As already mentioned, the software is written for a PIC18F14K50. It was written in JAL. The Intel Hex file for programming your PIC is attached. The software performs the following functions:
- Decoding NEC Infra-Red messages and send it to the PC via USB. The message is decoded from the bit stream that is generated by the Infra-Red receiver and translated to an address + command message or a repeat message.
- Sending NEC Infra Red messages received from the PC via USB. Note that the software also creates the 38 kHz carrier frequency which directly drives the Infra-Red LEDs. In parallel to the Infra-Red LED an Amber LED is connected as to make the transmission of a message visible.
By default this circuit will mute the Infra-Red receiver during transmission of an Infra-Red message. If a jumper is placed on the ‘Unmute’ position, it will disable this mute function. In that case the transmitted Infra-Red message will also be decoded in parallel to the transmission and after complete reception it is sent as a received Infra-Red message to the PC. If a valid NEC Infra-Red message is received, the Red ‘IR OK’ LED will light up.
In order to operate this device you need to have a Terminal Emulator program on your PC. I used ‘Termite’ for this purpose. When the device is connected to the PC, it will automatically be recognized as an additional COM port by Windows 10 since there seems to be a Microchip driver for this device in Windows 10 pre-installed. The setting for this COM port should be: 19200 baud 8 bits, 1 stop-bit, no parity and using RTS/CTS flow control. The baud rate can be set to any other value if needed so a baud rate of 115200 will also work. Once the device is configures via the USB port by connecting to it via the Terminal Emulator program, the Green ‘Configured’ LED will light up.
Receiving Infra-Red messages
When an Infra-Red message is received, the following will be displayed in the Terminal Emulator program:
- ‘A:xx C:xx’ in case of a complete message, where xx is the hexadecimal number of the address (A) and command (C). Values for both can range from 0x00 (0) to 0xFF (255).
- ‘Repeat’ in case of a repeat message.
Sending Infra-Red messages
For this I needed to define a protocol that tells the device what to do. Since we use a Terminal Emulator I used ASCII characters to define a message. The protocol to send a command to the device uses the following format: ‘!AACCRR#’, where (all characters are case insensitive):
- ‘!’ indicates the start of the message.
- ‘AA’ is the value of the address in hexadecimal notation so ‘0’ to ‘9’ and ‘A’ to ‘F’,
- ‘CC’ is the value of the command in hexadecimal notation so ‘0’ to ‘9’ and ‘A’ to ‘F’
- ‘RR’ is the number of repeat message that need to be transmitted in hexadecimal notation so ‘0’ to ‘9’ and ‘A’ to ‘F’. A value of ‘00’ means no repeat message is sent.
An example of a message with address 0x07, command 0x05 and 3 repeats should then be typed as follows on the Terminal Emulator program: !070503#
The device has different responses after a command is sent from the PC:
- ‘Y’ means that a message was transmitted. Note that this response is given after all messages – including all repeats – are transmitted so it might take some time before this response is given when many repeat messages need to be transmitted.
- ‘N’ means that there was an illegal character in the message sent to the PC.
- ‘B’ means that an Infra-Red transmission was still busy when the command was given.
- ?’ means that the device was expecting ‘!’ but it received something else.
Step 4:
I made a short video of the device in action. For this video I used a commercial LED Lamp with its Remote Control to see that both the transmission and reception work. The video shows the following:
- Configuring the USB device from the Terminal Emulation program. When the device is configured it responds with the message ‘USB NEC Infra Red Transmitter and Receiver’. On the device the Green LED is turned on showing that the device was configured by the PC.
- The lamp is turned on with the Remote Control. For this the Remote Control uses address 0x00 and command 0x07 which is decoded by the device and shown on the PC.
- The lamp is turned off with the Remote Control. For this the Remote Control uses address 0x00 and command 0x06 which is decoded by the device and shown on the PC.
- The lamp is switched on by typing the same Remote Control command on the PC with a repeat value of 0 (no repeat) so by typing ‘!000700#’. The lamp turns on.
- Changing the color of the lamp to blue by using address 0x00 and command 0x0A and using 0x30 repeats. The Amber Led, which is connected in parallel with the Infra Red LEDs is blinking showing the transmission of the repeat message via Infra Red. The typed message is ‘!000A30#’.
Note that during the recording of this video the jumper connection ‘Unmute’ was active so you could also see the transmitted message ‘!000700#’, being received as ‘A:00 C:07’ on the Terminal Emulation program. In the demo of the lamp coloring blue you can also see that the Red LED is lit as long as the valid – repeat – messages are transmitted since they are received and decoded in parallel with the transmission of the repeat messages.
- What does the device do?
It decodes NEC Infra-Red messages into address and command bytes or repeat messages and can transmit NEC IR messages from the PC via USB. - Which microcontroller is used?
The project uses the PIC18F14K50 microcontroller. - What software language and tools are used?
The firmware is written in JAL and an Intel Hex file is provided for programming the PIC. - How does the PC communicate with the device?
The device appears as a COM port and communicates over USB using a terminal emulator with settings like 19200 baud 8N1 and RTS/CTS flow control. - How do I send an IR command from the PC?
Send ASCII messages in the format !AACCRR# where AA is address hex, CC is command hex, and RR is repeat count hex. - What responses does the device give after sending a command?
Responses include Y for transmitted, N for illegal character, B for busy, and ? if it expected ! but received something else. - Can the device receive IR while transmitting?
By default the IR receiver is muted during transmission, but placing the Unmute jumper disables the mute and allows parallel reception. - What indicates a valid received message?
The Red IR OK LED lights when a valid NEC Infra-Red message is received. - What format is shown in the terminal for received messages?
Complete messages are shown as A:xx C:xx with hex address and command; repeats are shown as Repeat.