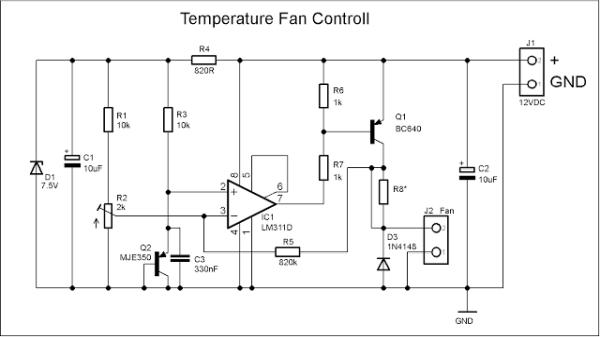
Some notes:
1. The C3 can be omitted, its purpose was to filter noises picked up by connecting cable between board and sensing transistor, but as the transistor is mounted on the board it become unnecessary.

2. R8 is optional and is for reducing the fan speed. Its value must be calculated according the fan current rating and the shorting track bellow it must be cut with sharp knife.
3. When mounting, make sure the board is not touching the heat sink. There are two mounting holes – the one above the sensing transistor and one in opposite corner. I suggest to use a 4mm nut or other similar spacer between the transistor and the board.
4. If there must be electrical insulation between transistor and heat sink, I suggest using transistor with insulated package like MJE350. If not, then BD140 will do the work.
5. Instead of fan you can connect a 12V relay which can do some other job, for example disconnecting appliance from power or connecting bigger fan(s).
6. Trimmer R2 adjust the temperature at which the board switch on. There is hysteresis of 5-10 degrees between switch on and switch off temperatures.
7. Zener diode D1 can be BZX79C7V5 or BZX55C7V5 or 1N4737.
