Introduction:
For our final project in ECE 4760: Design with Microcontrollers, we decided to explore the concept of controlling a vehicle with the user’s hand orientation relative to the ground. By the end of the semester, we designed a cheap and effective hand controlled vehicle using the PIC32 microcontroller. This project is comprised of two main parts, the physical vehicle and the user controls. The physical vehicle consists of two rear wheels on the chassis which are controlled by a single motor, and the front wheel is controlled by a servo. The rear wheels serve to control forwards and backwards motion while the front wheel enables the user to move side to side. Attached to the top of the chassis is the slave mode bluetooth module, which will receive the hand orientation data from the accelerometer, and transmits to the PIC32 board will output the appropriate movement commands.
High Level Design:
Our group decided to pursue this project as our final design because it not only a culmination of many of the concepts that we have learned throughout the semester, such as output compare units, and using PWM signals to run motors or servos, it also incorporates new concepts, such as the bluetooth communication protocol.
The vehicle component of this hand-controlled system is broken into three important parts:
- controlling the orientation of vehicle using the servo attached to the front wheel
- controlling the forward or backward direction of the vehicle
- receiving information of the orientation of the hand using bluetooth
The hand-controlling component of the system was divided into three parts:
- obtaining and processing the accelerometer data to determine the orientation of the hand relative to the ground
- transmitting this information to the vehicle using bluetooth communication
- a kill switch that would turn the vehicle off once the user is done controlling
Both the vehicle and the hand-controlling mechanism were operating with a PIC32 microcontroller. We had to make some tradeoffs between hardware and software functionalities. For example, the PWM signal that we could send to the motor had a much higher range than what we actually implemented. Due to the mechanical stability of our final project, we needed to have a limited range of forward and backward speed so that the vehicle did not tip over and compromise the electrical components on the car. We also had to make the same considerations while deciding the range of rotation for the servo. The center of mass of the vehicle made it tip to one side, so it was important to limit the range from -30 degrees to 30 degrees so that the vehicle would not tip over. There are no patents, copyrights, or trademark considerations relevant to this project.
PIC32 Microcontroller:
We used the PIC32 Microcontroller, model pic32mx250f128b, to send PWM signals and receive signals, digital signal, from the different components of our system. It was also used to power the components with a 3.3 voltage. The eight hardware timers and 5 output compare units on the PIC32 board were useful for this project since we needed two different PWM signals, timers, output compare units.
Hardware Design:
The chassis was comprised of a board that had two wheels in the back attached to one motor. The motor was connected to an h-bridge so that we could control the direction of movement, either forward or backward, and the speed that the vehicle would move. An h-bridge can reverse the direction of the current depending on the inputs that it receives. The forward or backward motion was determined by sending a digital high or digital low signal from the PIC32 board to one of the inputs, BIN1 or BIN2. The speed of the motor was controlled using a Pulse Width Modulation (PWM) signal. A PWM signal is essentially a digital signal described by its duty cycle, or the period of time that a signal is on or off. The higher the PWM signal we send to the motor, the faster the motor spins the wheels. The standby pin was connected to 3.3 volts to enable the motors. The motor was powered by an external power bank outputting 5 volts and the h-bridge was powered by 3.3 volts from the PIC32 board. A schematic of the wiring of the motor with the h bridge is available to view in the appendix below.
The servo movement was also controlled by a PWM signal, which enabled the robot to switch the direction left, right, and straight. As the tilt orientation of the hand becomes more extreme, the servo rotates the wheel so that the turn of the vehicle is more sharp. The servo was also powered by 5 volts and grounded from the PIC32 board. The servo was attached to the front wheel on the chassis, using a mechanical attachment that we constructed which ensured that the movement of the wheel was strictly guided by the servo. The hot glue around the wheel and its attachment kept the wheel from freely rotating, and the wooden components allowed the small servo to effectively rotate the wheel, given its relatively heavy weight. The final circuit attached to the chassis included the PIC32 board, which connected to the servo, motor, and bluetooth receiver, and was powered by both the 9 volt battery attached to the PIC32 board as well the an external power bank with outputted 5 volts for the motor and the servo. In order to simplify the circuitry hardware design and reduce the chance of wires dislocating, all the components were connected and soldered onto a protoboard. We decided to use the servo for turning because we noticed that the bluetooth robot car last year also used a servo to turn its front wheel for direction changes. However, for future projects, it is important to note that the servos purpose is not usually to rotate the wheel of a vehicle, especially of one that is considerably heavy. We had some concerns of whether or not the servo would be able to support the turning of the vehicle, even with the mechanical attachments that we made, and would consider using another turning mechanism in the future. This might include using two motors, one for each back wheel, and having one wheel spin clockwise while the other wheel spins counter clockwise.
Software Design:
The software setup for the servo and motor is very similar. Both the servo and motor required their own timers. The frequency for the servo timer was set to 50,000 (pwm_servo) and the frequency for the motor timer was set to 20,000 (pwm_on_time). These numbers were determined by:
40000000/(50 Hz*16)=50000 ( servo )
The system clock is defined to be 40000000, which is divided by the operating frequency of the servo, or 50 Hz, and also divided by the clock prescaler value, which is 16.
40000000/(8 Hz *256) = 20000 ( motor )
The system clock is defined to be 40000000, which is divided by the frequency of the motor, or about 8 Hz, and also divided by the clock prescaler value, which is 256.
The timers were set up using the following code:
// Set up Timer 2 to control Servo Motor Direction
OpenTimer2(T2_ON | T2_SOURCE_INT | T2_PS_1_16, pwm_servo);
ConfigIntTimer2(T2_INT_ON | T2_INT_PRIOR_2);
mT2ClearIntFlag(); // and clear the interrupt flag
// set up timer 3 for motor
OpenTimer3(T3_ON | T3_SOURCE_INT | T3_PS_1_256, pwm_on_time);
ConfigIntTimer3(T3_INT_ON | T3_INT_PRIOR_2);
mT3ClearIntFlag(); // and clear the interrupt flag
Then, an output compare unit was set up for both the servo and the motor, using their timers and pwm frequency, so that the PIC32 board can send a PWM signal to each of those components. Then the specific pin being used to send the signal to the component is enabled using PPSOutput. The following snippet of code shows the set up for the servo and motor:
// set up compare1 for PWM mode (motor)
OpenOC1(OC_ON | OC_TIMER3_SRC | OC_PWM_FAULT_PIN_DISABLE , pwm_on_time, pwm_on_time);
// OC1 is PPS group 1, map to RPB3
PPSOutput(1, RPB3, OC1);
//set up compare4 for PWM (servo)
OpenOC4(OC_ON | OC_TIMER2_SRC | OC_PWM_FAULT_PIN_DISABLE , pwm_servo, pwm_servo);
//OC4 is PPS group 3, map to RPA4
PPSOutput(3 , RPA4, OC4);
In order to run the motor and servo using the appropriate PWM signal, we used the command “SetDCOC1PWM(pwm_on_time)” or “SetDCOC4PWM(pwm_servo)”.
We also used the following command “INTEnableSystemMultiVectoredInt();” to enable system wide interrupts and also set the two pins sending digital signals to the h-bridge to control the direction of the motor as digital out pins using the command “mPORTASetPinsDigitalOut(BIT_0 | BIT_3)”. These bits were both cleared to ensure that they were both outputting digital low, and then the appropriate pin was toggled depending on whether the motor should move backwards or forwards. If we did not want the vehicle to move, neither pin was toggled. The move backwards, forwards, and stop commands were written in helper functions.
The interrupt service routines were written to adjust the direction of the servo depending on the accelerometer reading of the roll, which determines the magnitude of the left or right tilt of the hand, and the direction of the motor depending on the accelerometer reading of the pitch, or the magnitude of the front or backward tilt of the hand. The pitch and the roll varied from -1.5 to 1.5, and each orientation is determined using the following format:
- -1.5 roll = rightmost direction
- 0 roll = straight direction
- 1.5 roll = leftmost direction
- -1.5 pitch = fastest move forward
- 0 pitch = stop movement
- 1.5 pitch = fastest move backward
In order to adjust the direction or speed of the robot proportionally to the roll or pitch, we used the following formula to determine the pwm signal that we send to the servo or the motor:
(variance from middle value to most extreme value)* ( |pitch or roll | /1.5) + (initial pwm value of servo or motor).
The leftmost PMW value is 5700, the straight PWM value is 5000, and the rightmost PWM value is 4300. The PWM value for fastest speed for the motor is 20000, and the PWM value for om movement is 0. The first interrupt service routine, linked to timer2, uses a conditional statement to determine the appropriate direction and pwm value of the vehicle based off the roll value outputted by the accelerometer. The second interrupt service routine, linked to timer3 uses a similar conditional statement using the pitch values from the accelerometer to determine the direction the vehicle is going to turn.
Bluetooth Hardware:
During the initial first couple of weeks of this project we started of with using a couple of DSD HM-08 modules. The HM modules transmits information using Radio frequency at 2.4GHz. These modules can function in Master and Slave mode. In order to establish pairing between these two modules we had to follow the AT-COMMAND listing found on HM-10 module. An AT-COMMAND set, also known as Hayas command set, is standardized set of instructions used for calibrating and establishing communication among modules. The documentation guide found on the DSD datasheet for the HM-08 fails to list the full set of AT commands accepted by this module and currently only has a total of 11 total commands. In order to establish pairing we used pairing sequence one would use for a couple of HM-10 or HM-05 modules.
- AT+ADDR?
- This command is used to get the slaves device address. To connect to the module with this address follow the command sequence below.
- AT+RENEW
- This factory resets the module. This will break any pairings that may have been saved in the chips non volatile memory. It will also default all the settings.
- AT+ROLE1
- This command tells the chip to swap from the default slave mode to master mode.
- AT+IMME1
- This commands tells the chip to swap to single connection mode by default the chip will be in multi-connection mode.
- AT+CON(ADDR #)
- This is the pairing command used to establish link that will be stored in the non-volatile memory of the chip. Once you’ve paired two chips. You’ll notice that the two chips will automatically pair with each other regardless of which order you turn then on in. For consistently stable pairing I would recommend turning on the slave module followed by the master module.
The complete set of AT-COMMANDS that can be used by the HM-10 and HM-08 modules can be found in this data sheet.
About halfway through our project we accidentally broke one of our HM-08 by reversing the order we plugged in power and ground. This small mistake completely fried the module and we verified that it was broken by plugging it into our computer and trying to run a couple of basic AT-COMMANDS. The module responded with incohesive characters along with the LED indicator being burnt out.
Following this set back we tried to swap out our module with Bluetooth uart friend from Adafruit. This module has more descriptive documentation and a coherent data sheet that makes the set up very convenient. However, we soon found out that this modules are built to operate in slave mode and are unable to establish pairing from one module. In other words we would have needed to rebuild our entire control system since we would need something like our phone or laptop to establish this new pairing sequence and send the movement commands.
The bluetooth UART friend has two modes which can be set using physical switch on the chip. You can choose between having in the module command mode which will allow you to calibrate the module using the Adafruit AT-COMMAND list or you can have it in UART mode which will allow you to send and receive data using the standard RX and TX transmission lines. During our initial test phase of this module we found the following set of AT-COMMANDS to be helpful to know. For information about how we were able to interact with these modules refer to software section where we discuss the various types of serial comm interphases we used throughout the project.
- AT+FACTORYRESET
- This is used to reset the device.
- AT+BLEGETADDR
- This is used to get device address.
- AT+BLEUARTTX=STRING TO SEND
- This is send data through UART channel when it’s connected in CMD mode. Note that the sending on this module works differently than a regular HM module and uses buffer to queue the send characters. Overflowing the buffer will cause you 200ms sending delay. For better understanding on the send restrictions refer to datasheet for the current version you’re working with.
- AT+BLEUARTTXF
- This command works similar to one above but instead of queuing it a buffer it force send. This command has 20 char limit and any transmission above that limit will cause an error.
- AT+GAPCONNECTABLE=1
- This used to set the connectability of the module to being true.
- AT+GAPGETCONN
- This command is used to get the connection status. It will return 1 if connected and 0 otherwise.
- AT+GAPDEVNAME
- This can be used to get and set the device name
- AT+BAUDRATE
- This can be used to get and set the baudrate
- ATI
- This is a general command used a ton of information on the chips current settings at once
- ATE
- This commands enable/disable echo support.
The complete set of commands for the uart friend can be found in the data sheet.
After realizing that the bluetooth uart friend wouldn’t serve our purpose we tried swapping our project to work with HM-10 modules. We followed the same pairing sequence as the one we listed above for the HM-08 modules. After establishing pairing and testing that we were able to send and read in data properly we moved on to merging our project together. For consistency in getting this project up and working we would recommend establishing pairing once and having a parameter in your code which can disable and enable the pairing sequence. The HM modules are able to retain and establish pairing in the mater of second once paired. Going through the pairing sequence generally takes anywhere from 5-10 seconds.
Bluetooth Software:
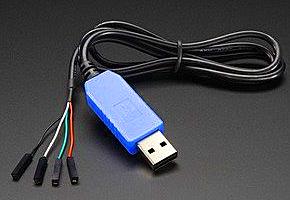
Before opening the serial communication we used uart serial communication cable, which be found in lab, and followed the documentation on the bottom of the page on how to hook up the module using this module. The link for the course documentation can be found in this link.
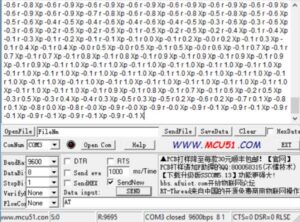
When working with serial communication we found that using Putty alone was slightly inconvenient. Since you’re required to transmit your command within a second we found that using SSCOM 3.2 serial comm worked best. This provides an environment where you can write your command and send it when you’re ready. This allowed us to debug our modules easily by sending and receiving the transmission. To download SSCOM follow this link: www.mcu51.com
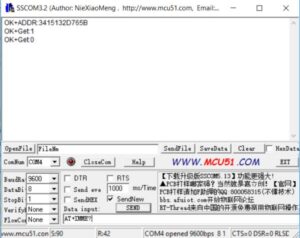
The SSCOM worked really well for almost every bluetooth chip we used it for. However, when we tried testing our HM-10’s using this serial comm it ended up failing to transmit the commands. Since we were unsure why something like this was happening we swapped to using Tera Term. Tera Term provided a similar interphase like Putty, however, it had easy and convenient panel for setting up the default transmission baud rate and other settings. Since there is no typing data input like SSCOM we just wrote out our commands in notepad and copy pasted it in by right clicking in the Tera term window.
Before opening up the module in any serial comm make sure to read through the datasheet to find out the default setting for the module you’re using. The default might be different for each module so transmission might result in an incohesive response or no response at all if you haven’t set your serial comm up properly.
Once we were able to establish pairing between our modules we plugged them in to our PIC’s and did a transmission test. The schematic for this hook up can be seen above. Before starting this test we modified the default braudrate set in the config.h to match our bluetooth units braudrate.To transmit a command from our transmission protothread we were able to use “PT_DMA_PutSerialBuffer” method implemented in the PT header files. To use this method we made our command calls as follows:
sprintf(PT_send_buffer, “%s”,”AT+RENEW”);//resets the bluetooth module
PT_SPAWN(pt, &pt_DMA_output, PT_DMA_PutSerialBuffer(&pt_DMA_output));//Sending
PT_YIELD_TIME_msec(400) ;// causes delay for response and resetting
Note that we needed to put in a yield between AT commands.The module will only process your first setting and the reset will not process if we don’t wait enough time for the module to finish processing current command. Each command can have a 200 to 400 msec execution and response time. For more information on the required yield time refer your modules datasheet.
Once pairing was established with the sequence we specified in the hardware section we transmitted our data using the same process as how we sent our AT-COMMAND. For more information about this refer to our commented code below in the appendix.
We tested that our module was receiving properly by plugging in our UART to USB cable and opening up SSCOM and seeing the received data. We found this step to be helpful way of debugging what your transmission sequence and whether it matches what your expecting to receive.
In order to receive this transmission in our PIC module we plugged in our bluetooth slave module to the PIC using the same connection sequence as above. We were unable to get a stable reading using the implemented “PT_GetMachineBuffer” method. We suspect this was happening due to fact that our transmission rate was a lot faster than the rate at which this thread can read our data. In the end we found that we were unable to read because of UART frame error to fix this and the reading delay we wrote our own read sequence in our thread that doesn’t need to spawn another thread and functions as fast as possible.
if(UART2GetErrors() & 0x02){ // this clears the UART frame error
UART2ClearAllErrors();}
while(!UARTReceivedDataIsAvailable(UART2)){}; //halts the tread until char data is ready
character = (char) UARTGetDataByte(UART2); // reads in the char data
Knowing our transmission sequence meant that we were not only able to filter out our incomplete transmissions but also write our own parser for converting in the char array to a coherent float values. We also didn’t put any yield in this thread. This meant that it continuously looped through our received chars to form our read sequence. Refer to our commented code in our appendix for parsing implementation specifics. Our hand control module transmitted the most uptodate pitch roll computation every 50 msec in order for our receiver to have less than 100 msec latency we avoided using any yield statements along with filtering out incomplete transmissions.
sprintf(PT_send_buffer, “p %.1f r %.1f X”, pitch, roll); // bluetooth transmission data
PT_SPAWN(pt, &pt_DMA_output, PT_DMA_PutSerialBuffer(&pt_DMA_output)); // UART transmission
In order to filter out a incomplete transmission we did a length filter along with a first received char filter.Every new transmission from our hand controller begins with a ‘p’ and if our char array doesn’t start with a ‘p’ we know that we have received an incomplete transmission. The received char array was then parsed with the use of the sscanf and strtok methods which can be found in stido.h. These two methods provided a clean and easy way of parsing our complete transmissions. We note that without prior filtering of incomplete transmissions the use of these parsing methods may cause a null pointer or an incoherent result.
Accelerometer:
The data sent through the bluetooth information only contained the pitch and roll orientation of the hand with respect to the ground. In order to attain these calculations we ended up using Adafruit 3-axis accelerometer. This module requires an I2C communication protocol along with an initial setup sequence. Powering the module will default it to go into active standby mode during this phase the accelerometer will wait for you to set the active status register to 1 in order to start updating the current accelerometer register values. Along with enabling this module you get to choose the sensitivity range which can be 2G,4G,8G. Since our project required precise hand tilt measurement we set our accelerometer to 2G mode. In order to setup the accelerometer we first enabled I2C channel and set our module specification using the i2C_write command.
OpenI2C1( I2C_ON, 0x0C2 ); //enabling I2C along with setting baudrate to 100kHz
char data2[] = {0x01};// active status
i2c_write(0x2A,data2,1);//takes in from standby and puts in active mode
For a comprehensive set of configuration options along with multibyte simultaneous communication refer to the adafruit datasheet. Our set up along with I2C data reading can be found in our i2c_helper.h file in our appendix.
In order to read accelerometer values we created helper function that reads through all 3 accelerometer registers at once and stores them into a 3 index float array. We then convert these values to default range by dividing them by the max 1G value specified in the datasheet which 5000. After normalizing down the reads we create a 4 value software low pass filter which is used to get rid of any random discrepancies which might arise in the readings. When then utilize this low pass filter value to compute the current pitch and roll orientation of the hand we then transmit this information through UART as shown in the bluetooth section.
After deriving our pitch and roll computation we verified our result by reading through an Arduino computation guide we found online. Our final equation for computing pitch and roll along with our low pass filter can be seen below.
accum_values[index] = accum_values[index]*0.75 + .25* values[index]/MAX_G_VALUE; // low pass filtering

Since our computed values where capped between -π/2 and π/2, we simply added in a conditional statement to avoid errors by casting down anything that is lower than -1.5 to -1.5 and similarly we casted down numbers greater than 1.5 to 1.5.
As part of our control sequence and safety measure we added in a kill switch. The user can switch to disable the car by transmitting zero values for the pitch and roll. This effectively stops the car. The implementation of this feature was done by creating one pulldown digital in value which was constantly read in during each iteration and if the value for that digital in went to 1 then a stop transmission was sent to the car.
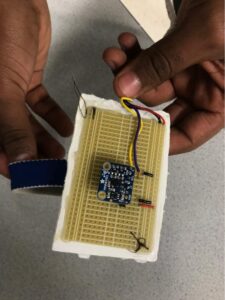
Accelerometer Hardware:
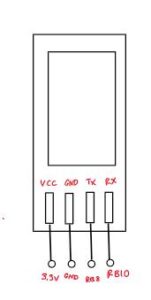
The actual hardware hardware setup for the accelerometer only required a a few things. We set up our connection scheme as can be seen in the diagram below.
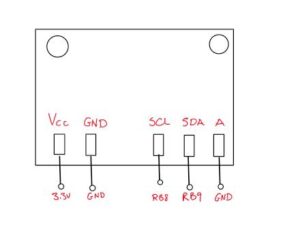
As shown above, the Vcc, GND, and Address pins were connected to the 3.3 V and GND pins on the PIC32 board. The Address pin was pulled down to ground to give it an address of 0x1C. The SCL pin is the I2c clock pin, which was connected to the PIC32 I2C clock line, and the SDA pin was connected to the PIC32 I2C data line.
The schematic wiring of the hand controller is shown below in appendix C.
Results:
We were able to meet our project objective and get a product that’s very responsive and functional. Throughout the project development process we worked with goal of minimizing latency while not compromising data accuracy. From a software perspective we were able to minimize latency and create nice reliable data readings.
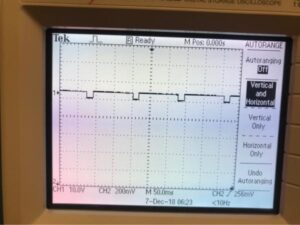
We tested the accuracy of our pitch and roll computation by using a protractor to measure the orientation of the accelerometer and comparing it to the printed value to check for any discrepancies. We were unable to find any noticeable discrepancies. Due to the fact that these measurements were done by eye, we mainly focused tested for any outliers in our readings. The latency of our transmission was limited by two things: the rate at which we can read new accelerometer data and the rate at which our PIC32 can receive the new readings. The set up for the accelerometer enabled to solve the sampling rate bottleneck from the accelerometers side by setting up to update values at 80Hz. This meant that we never be hindered by the reading rate. However for receiving we noticed that anything more than 20 Hz transmission resulted in greater read latency. To test the delay value we needed to put into our send transmission, we simply kept lowering the yield until we reached the value that made receive rate spike to something higher. This happened at 50 msec, having a delay of anything less than that caused 1sec or more latency in updating values. The overall target of our latency was to have our delay to be under 100 ms to achieve near real time response from the car. We also observed the PWM signals inputted into the motor and servo of the vehicle, which is shown below:
From a physical build perspective, we could have significantly improved our final build by using a custom designed hand mount and chassis to fit our project need. A good portion of our final build was made from parts we found left over from prior projects and scrap materials. Creating custom designed and printed parts that serve our specific needs would have enabled us to get better results. For instance, our turning radius was currently limited to 35 degrees. This is due to the fact that the chassis had the servo mount offset to one side and making a widder turn would have resulted in our car tipping over. We also had to glue two wheels together to achieve a greater stable center of mass. If we were to re-do this project again. We would spend a reasonable amount of time optimizing this portion of our project. We would also implement a dull rear motor system to achieve higher speeds. Currently the weight of the car along with the four wheels running off one motor considerably slowed our maximum speed. We ensured safety in our design by incorporating a kill switch in the hand controller component so that the user has the option to bring the vehicle to an automatic and full stop if they ever lose control of the vehicle or would like to stop controlling the vehicle. Any part of the hand controller that was in contact with the user was padded with styrofoam to ensure that no electrical components would touch the person’s skin.
Testing and debugging:
A majority of the accelerometer setting up and testing heavily relied on using the big pic32 board. After reading through the datasheet and creating the appropriate hardware setup, we moved on to creating our I2C communication protocol. For this step we utilized the starter code we sited bellow and modified the register readings to work with our IMU module. After creating our protocol and modifying we started off by displaying the accelerometer values we were reading on the TFT. A majority of the problems we had during the set up phase was caused by the slight mix up we had in understanding the datasheet. The accelerometer by default goes what they refer to as active standby mode rather than active ready mode. Due to this mix up we were constantly reading in default value for the registers. We finally cleared this up by reading in if the accelerometer was active by using the command bellow. Once we figured out we were simply stuck in standby mode we added in an activation set up.
int active = i2c_read( 0x01); // reads if accel is Active
When we started reading in live values we used our big board to display our computed pitch and roll values. Used this display as a means of figuring out if our accelerometer was updating as expected and if any unexpected issues would arise if we were to transmit this value. After repeatedly testing this, we manually updated our code so that we can simply plug in the Big PIC32 board and display our values if we ever needed to debug again. Throughout our commented code we found that adding in a global conditional compile and debug values made it so that modifying our code for debug and final programming was simple and quick.
if (BOOL_BIG_BOARD){
// Used for Debugging Accelerometer
tft_fillRoundRect(0,10, 300, 14, 1, ILI9340_BLACK);// x,y,w,h,radius,color
tft_setCursor(0, 10);
tft_setTextColor(ILI9340_YELLOW); tft_setTextSize(1);
sprintf(buffer,”roll: %.1f pitch:%.1f z:%.1f”,(roll),
(pitch),(values[2]/MAX_G_VALUE));
tft_writeString(buffer); // prints out pitch, roll and Az readings
}
One issue we faced while debugging was that the I2C communication for some reason disables A0 and A1. We later found out that there is an actual chip flaw that disables A0 and A1 everytime I2C is enabled. The default UART RX pin is set to A1 and during our transmission and receive testing we found that we were simply not getting anything. We ended up resolving this by setting the RX pin to B8 in the PT header file setup sequence.
A majority of the debugging for bluetooth transmission was done by using the UART cable. Once we figured out which modules worked by using the steps we described in the bluetooth software section, we moved on to slowly incorporating and testing our bluetooth modules.The verification process for whether the bluetooth modules were pairing was simple and fast. We simply had to observe if the light on the bluetooth modules was flashing or staying constantly on. Once stable pairing was achieved when the lights were stable, a majority of the work was just testing if transmission was working as expected and for this step we simply used the UART cable and opened up SSCOM to view the transmission. Once we were able to get stable transmission we worked on reading values in. We had the biggest problem with this step. For debugging, we went through the default pic BAUD RATE and pin setup and modified it to see if that made a difference. In the end we found that were able to read in single chars but seemed to have problems when trying to read in and store it as a char array. To solve this problem we simply got rid of all yield statements in our code and made our reading sequence size dependent along with adding in a ‘\r’ termination sequence to our transmission. For more details on how this works refer to the software section above where we discuss the step by step sequence followed in getting a stable reading up and running.
Each of the components used on the chassis were united tested before they were combined as a subsystem and mounted on the vehicle. The h-bridge was tested without sending any PWM or digital signals into it from the PIC32, and using an external power supply and the 3.3 voltage from the PIC32 board. By switching whether the digital inputs of the h-bridge were wired to power or ground, I tested whether it could effectively change the direction the motor was spinning. The servo was also tested in a similar manner. Once the servo and motor were mounted on the chassis, I conducted a subsystem test to make sure that they both worked well together. If there were any issues, I debugged the circuit using an oscilloscope and visually seeing the PWM and digital signal at each point in the circuit to narrow down which component was not working properly.
In order to test the final build, we made sure each subsystem, which was bluetooth and accelerometer, or motor and servo, were working before integrating. Then we merged the code and tested and tuned the vehicle so that it would turn appropriately given the accelerometer input. We used the hand controller and tested it throughout its entire range of motion to ensure that there were no glitches in the system or hand motions that would break the system. We also displayed the pitch and roll values being transmitted from the bluetooth on the tft screen on the PIC32 board that was connected to the bluetooth receiver to ensure that the values that were being sent to the motor and servo were not garbage values. During these tests we realized that while the software and electrical components were working, we did not take mechanical stability into account for our final build. We then added another set of wheels to the back two wheels to make them act as thicker wheels, which added a lot more stability to the system.
Conclusion:
Our final bluetooth robot worked as we expected it to and outlined in the final project proposal. We met all the goals we outlined and the car in the demonstration was able to move according to the hand movement. If we were to do this project again, we would devote more time and consideration of the mechanical design of the vehicle. Since so much time was devoted to software and electronics, we did not consider how the center of mass of the vehicle and how we mounted different components on the vehicle would affect the turning radius of the servo. We had to limit our turning range to keep the vehicle from toppling over. We would also use a different mechanism for turning rather than a servo, such as using two different motors for the back two wheels. We would also make a better attachment mechanism for the hand controller so that the user does not have to carry the microcontroller in their hand as they try to control the vehicle. We believe that our design incorporated many different concepts from this semester, and implemented a bluetooth communication protocol that we had not been exposed to in previous labs. We used last year’s avoidance car project as a reference on how to set up bluetooth, and use direction control using their idea of attaching the front wheel to the servo. There were no patent or trademark issues with this design. We did not have to sign a non-disclosure to get a sample part. There may be publishing opportunities for our project which our group may explore in the technical writing class next semester in ECE 4920.
Ethics and Legal Considerations:
Our group did not have any ethical concerns this hand-controlled vehicle. Our hardware and software system is in compliance of the IEEE Code of Ethics. In order to take FDA regulations and safety concerns into account, the hand-controlling component of the system is soldered to a protoboard and then attached to a foam board so that no wires touch the human user. This eliminates the risk of any electrical shock to the person and also prevents the system from getting damaged from the user as well. The protoboards with the accelerometer and the bluetooth transmitter are also attached to the user using cloth bands to prevent any dislocation of the circuit and unintended circuit contact with the user. We were compliant with FCC regulations and transmitted and received frequencies in the allowable range. The bluetooth operated at 2.4 GHz which does not interfere with any other government regulated frequencies.