


Summary of Pinguino Project (a PIC Microcontroller Based Arduino #No Programmer Required)
This article is a tutorial for building a PIC-based Arduino-compatible board (Pinguino) using PIC18F2550 or PIC18F4550, leveraging their built-in USB to avoid an external programmer. It lists required components and instructs assembling them on a breadboard or PCB per the provided circuit diagram to run Arduino programs on the PIC microcontroller.Parts used in the Pinguino Board:
- PIC18F2550 (28pin) or PIC18F4550
- 20MHz crystal
- 22pF capacitors (2)
- 470 ohm resistors (2)
- USB B type PCB mount connector
- 220nF capacitor
- Jumpers (few)
- LED (1 or 2)
- Push button
- 10K ohm resistor
Hey Guys i am Back after 2 months with Awesome Project,This is a Complete tutorial to make PIC Microcontroller based Arduino ,which can run Arduino Programs on PIC18F4550 or PIC18F2550 Microcontroller , one advantage on this microcontroller is ,it does'nt require any External Programmers, Since it has inbuilt USB support .so guys lets get started
Step 1: Things Needed !
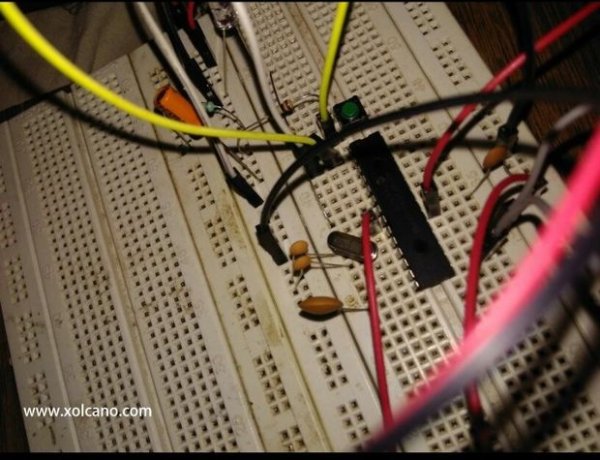
) PIC18F2550 (28pin) -1
2) Crystal 20Mhz -1
3) Capacitor -22pf -2
4) Resistor 470ohm - 2
5) USB B type PCB mount - 1
6) Capacitor 220nf - 1
7) Jumpers -few
8) LED - 1 or 2
9) Push button
10) Resistor 10K ohm - 1
Step 2: Circuit Diagram for Pinguino Board
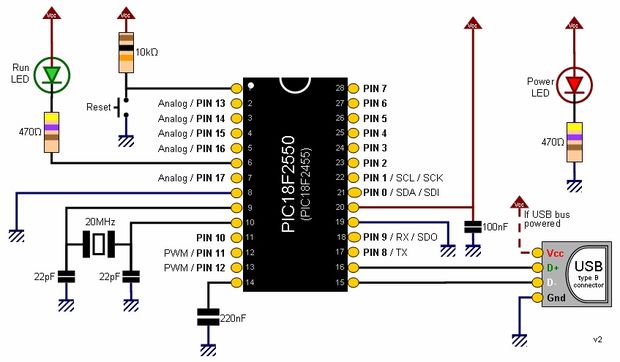
Connect all the components as shown in the circuit diagram on Breadboard or you can make your own PCB board , here i used Breadboard for my project.
For more detail: Pinguino Project (a PIC Microcontroller Based Arduino #No Programmer Required)
- What is this project about?
Building a PIC microcontroller based Arduino-compatible board (Pinguino) that can run Arduino programs using PIC18F2550 or PIC18F4550. - Which microcontrollers can be used?
PIC18F2550 or PIC18F4550 can be used. - Does this design require an external programmer?
No, it does not require an external programmer because the PIC18F2550/4550 has built-in USB support. - What crystal frequency is needed?
A 20MHz crystal is required. - How many 22pF capacitors are needed?
Two 22pF capacitors are needed. - What connector is used for USB?
A USB B type PCB mount connector is used. - Can this be built on a breadboard?
Yes, the components can be connected on a breadboard or assembled on a PCB. - Are there any passive components required?
Yes, resistors (470 ohm x2 and 10K ohm x1) and capacitors (220nF and two 22pF) are required.
Related projects
PICDEM FS USB CDC Evaluation Board using PIC18F4550 with Proteus Simulation
Introduction The PICDEM FS USB CDC Evaluation Board is a practical microcontroller project built around the PIC18F4550, designed to demonstrate USB communication...
Peripheral Tutorials · PIC18F4550PICDEM FS USB Mass Storage Device using PIC18F4550 with Proteus Simulation
Introduction This microcontroller project demonstrates how to simulate a USB Mass Storage Device (MSD) using the PIC18F4550 in a Proteus simulation environment....
Development Boards & Kits · PIC18F2550Pinguino Project: A PIC Microcontroller Based Arduino
This is a complete tutorial to make a PIC Microcontroller based Arduino. This is a complete tutorial to make PIC microcontroller based...
Programmers & ICSPCalculator Test using PIC24FJ64GA006 with Proteus Simulation
Introduction The Calculator Test using EASYHDL is a practical microcontroller project built on the PIC24FJ64GA006 and simulated in Proteus. This project demonstrates...
Programmers & ICSPPID Controlled Oven using TMS320F28027PT with Proteus Simulation
IntroductionThis project demonstrates a PID controlled oven implemented using a PICCOLO TMS320F28027PT microcontroller and verified through Proteus simulation.It is a practical microcontroller...
Programmers & ICSPPICCOLO Motor Controller Sample Design using TMS320F28023PT with Proteus Simulation
IntroductionThis project demonstrates a PICCOLO motor controller sample design implemented using the TMS320F28023PT Piccolo microcontroller and tested through Proteus simulation. It focuses...

Ibrar Ayyub
I am an experienced technical writer holding a Master's degree in computer science from BZU Multan, Pakistan University. With a background spanning various industries, particularly in home automation and engineering, I have honed my skills in crafting clear and concise content. Proficient in leveraging infographics and diagrams, I strive to simplify complex concepts for readers. My strength lies in thorough...