


This tutorial is about placing data in a specific ram(random access memory) location/address using xc8 compiler and mplabx ide. I am using microchip pic16f877 8-bit microcontroller in this tutorial. It has 8KB of rom (read access memory) and 368 Bytes of ram(random access memory). Its generally not recommended to place data in data memory(ram). Since data memory(ram) size is limited, few Kb’s. Our processor runs sequential routines to store and access data from data memory. Placing data in specific ram location/address disturbs these sequential routines and processor has to jump to specific address for storing and retiring our data. On the other hand it is useful in case if we want our data to be accessed and processed faster by processor. Since data in placed in ram, we do not need it to load from program memory. Thus time to fetch the data from program memory(rom) is reduced.
Do not reserve large chunks of addresses/locations for data in data memory(ram). If the data memory(ram) is flooded with the reserved addresses/locations, their will be no space left for variables/data that needs to be loaded in the memory while our program is running. I recommend to only place the data in memory which is continuously required by the system or data that is highly fetched by the processor for manipulation and generating output, and this output is directly related to the system performance.
We can use ‘@’ qualifier to access the address of microchip pic microcontroller ram using xc8 compiler. With ‘@’ qualifier we not only can access ram addresses, we can also access program memory(rom) address. In this project i am also using ‘@’ qualifier to access the ram location/address. Their are other two methods through which we can access the ram and rom but they are little difficult to manage. These two methods utilizes the compiler special directives.
- __section()
- __at()
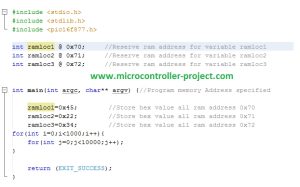
I am going to allocate address in ram of pic16f877 microcontroller. I am using mplabx with xc8 compiler for writing and compiling code. You can see the code syntax in the picture on right side.
Addresses 0x70, 0x71 and 0x72 are allocated for integer variables ramloc1, ramloc2 and ramloc3. Please see the syntax of the code its
- int ramloc @ 0x70;
In the main function variables are initialized with data. I initialized variables with hex data 0x45 =69(decimal), 0x22=34(decimal) and 0x34=52(decimal). Initializing with hex data is easy to see in the ram file registers of mplabx ide.
| /* | |
| * File: code.c | |
| * Author: Usman Ali Butt | |
| * Property off: www.microcontroller-project.com | |
| * Created on 19 March, 2017, 3:38 PM | |
| */ | |
| // PIC16F877 Configuration Bit Settings | |
| // 'C' source line config statements | |
| #include <xc.h> | |
| // #pragma config statements should precede project file includes. | |
| // Use project enums instead of #define for ON and OFF. | |
| // CONFIG | |
| #pragma config FOSC = EXTRC // Oscillator Selection bits (RC oscillator) | |
| #pragma config WDTE = OFF // Watchdog Timer Enable bit (WDT disabled) | |
| #pragma config PWRTE = OFF // Power-up Timer Enable bit (PWRT disabled) | |
| #pragma config CP = OFF // FLASH Program Memory Code Protection bits (Code protection off) | |
| #pragma config BOREN = ON // Brown-out Reset Enable bit (BOR enabled) | |
| #pragma config LVP = ON // Low Voltage In-Circuit Serial Programming Enable bit | |
| //(RB3/PGM pin has PGM function; low-voltage programming enabled) | |
| #pragma config CPD = OFF // Data EE Memory Code Protection (Code Protection off) | |
| // FLASH Program Memory Write Enable (Unprotected program memory may be written to by EECON control) | |
| #pragma config WRT = ON | |
| #include <stdio.h> | |
| #include <stdlib.h> | |
| #include <pic16f877.h> | |
| int ramloc1 @ 0x70; //Reserve ram address for variable ramloc1 | |
| int ramloc2 @ 0x71; //Reserve ram address for variable ramloc2 | |
| int ramloc3 @ 0x72; //Reserve ram address for variable ramloc3 | |
| int main(int argc, char** argv) {//Program memory Address specified | |
| ramloc1=0x45; //Store hex value all ram address 0x70 | |
| ramloc2=0x22; //Store hex value all ram address 0x71 | |
| ramloc3=0x34; //Store hex value all ram address 0x72 | |
| for(int i=0;i<1000;i++){ | |
| for(int j=0;j<10000;j++); | |
| } | |
| return (EXIT_SUCCESS); | |
| } |
 by
by Download the project code written in mplabx ide. Folder includes all the mblabx files. Please provide us your feed back on the project. If you have any queries please write them below in the comments section.
Related projects
PIC16F877 Driving LCD in 4-Bit Mode using PIC16F877 with Proteus Simulation
Introduction This microcontroller project shows how a PIC16F877 can drive an LCD display using 4-bit mode inside a Proteus simulation.The project demonstrates...
Programmers & ICSP · PIC16F877AEPE PIC/LCD Demo using PIC16F877 with Proteus Simulation
IntroductionThe EPE PIC/LCD Demo is a classic microcontroller project that demonstrates how a PIC16F877 can fully control a PG12864F graphical LCD.Designed as...
Motors & Robotics · PIC16F877AEfficient Sun-Following Robot: A Solar Tracker with Microcontroller Control
Abstract The impending global challenge of dwindling non-renewable fuel resources underscores the urgency of transitioning towards renewable energy alternatives like solar power....
IDEs & CompilersDownload Legacy MPLAB IDE 8 from Microchip
The original MPLAB® IDE 8 series is still relevant when maintaining older PIC® and dsPIC® projects that were created before MPLAB X...
IDEs & CompilersHow to Download MPLAB X IDE Safely
MPLAB® X IDE is used for developing, building, debugging and programming embedded applications across several Microchip device families. For an active firmware...
IDEs & CompilersDownload MPLAB IDE v8.92 from Microchip
MPLAB® IDE v8.92 belongs to the final generation of the original MPLAB IDE 8 development environment. It still appears in older PIC®...

Muhammad Bilal
I am a highly skilled and motivated individual with a Master's degree in Computer Science. I have extensive experience in technical writing and a deep understanding of SEO practices.