Summary of Making of PIC18F452 Micro-Controller Development/Generic Board
This article details the design and fabrication of a generic PIC18 microcontroller development board, specifically utilizing the PIC18F452. The project emphasizes the benefits of the PIC18 series over 8051 controllers, such as enhanced memory and instruction sets. It covers schematic design using Proteus software, component selection for serial communication and power regulation, and the physical PCB manufacturing process involving iron transfer and ferric chloride etching.
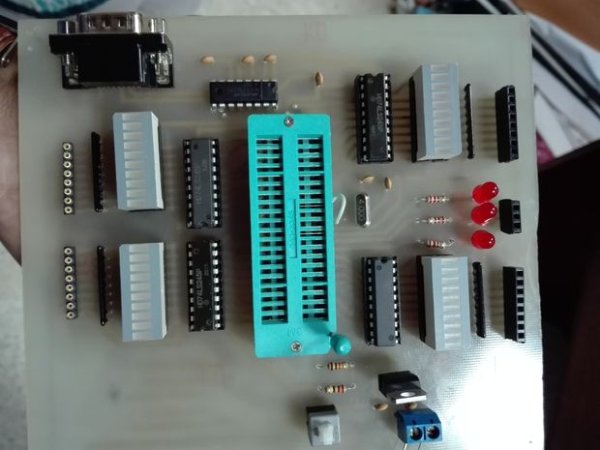
Parts used in the PIC18 Micro-controller Development Board:
- PIC18F452 Micro-Controller
- MAX232 (Multichannel RS232 Driver/Receiver)
- 74LS245 (Octal bus Transceiver)
- PIC18FXXX DIP40 Locking Socket
- 7805 (5V fixed 1A Positive Power Supply Regulator)
- BUTTON (SPST Push Button)
- Capacitor (Generic non electrolytic capacitor)
- Serial Port Connector CONN-D9M (9 Pin male D-Type)
- CONN-SIL2 (0.1 in pitch SIL connector strip)
- 3 pin Female Header CONN-SIL3
- 8 pin Female Header CONN-SIL8
- CRYSRTAL (Quartz Crystal)
- LED-BARGRAPH-RED (Red LED Bargraph Display)
- LED-RED (Animated LED Model red)
- RES (Generic resistor symbol)
- RESPACK-8 (8 way resistor pack with common)
- SWITCH
- Jumper Wires
- Our instructable shows how to create a generic board of PIC18 micro-controller which is further used in advanced embedded projects as there is a number of PIC micro-controller applications .e.g. microwave ovens, multimedia devices, medical and health based equipment e.g. blood-pressure meter, UPS, Power supplies, burglar alarms & detectors and other security and safety equipment.

-
- Now the question arises why we use PIC18 micro-controller? So the reason behind choosing PIC 18 series is that these controllers dramatically enhance the PIC core as the number of instructions are more than doubled with 16-bit instruction word, there are more external interrupts, radically different approach to memory structures, with increased memory size, enhanced address generation for program and data memory and bigger stack, with some user access and control. And PIC micro-controller is fast and easy to implement program when we compare other micro-controllers like 8051. The ease of programming and easy to interfacing with other peripherals PIC became successful micro-controller.
- why we choose to design a PCB for our project is because it has a lot of advantages such as all of the PCB components are fixed, there is a minimal chance of short circuits and wrong wiring, since it is computer generated, one can create uniform printed circuit boards using the same schematic layout. Thus, creating boards that are identical is effortless to make. The generic board of PIC 18 micro-controller is a low cost demo board for evaluation of PIC18 MCU families. PIC 18 is 8-bit architecture and has three different families standard PIC18, PIC18 J-series and PIC18 K-series so it is highest performance micro-controller. So our generic board supports various general purpose PIC 18 families.
- PIC18F452 Micro-Controller
- MAX232 (Multichannel RS232 Driver/Receiver industry standard)
- 74LS245 (Octal bus Transceiver)
- PIC18FXXX DIP40 Locking Socket
- 7805 (5V fixed 1A Positive Power Supply Regulator)
- BUTTON (SPST Push Button)
- Capacitor (Generic non- electrolytic capacitor)
- Serial Port Connector CONN-D9M (9 Pin male D-Type)
- CONN-SIL2 (0.1 in pitch SIL connector strip)
- 3 pin Female Header CONN-SIL3 (0.1 in pitch SIL connector strip)
- 8 pin Female Header CONN-SIL8 (0.1 in pitch SIL connector strip)
- CRYSRTAL (Quartz Crystal)
- LED-BARGRAPH-RED (Red LED Bargraph Display)
- LED-RED (Animated LED Model(red))
- RES (Generic resistor symbol)
- RESPACK-8 (8 way resistor pack with common)
- SWITCH
- Jumper Wires
Step 2: List of Materials for Making PCB
- Printed Circuit Board (PCB)
- Glossy Paper
- PCB Designs
- Iron
- Ferric Chloride
- Drill Machine
- Laser printer
- Soldering Wire
- Solder
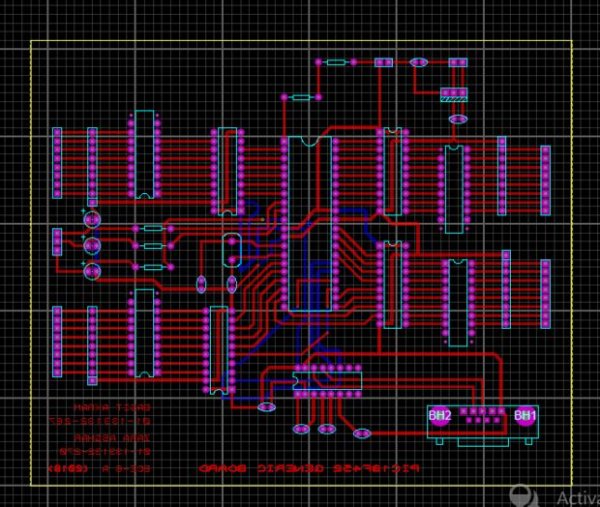
Step 3: Proteus Simulation PCB Designing (Software)

- We run a proteus simulation for our project first because it can further take us to PCB layout
First of all the given video can show you how to make a proteus project, schematic capture of the development board and PCB Layout.
- Now first select all the above mentioned devices
- Then place them to develop a schematic capture
- The wiring is shown in the figure where all the four ports of PIC18F452 are connected with 74LS245 which is an octal bus transceivers that are designed for asynchronous two-way communication between data buses. Then these 74LS245 transceivers are connected with LED Bars which is a 10 segment bar graph they are 10 individual red LEDs housed together, each with an individual anode and cathode connection and these LED Bars are further connected with RES-PACK-8(8 way resistor pack with common) while CONN-SIL8 is connected in between them.
- CONN-D9M is connected with MAX232 which is used in Serial communication it basically provides communication through a serial port, this is a versatile IC which is one of those wonderful components that solve so many signal conversion problems. The T1IN pin max232(input of transmitter data) is connected with pin 5 PORT C of PIC18F452.
- A Quartz Crystal along with two capacitors of 22pF is connected with pin 13 OSC1/CLK1 and pin 14 OSC2/CLK0 of PIC18F452.
- A regulated power supply is very much essential for several electronic devices due to the semiconductor material employed in them have a fixed rate of current as well as voltage. So we use linear voltage regulator 7805 along with capacitors of 1nF. The input and output pins of the regulator are connected with CONN-SIL2
- We have one port on PIC18F452 with three input/outpur registers for them we use separate LEDs and connect them with three respective resistors of 220 and in between them there is CONN-SIL3 and the LEDs are grounded from the other side.
- After this run the proteus file in order to check wiring errors
For more detail: Making of PIC18F452 Micro-Controller Development/Generic Board
- Why is the PIC18 series chosen for this project?
The PIC18 series is selected because it dramatically enhances the PIC core with doubled instructions, 16-bit word size, more external interrupts, increased memory size, and easier programming compared to other micro-controllers like 8051. - What are the advantages of designing a PCB for this project?
Designing a PCB ensures all components are fixed, minimizes short circuits and wiring errors, allows for uniform boards using computer-generated layouts, and makes creating identical boards effortless. - How is the MAX232 connected in the schematic?
The T1IN pin of the MAX232 is connected with pin 5 PORT C of the PIC18F452 to provide communication through a serial port. - What components are required for the Quartz Crystal connection?
A Quartz Crystal along with two capacitors of 22pF is connected with pin 13 OSC1/CLK1 and pin 14 OSC2/CLK0 of the PIC18F452. - How is the regulated power supply implemented?
A linear voltage regulator 7805 is used along with capacitors of 1nF to ensure a fixed rate of current and voltage for the electronic devices. - What role does the 74LS245 play in the circuit?
The 74LS245 is an octal bus transceiver designed for asynchronous two-way communication between data buses, connecting the four ports of the PIC18F452 to the LED Bars. - Which software is used for simulation before PCB layout?
Proteus simulation software is run first to check wiring errors and create the schematic capture and PCB layout. - What materials are needed to physically make the PCB?
The materials include a Printed Circuit Board, Glossy Paper, PCB Designs, Iron, Ferric Chloride, Drill Machine, Laser printer, Soldering Wire, and Solder.