Summary of LCD Interface With PIC16F877A Microcontroller
This article guides users on interfacing a 16x2 LCD with a PIC16F877A microcontroller using the 4-bit data method. It outlines necessary hardware components, provides a schematic for connections including contrast adjustment via a potentiometer, and instructs on setting up MPLAB X IDE with specific libraries and code examples to display text on the screen.
Parts used in the LCD Interface With PIC16F877A Microcontroller:
- PIC16F877A or any PIC MCU
- Any 16x2 LCD
- Breadboard
- Breadboard wires
- Soldering station
- MPLAB X IDE from Microchip
- PICKit 3 or PICkit 4
- Potentiometer
PIC MCUs and other MCUs can control such LCDs easily using either 8 data bits method or just 4 data bits, which we will be using today.

Parts needed are:
1- PIC16F877A or any PIC MCU.
2- Any 16×2 LCD.
3- Breadboard.
4- Breadboard wires.
5- Soldering station -> just to prepare the LCD itself with pins.
6- MPLAB X IDE from Microchip.
now you are ready to start.
Step 1: Video Tutorial
Please first watch this entire video tutorial (4 mins) to see the code and practical example.
Now, kindly refer to further steps.
Step 2: Schematic
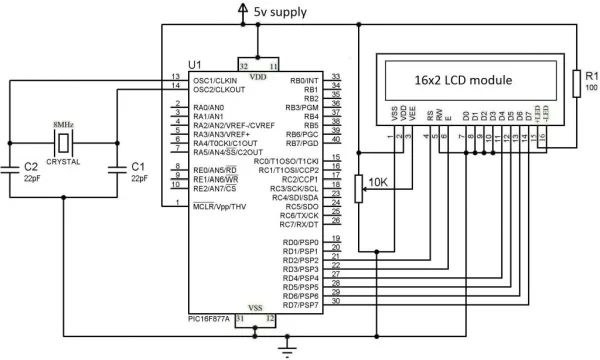
Schematic is easy as seen in picture attached!
we need to use LCD pins D4, D5, D6, and D7 with PIC16F877A pins D4, D5, D6, and D7 respectively.
also, connect power and ground to both the PIC and LCD.
Connect power and ground to a potentiometer then wire the middle pin (variable part) to Vee pin of the LCD to be able to adjust the contrast.
Now after powering the whole thing with 5v, we are ready to code.
Step 3: LCD Library
But before the actual code itself, we need to use this awesome library:
be sure to open mplab x, then inside your project make a file called “lcd.h” then paste the contents of this link into it.
Save and now to the actual code!!
Step 4: Full Code
Full code is shown in here: https://pastebin.com/JK6e4BdF
first you have to initialize the PIC itself by entering the correct crystal settings and configuration bits as shown in my previous tutorial of this series.
then you may enter the while (1) loop to put what you want. However, don’t forget to include the lcd.h library mentioned in previous step.
and by now you are done! you may use other tricks and commands with the LCD all by using the exact same method and library.
Source: LCD Interface With PIC16F877A Microcontroller
- How many data bits are used for this project?
The project uses either an 8 data bits method or just 4 data bits. - Which pins connect the LCD to the PIC16F877A?
LCD pins D4, D5, D6, and D7 connect to PIC16F877A pins D4, D5, D6, and D7 respectively. - What is the purpose of the potentiometer in the circuit?
The potentiometer connects to the Vee pin of the LCD to adjust the contrast. - How do you create the required library file?
You must open MPLAB X, create a file named lcd.h inside your project, and paste the contents from the provided link into it. - What voltage powers the entire setup?
The whole thing is powered with 5 volts. - Can other tricks be used with the LCD after this setup?
Yes, you can use other tricks and commands with the LCD by using the exact same method and library. - What configuration steps are needed before coding?
You must initialize the PIC by entering the correct crystal settings and configuration bits.