I recently bought The Energy Detective (TED), a pretty inexpensive and friendly way to keep tabs on your whole house’s electricity usage. It’s a lot like having a more featureful version of your utility company’s power meter, sitting on your kitchen counter. It can estimate your utility bill, and tell you how much electricity and money you’re using in real-time. The resolution is pretty good- 10 watts, 1 second.
As a product, I’ve been pretty happy with it. It does what it claims to, and the measurements seem to be fast and accurate. Of course, being the crazy hacker I am, I wanted to interface TED with other things. I don’t have a home automation system as such, but I did want to get real-time graphs of my electricity usage over various time periods. I also wanted the possibility to use TED as an information feed for various other display devices around the house. (But that’s a topic for another blog post…)
 The stock TED package consists of two pieces: A measurement/transmit unit (MTU) and receive/display unit (RDU). The MTU has a pair of current transformers, and it installs entirely in your house’s breaker panel. It takes the power readings every second, and transmits them over the power lines to the RDU, which is just a little LCD panel that plugs into the wall. The RDU has a USB port, which you can use with TED’s “Footprints” software.
So, hoping that the USB port would do what I want, I bought the Footprints software for $45. The TED system itself is, in my opinion, a really good value. The Footprints software is not. As a consumer, I was disappointed by two main things:First of all- the UI lacks any polish whatsoever. It looks like a bad web page from the 90’s. Second of all, the data collection is not done in hardware, it’s implemented by a Windows service. This means you can’t collect data to graph unless you have a Windows PC running. Not exactly a power-efficient way to get detailed power usage graphs.
As a hobbyist, a few more things frustrated me about Footprints. The implementation was pretty amateurish. Their Windows service runs a minimal HTTP server which serves up data from an sqlite database in XML. The front end is actually just a Flash applet masquerading as a full application. Energy Inc, the company behind TED, has an API for Footprints: but you have to sign a legal agreement to get access to it, and I wasn’t able to get any details on what the API does and doesn’t include without signing the agreement. So, I opted not to. It would be much more fun to do a little reverse engineering…
So, I did. The end result is that I now have two ways of getting data out of my TED system.
Using the USB port
The TED RDU’s USB port is actually just a common FTDI usb-to-serial adapter. The RDU sends a binary packet every second, which includes all of the data accessible from the Footprints UI. This includes current power usage, current AC line voltage, utility rates, month-to-date totals, and anything else you’ve programmed into your RDU.
There has been some prior work on reverse engineering this protocol. The Misterhouse open source home automation project has a Perl module which can decode the TED messages.
Unfortunately, the Perl module in Misterhouse won’t work with more recent versions of the RDU like mine. The recent RDUs have a different packet length, and they require a polling command to be sent before they’ll reply with any data.
I found the correct polling command by snooping on Footprints’ serial traffic with Portmon. I also noticed a packet framing/escaping scheme, which explains some of the length variations that would have broken the module in Misterhouse.
The result is a Python module for receiving data from a TED RDU. It isn’t terribly featureful, but it should be pretty robust.
- Get the latest TED Python Module from my Subversion repository.
Direct from the wall socket
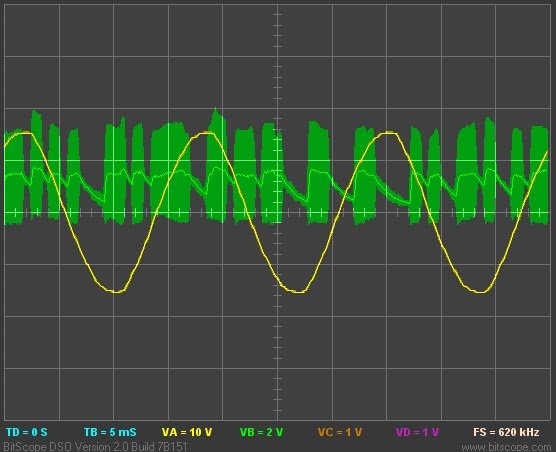
Now for the more exciting method: What about reading data directly from the power line, without using the TED receive/display unit at all? This could provide some exciting opportunities to embed a small and cheap TED receiver inside of other devices, and it would provide some insight on what exactly is being transmitted by the box in my breaker panel.
The TED RDU is pretty simple internally: A Dallas real-time clock, PIC18 microcontroller, chip-on-glass LCD, some buttons, and the TDA5051A, a single-chip home automation modem from Philips. This chip can receive and transmit ASK modulated signals at 1200 baud, with a carrier frequency of around 132 kHz.
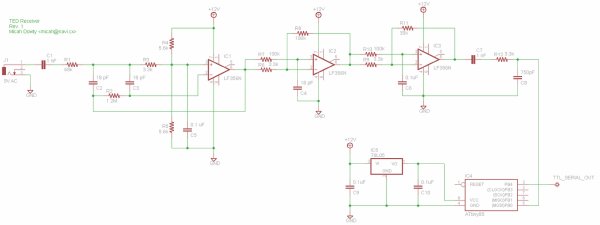
Digi-key carries the TDA5051A, but I figured it would be more educational (and more hobbyist-friendly) to try and build a simpler receiver from scratch using only commonly available parts.
For more detail: Interfacing with The Energy Detective