Summary of INTERFACING LCD WITH 8051 MIROCONTROLLER with code
This article details interfacing an LCD 16x2 display with an 8051 microcontroller in 8-bit mode. It covers hardware connections, initialization sequences, command/data writing functions, and code for static text and rolling display effects. The guide emphasizes timing delays for power-on initialization and command execution to ensure proper operation.
Parts used in the 8051 LCD 16x2 Interface Project:
- LCD 16x2 Display
- 89c51 Microcontroller
- Data Port (PORT1)
- Register Select Pin (PORT2.0)
- Read/Write Pin (PORT2.1)
- Enable Pin (PORT2.2)
Introduction
LCDs (Liquid Crystal Displays) are used for displaying status or parameters in embedded systems.
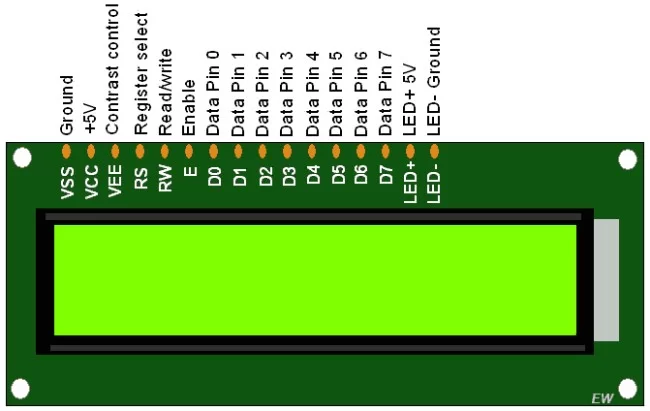
LCD 16×2 is 16 pin device which has 8 data pins (D0-D7) and 3 control pins (RS, RW, EN). The remaining 5 pins are for supply and backlight for the LCD.
The control pins help us configure the LCD in command mode or data mode. They also help configure read mode or write mode and also when to read or write.
LCD 16×2 can be used in 4-bit mode or 8-bit mode depending on the requirement of the application. In order to use it we need to send certain commands to the LCD in command mode and once the LCD is configured according to our need, we can send the required data in data mode.
For more information about LCD 16×2 and how to use it, refer the topic LCD 16×2 display module in the sensors and modules section.
Interfacing Diagram

Hardware Connection:
| LCD 162 Pins | 89c51 Pins |
|---|---|
| data pins D0-D7 | PORT1 |
| RS | PORT2.0 |
| RW | PORT2.1 |
| E | PORT2.2 |
Programming LCD16x2
Initialize LCD16x2
It is very easy to initialize LCD
- Power ON LCD
- Wait for 15ms, Power on initialization time for LCD16x2
- Send 0x38 command (initialize. 2 line, 5×8 matrix, 8-bit mode)
- Send any Display ON command (0x0E, 0x0C)
- Send 0x06 command (increment cursor)
void LCD_Init (void)		/* LCD Initialize function */
{
	delay(20);		/* LCD Power ON Initialization time >15ms */
	LCD_Command (0x38);	/* Initialization of 16X2 LCD in 8bit mode */
	LCD_Command (0x0C);	/* Display ON Cursor OFF */
	LCD_Command (0x06);	/* Auto Increment cursor */
	LCD_Command (0x01);	/* Clear display */
	LCD_Command (0x80);	/* Cursor at home position */
}
Now we successfully initialized LCD & it is ready to accept data to display.
Command write function
- Send command to data port
- Make RS pin low, RS=0 (command reg.)
- Make RW pin low, RW=0 (write operation)
- Give High to Low pulse at Enable (E) minimum of 450ns.
When we give Enable pulse, LCD latch the data present at D0 to D7 & execute a command as RS is command reg.
void LCD_Command (unsigned char cmd)	/* LCD16x2 command funtion */
{
	lcd_data_port= cmd;
	rs=0;				/* command reg. */
	rw=0;				/* Write operation */
	en=1;
	delay(1);
	en=0;
	delay(5);
}
Data write function:
- Send command to data port
- Make RS pin low, RS=1 (data reg.)
- Make RW pin low, RW=0 (write operation)
- Give High to Low pulse at Enable (E) minimum of 450 ns
When we give Enable pulse, LCD latch the data present at D0 to D7 & display it on the 5×8 matrix as RS is data reg.
void LCD_Char (unsigned char char_data)	/* LCD data write function */
{
	lcd_data_port=char_data;
	rs=1;				/*Data reg.*/
	rw=0;				/* Write operation*/
	en=1;
	delay(1);
	en=0;
	delay(5);
}
Note:
- LCD Power on delay: after power on, we can’t send commands immediately, LCD16x2 needs self-initialization time 15ms. While programming we need to take care of providing sufficient power on delay> 15ms, and then send command to LCD.
- After providing commands to execute, LCD16x2 takes time in microseconds but for 0x01 command (Clear display), it takes 1.64ms to execute. So after giving this command, we need to give sufficient delay> 1.63milliseconds.
Program:
/*
LCD16x2 8 bit 8051 interface
http://www.electronicwings.com
*/
#include<reg51.h>
sfr lcd_data_port=0x90; /* P1 port as data port */
sbit rs=P2^0; /* Register select pin */
sbit rw=P2^1; /* Read/Write pin */
sbit en=P2^2; /* Enable pin */
void delay(unsigned int count) /* Function to provide delay Approx 1ms */
{
int i,j;
for(i=0;i<count;i++)
for(j=0;j<112;j++);
}
void LCD_Command (unsigned char cmd) /* LCD16x2 command funtion */
{
lcd_data_port= cmd;
rs=0; /* command reg. */
rw=0; /* Write operation */
en=1;
delay(1);
en=0;
delay(5);
}
void LCD_Char (unsigned char char_data) /* LCD data write function */
{
lcd_data_port=char_data;
rs=1; /* Data reg.*/
rw=0; /* Write operation*/
en=1;
delay(1);
en=0;
delay(5);
}
void LCD_String (unsigned char *str) /* Send string to LCD function */
{
int i;
for(i=0;str[i]!=0;i++) /* Send each char of string till the NULL */
{
LCD_Char (str[i]); /* Call LCD data write */
}
}
void LCD_String_xy (char row, char pos, char *str) /* Send string to LCD function */
{
if (row == 0)
LCD_Command((pos & 0x0F)|0x80);
else if (row == 1)
LCD_Command((pos & 0x0F)|0xC0);
LCD_String(str); /* Call LCD string function */
}
void LCD_Init (void) /* LCD Initialize function */
{
delay(20); /* LCD Power ON Initialization time >15ms */
LCD_Command (0x38); /* Initialization of 16X2 LCD in 8bit mode */
LCD_Command (0x0C); /* Display ON Cursor OFF */
LCD_Command (0x06); /* Auto Increment cursor */
LCD_Command (0x01); /* clear display */
LCD_Command (0x80); /* cursor at home position */
}
void main()
{
LCD_Init(); /* initialization of LCD*/
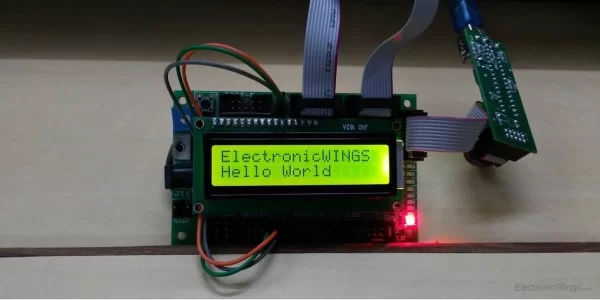
LCD_String("ElectronicWINGS"); /* write string on 1st line of LCD*/
LCD_Command(0xC0);
LCD_String("Hello World"); /*write string on 2nd line*/
while(1); /* Infinite loop. */
}
Program Output
Rolling Display
To roll the string or character on the LCD, we need to use following commands
| Command | meaning |
|---|---|
| 0x1c | Shift entire display right |
| 0x18 | Shift entire display left |
For rolling the display, simply we have to put these command in loops.
Rolling Display:
- Display string on the LCD
- Roll it to the right using the ‘0x1C’ command
- Roll it to the left using the ‘0x18’ command
Main function code
void main()
{
  unsigned char i,shift;
	delay(5);
	LCD_Init();			/* initilize LCD */

	LCD_String("ElectronicWings");  /* display string */
	delay(1000);

	shift=15;			/* number of time shifts count=15 */

while(1)
{
	for(i=0;i<shift;i++)
  {
		LCD_Command(0x1c);  	/* shift display right */
		delay(300);
  }

	shift=30;			/* number of time shifts 30 */

  for(i=0;i<30;i++)
  {
		LCD_Command(0x18);  	/* shift display left */
		delay(300);
  }
 }
}
Video:
LCD16x2 Rolling Display
Supporting Files
- LCD Datasheet Download 336
- How do I initialize the LCD 16x2?
Power on the LCD, wait more than 15ms, send command 0x38, then send commands for display ON, cursor increment, clear display, and home position. - Can I use the LCD in 4-bit mode?
The article states the LCD can be used in 4-bit or 8-bit mode depending on application requirements, though the provided code uses 8-bit mode. - What is the purpose of the RS pin?
The Register Select pin configures the LCD into command mode when low or data mode when high. - Does the LCD require a delay after power on?
Yes, the LCD needs a self-initialization time greater than 15ms before sending commands. - How do I shift the display to the right?
Send the command 0x1c within a loop to shift the entire display to the right. - What command clears the display?
The command 0x01 is used to clear the display, which takes approximately 1.64ms to execute. - How do I write a string to a specific row and column?
Use the LCD_String_xy function, which sends a command to set the cursor position based on the row and position arguments before calling the string function. - What happens if I do not provide sufficient delay after the clear command?
The LCD may not execute the clear command correctly as it requires over 1.63 milliseconds to complete.