Summary of CONTROLLING A LED WITH ESP32-C3-DEVKITM-1 DEVELOPMENT BOARD USING ESP-IDF
This article explores the onboard RGB LED functionality of the ESP32-C3-DevKITM-1 development board, highlighting its addressable WS2812 LED controlled via GPIO8. Utilizing the ESP-IDF framework, it demonstrates programming for various LED blinking applications including single blink, color and pattern control, input-based control, and external LED blinking. The article provides step-by-step instructions for setting up and running LED blink examples, showcasing the board's capabilities for IoT projects through practical LED control.
Parts used in the ESP32-C3-DevKITM-1 LED Control Project:
- ESP32-C3-DevKITM-1 development board
- Onboard WS2812 addressable RGB LED
- GPIO8 (general-purpose input/output pin for LED control)
- ESP-IDF software development framework
In this article, we will explore another onboard functionality of Espressif’s ESP32-C3-DevKITM-1 which is the onboard RGB LED. With its powerful connectivity, compact size at such a low cost the ESP32-C3- DevKit M-1 board is a must-try for your next IoT project. You can read the official documentation of the development board as well.
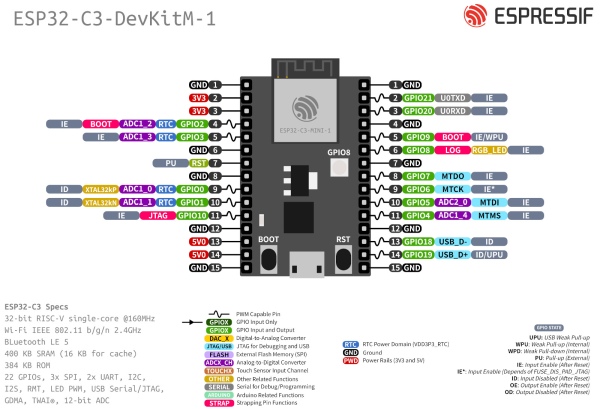
The board features an onboard addressable RGB LED (WS2812), driven by GPIO8 which can be configured to glow in different colors based on the RGB value of the color given. ESP-IDF being the native software development framework for ESP boards with all API, Toolchain scripts are preinstalled. In this article, we focus on the programming of ESP32-C3 using ESP-IDF.
We will program the ESP32-C3-DevKITM-1 module for the following blink applications:
- Single Blink Example
- LED color and pattern
- Led control on Input
- External LED blink
Let’s see all these one by one:
1. Single Blink LED Use Case On ESP32-C3-DevKITM-1
Step1: Launch your ESP-IDF CMD Application.
Step2: By default, you will be in the esp-idf home directory, change the directory by using cd.. command.
Step3: Use xcopy /e /i %IDF_PATH%\examples\get-started\blink blink command. This makes a copy of the blinking folder situated in the examples folder of the esp-idf home directory in the current location.
Read more: CONTROLLING A LED WITH ESP32-C3-DEVKITM-1 DEVELOPMENT BOARD USING ESP-IDF