Have you ever thought that most of our perception about the robot is based on the Hollywood movie! The famous 3CPO and R2D2 from Star Wars until the little cute garbage compacting robot named WALL-E; all of these machines are example of our dreams or should I say our quest to what we all think about the robot should be. Although the robot that we are going to build here is still far away from the technologies shown on those movies but at least it will give you an introductory to the robotics world. On this tutorial we will build BRAM which stand for Beginner’s Robot Autonomous Mobile, BRAM construction is designed to be easily built using some of the parts that you could easily found at home, this time we will use Microchip 8-Bits midrange PIC16F690 microcontroller as the BRAM’s brain.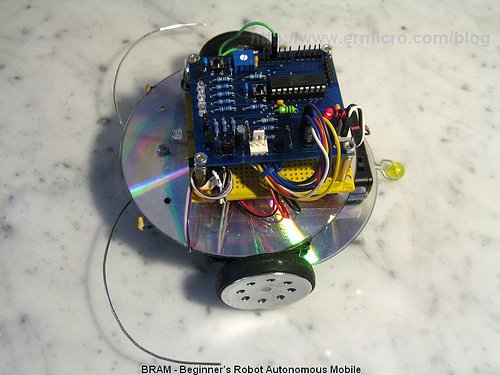
The first autonomous mobile robot is built by William Grey Walter around 1950 at the Burden Neurological Institute in Bristol as part of his research to model brain’s neuron. He built these three wheels robots named ELMER and ELSIE (Electro Mechanical Robot, Light Sensitive) which consists of just two electronic vacuum tubes that represent a simple 2 neurons, remember on those days transistors is just in their earlier stages; these two tube work as two stage amplifier to control a relays that connected to the two DC motors for the robot steering and locomotion.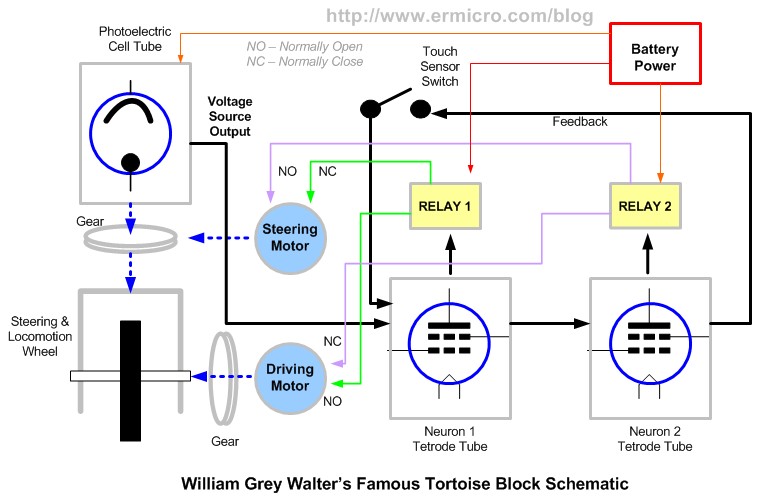
The steering motor also connected to the photoelectric cell tube sensor and only rotates in one direction. On the dark environment the steering and the driving motor will turn slowly; when the photoelectric cell capture a bright enough light, the steering motor will stop rotate (relay 1 on) and the robot move toward it (light attracted). When the light becomes too bright, the steering motor starts to rotate (relay 2 on) and the robot simply turn away from the light (light avoided). The touch sensor switch is connected to the clear plastic shell (that’s why it’s being called tortoise, because it looks like a tortoise shell) that covered the robot’s body. When the shell bumped to the object, the two stages amplifier will start to oscillate because of the feedback signal generated by the closed touch switch until the robot successfully avoid the obstacle.
Using just a simple electronics neurons model, William Grey Walker is able to show a complex behavior caused by the combination of stimulus (sensors) and the interaction between these two electronics neuron. His works later on inspired many young generation roboticists such as Rodney A. Brooks (subsumption architecture) and Mark Tilden (BEAM) who pioneering a new approach to the robot’s artificial intelligent or known as the nature behavior based artificial intelligent.
BRAM Chassis Construction
BRAM chassis use two CDs, the lower deck is use to hold the geared DC motor, battery power, caster and the robot’s bumper switches (whiskers) while the upper deck hold the robot’s motor driver, sensor’s board and the PICJazz 16F690 board. The following are the list of BRAM’s construction material parts:
- Two CD/DVDs for the chassis
- Two geared DC motor rated 4.5 to 5 volt with the wheel or you could use the modified servo motor (it’s a servo motor without the electronics’s control board)
- One 3 x 1.5 volt AA battery holder with on-off switch
- One plastic bead (usually it use for the neck less) and one paper clip for the caster
- Two microswitches and two paper clips for the whisker or bumpers sensor (not shown on the above picture).
- Nuts, bolts, PCB (printed circuit board) holders, double tape to hold all of these parts together.
Through these series of the pictures bellow you will get an idea of how to assemble BRAM’s parts; the first two picture show you how to assemble the BRAM’s caster and whisker:
For more detail: Building BRAM your first Autonomous Mobile Robot using Microchip PIC Microcontroller – Part 1