Summary of Borkbit: A Wifi-Enabled Smart Collar
The article describes "Borkbit," a smart wearable device for pets that tracks their location and activity using a GPS module and a 9-DOF IMU, with data processed by a PIC32 microcontroller. Information is sent via an ESP8266 WiFi module to a local webpage displaying the pet's location on a map and velocity. Although heart rate monitoring and remote server integration were explored, they were not fully implemented. The design prioritizes compact hardware, wireless communication, and user accessibility through WiFi, aiming to provide comfort for pet owners who are away from their pets.
Parts used in the Borkbit Smart Collar:
- PIC32 Microcontroller (development board)
- Adafruit Ultimate GPS Breakout Module (MTK3339 chipset)
- BNO055 9-DOF IMU Sensor
- Adafruit ESP8266 Huzzah WiFi Module
- Portable 5V Power Bank (phone charger)
- Pulse (heart rate) sensor (not included in final integration)
- Breadboard for wiring and assembly
Introduction
“A smart, wearable device for your pet.”
Borkbit is a smart, wearable device for pets that helps owners track their pets from afar. As any pet owner can attest, being away from one’s animal friend is difficult. Today, an increasing number of people are living away from their families, working eight to ten hours a day, going to college, and travelling. However, the number of people wanting to keep pets is also increasing. There are currently few ways for pet owners to keep track of their pet’s whereabouts, activity, and diagnostics from a distance. Our solution is a smart device that can be attached to the collar or the clothing of a pet. The device tracks the pet’s location using a GPS module and activity using an IMU. This information is collected and parsed on a PIC32, which processes the data and then sends it to a webpage using a WiFi module. All of the breakout boards can easily be packed into a wallet-sized package, and can be powered with a standard 5V portable phone charger. The user can view the latest statistics for their pet by navigating to the webpage and refreshing it. The webpage also displays a map with a marker for the pet’s location.
Currently, our project writes to a webpage on a local IP address, but we have also had success writing to a remote IP address and integrating a heart rate sensor. In the interest of time, we have not yet integrate these features yet, but have experimented with them, and plan to include them in the future!
We hope that our project can bring comfort and happiness to pet owners by allowing them to have access to regular updates on their pets from afar. The device is aimed at pet owners who often spend time away from their pets, such as people who live by themselves, people who send their pets to daycare, students, frequent travellers, and more. The device can obviously also be used for inanimate objects such as vehicles, backpacks, and other belongings.
High Level Design
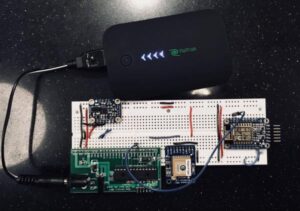
Our system consists of the PIC32 microcontroller (mounted on a small development board), a portable power bank, and three peripheral devices — a GPS module, a 9-DOF IMU, and an ESP8266 WiFi module. The GPS module and IMU are connected to the PIC32, which takes in readings from all three peripherals. It then cleans the data received by either parsing it, or performing computation on it, and packages it into a single string, which is communicated over UART to the WiFi module. The WiFi module connects to a pre-programmed WiFi network, and displays the information received as a webpage on a local IP address. The GPS module communicates a string to the PIC32 over UART, while the IMU sends values for acceleration in the x, y and z axes using the I2C protocol.
Since our design is more dependent on peripheral devices than analog circuitry, the hardware design of our project consisted mostly of wiring the components together in a compact manner onto a single breadboard, such that it could be suitable for use on a pet, and ensuring that all components were supplied with the correct voltage. The software design consisted of separate threads for receiving data from the GPS and IMU, sending data to the WiFi module, and an ISR for computing the heart rate using the input from the pulse sensor. Our project uses several standard protocols, such as UART, NMEA, I2C, and WiFi. The use of these protocols, as well as legal considerations are discussed in more detail in later sections.

Detailed System Design
PIC32 Software
GPS Module and Thread
The Adafruit Ultimate GPS Breakout was used to provide current geolocation data of the pet, including time, latitude, and longitude, at all times. The breakout board utilizes a MTK3339 chipset, a high-quality and low-power GPS module able to track up to twenty-two satellites and perform location updates at a rate of up to 10 Hz. The GPS module sends a steady stream of NMEA data (a standard data format for GPS) to the PIC32 via UART2 at the default 9600 baud rate, which were then parsed to extract time, latitude, and longitude values in the GPS thread.
The GPS thread spawns a thread which calls a function, PT_GetSerialBufferGPS, defined in the GPS_UART.h file. This function reads and parses the UART2 input buffer. The thread yields to other threads until data is available in the UART2 buffer. Once a byte is available, it reads it and stores in a character buffer. If the character received is a newline character, ‘\n’, it signals the end of the string, and the buffer is zero-terminated. Otherwise, if the character received is a backspace, the buffer is checked for underflow. If neither of these conditions takes place, the buffer index is incremented and the character received is added to the buffer.
Once the entire NMEA sentence is collected in the buffer, it is verified and parsed. Each NMEA sentence start with the ‘$’ character and a short tag to identify the message type followed by multiple data fields delimited by commas. For this project, we only read $GPGGA sentences, although the GPS module outputs several types of messages, since they contain all the information we needed to know: time, latitude, and longitude. In order for the data to be valid, the sentence must begin with “$GPGGA”. The program checks that this condition is true, and if so, it sets a flag high and clears the string received. Once the program has verified the start and end of the sentence, it parses the string to retrieve the current time, latitude, longitude from the string, and makes conversions to the required units by performing some basic math on the values retrieved. The time is converted from UTC to EST, and represented in military time, while the latitude and longitude are represented as floats in degrees. The latitude and longitude floating point values were accurate up to six decimal places, since that was required to narrow the location down to a specific street or building.
The GPS_UART.h functions PT_GetSerialBufferGPS() and parse() were adapted from Junyin Chen’s and Haonan Liu’s project “GPS Navigator for Runners” (citation below), which used the same GPS module.
IMU Module and Thread
A BNO055 IMU was used to detect movement of the collar. The 9-DOF IMU interfaces with the PIC32 using the I2C protocol. The IMU outputs accelerometer, gyroscope, and magnetometer readings that can be used to make sophisticated measurements for yaw, pitch, and roll for the device it is mounted on. Originally, we had intended to use the IMU to facilitate step counting on the device, however, since that data may not necessarily be accurate or useful when the collar is placed on a pet, we instead chose to use the accelerometer on the IMU to calculate the speed at which the device is moving at any given time.
The IMU thread on the PIC32 utilizes a I2C helper function to read accelerometer values in the x, y, and z direction. Each value is subtracted from the previously read value for the corresponding axis, and compared to a threshold (set to 5 for our purposes) to ensure data integrity. If the data read fulfilled our condition, i.e. the difference between two consecutive readings must be less than the threshold, it was used to set a flag that indicates whether or not the device is in motion.
The accelerometer data is stored in variables which are updated on every execution of the loop. Buffers are used to keep track of the last 20 observed values for x, y, and z accelerometer readings, as well as a fourth buffer to keep track of at what time these measurements were taken using the PT_GET_TIME(). The entries in each array are summed and averaged to use in the formula v = v0 + at, where a is the average acceleration and t is found by subtracting the first and last entries in the time buffer. The initial velocity, v0, was initialized to 0 and updated to the current velocity at the end of execution of the thread loop.This method of calculating velocity is likely not very accurate, as it makes use of several approximations, but works adequately for our purpose, which is determine if the device is at rest or in motion.
In order to receive data over I2C, we utilized macros and helper functions from a previous ECE 4760 project by Ashley Xue, Jessica Chen, and Adam Chung, as referenced below. A file, i2cIMU.h defines the device address and the different data registers on the IMU, and the helper function i2c1ConsecutiveRead() is used to read from two consecutive registers on the IMU. It does so by taking in a start register address, and the number of registers to be read (which is always 2). It returns a short, with the value from the first register stored in the LSB and the value from the second register stored in the MSB.
WiFi Module and Thread
The Adafruit ESP8266 Huzzah breakout board was used to provide WiFi connectivity to the device. The ESP8266 communicates with the PIC32 using UART1.
On the PIC32, the WiFi thread communicates the parsed data from the GPS module and velocity calculated from the IMU readings to the ESP8266 by writing to the UART1 buffer. This is done by spawning a thread that uses the PutSerialBuffer() helper function to write the UART1 output buffer.
This thread was implemented with the help of sample code from the ECE 4760 website, and the PutSerialBuffer() function was adapted from the file pt_cornell_1_2_2 to use the UART1 channel instead of UART2. The ESP8266 was programmed using the Arduino IDE, and this is discussed in further detail in the “WiFi Module Software” section.
Main
The main function performs a series of important tasks required for the functionality of the rest of the program. It opens the I2C1 channel, and configures the IMU by writing the device address to it, writing the address of the operation mode register, and setting which mode to use in that operation mode register. The mode used was “fusion”, which allowed us to get the degrees relative to the IMU for pitch, yaw, and roll. This was done using a helper function, configIMU().
The main function also configures, initializes, and schedules the protothreads using a round-robin scheme, in addition to enabling system-wide interrupts (required for full protothreads functionality. Additionally, we also opened and configured Timer 2 in main, since we implemented an ISR for a pulse sensor to compute heart rate, but we did not include the hardware for this part in the final project.
WiFi Module Software
The ESP8266 Huzzah breakout can be programmed using NodeMCU’s Lua interpreter (which comes pre-programmed), an Arduino IDE, or by sending AT commands via serial. For ease of use, we chose to program our module using the Arduino IDE. For this project, we wrote an Arduino sketch to read incoming serial data from the PIC and save it to a HTML file which was then displayed on a local server. The program uses the Adafruit ESP8266 libraries ESP8266WiFi, ESP8266WebServer, and WiFiClient to handle the backend processes of setting up a web server and client.
The wifi module program first connects to a pre-programmed wifi network whose network name (SSID) and password are written in the sketch, waits for a connection, and prints out the IP address to the serial monitor once the module is connected. The module then starts a web server, with a subdirectory, “/temp”, which displays the real-time values of your pet’s velocity and GPS coordinates along with the timestamp for when they were taken. To view the web page, simply open up a browser window and type in the IP address followed by “/temp”. We define the helper function getSerial(), which reads the serial buffer input from the PIC and stores it in a character buffer which will be printed to the web page. The server.on() function calls getSerial() everytime the web page is refreshed and sends the updated version of the data string.
In addition to displaying the current values of the pet’s GPS location and velocity, we also wanted the webpage to embed a map that actually shows the pet’s current location. To do that, we would have to parse the serial input string to extract the latitude and longitude coordinates. Therefore, we wrote a second sketch which implemented this functionality. In this program, the module again starts a web server, but this time adds two subdirectories, one (“/borkbit”) which displays the real-time values of your pet’s velocity and GPS coordinates, and the other (“/map”), which displays a map marking the current location of your pet.
We define a new helper function in the sketch: makeMap(), which sends a String containing the HTML code to embed the Google API map to the server. We also modify the helper function getSerial() described above, which reads the serial buffer input from the PIC, parses it to extract GPS and velocity data, and stores these values in global variables. The photos below show what web pages look like.
The map has a window of roughly 0.4 mile by 0.2 mile, which we felt was a good point of view to see the exact location of your pet but was not too close to lose geographic context. The map location was also quite accurate, as we will discuss in the next section. Due to how we parse the serial input buffer in this second sketch, the data values do not update as quickly on the website, and so they require a couple refreshes to display accurate data. We likely could have found a workaround for this issue with a little more time; however for now, we just include code for both sketches.
Unintegrated Parts
In addition to the above software, an ISR was was also written in the PIC32 code, which calculates the heart rate based on a heart rate sensor connected to an analog pin on the PIC32. This code is available in the main source code for the PIC32 in the “Code” section. Additionally, we wrote some Arduino code that writes to a remote web server, and a PHP file that reads from this Arduino code to display data on an HTML file.
Results
The accuracy of the GPS was verified using the Google Maps interface. The GPA latitude and longitude data was used to detect current location on the map interface. While testing the device in the ECE lounge of Phillips hall, we were able to map our location on Google Maps as shown in the picture below. The marker on the map lines up very closely with the lounge windows, which is where the device was set up. The exact latitude and longitude coordinates measured for various locations are shown in Table One below.
Additional issues encountered when acquiring GPS readingings included being unable to consistently get a signal from the module. From within building lab spaces, we were often unable to acquire latitude and longitude coordinates, and at times also received inaccurate time values. These restrictions made harder to debug our design as at points, we could not be sure whether there was a flaw in our code and implementation, or if the module wasn’t functioning as expected.
The device velocity was detected using accelerometer readings as described in the IMU thread above. While these are likely slightly inaccurate as mentioned in the IMU thread, comparing the results to determine accuracy requires detection speed through a secondary source, which is difficult to achieve. As such, determining the percentage error of these readings is difficult.
Usability of the current design is fairly limited, due to the need for the remote monitor to be on the same WiFi network as the Huzzah module in order to access the webpage displaying data. This restriction can be eliminated through the use of a remote server to host the data webpage. In all designs, however, accessibility would still be limited to those with WiFi access.
Safety considerations include ensuring that all electrical components are isolated from skin (fur) contact of the pet wearing the collar. This can be achieved by encasing the collar in an electrically insulating material while allowing for the device to be removed as necessary to charge. Further considerations include ensuring that the remote website cannot be accessed by individuals apart from the owner. Requiring a password to access the website could achieve this and could be a avenue for further development of the design.
GPS Module | Google Maps | %Error | ||
Phillips Hall | Latitude | 42.444415 | 42.444538 | 0.00028978 |
Longitude | -76.481758 | -76.481725 | 0.00004314 | |
Gates Hall | Latitude | 42.2677867 | 42.444940 | 0.41737201 |
Longitude | -76.481758 | -76.481192 | 0.00074005 | |
Eddygate Apartments (Collegetown) | Latitude | 42.441200 | 42.4448110 | 0.00850751 |
Longitude | -76.485900 | -76.486122 | 0.00029024 |
Conclusion
Expectations vs. Outcome
We initially hoped to make the smart collar interface with a remotely hosted web server, enabling pet owners to check up on their pets while at work, on vacation, etc. However, we ran out of time before we could integrate these features seamlessly. We had also hoped to include heart rate and step counting metrics, however both of these features required additional data processing and calculations we were unable to implement within the time we had remaining. As such the design did not completely meet our initial expectations, but was a good baseline design we can continue to add features to.
The most challenging aspect of our design was integrating all four intended peripherals with the PIC32: the GPS module, IMU, Huzzah and heart rate monitor all required specific protocols to communicate with the PIC32. Something we would do differently if redoing the project would be focussing on implementing fewer peripheral and developing more functionality and features built on the data provided by that peripheral. For example, we could have implemented only the GPS module and spent more time creating the web interface and parsing GPS data to facilitate processing of additional data such as distance travelled and position history.
A major future additions would be displaying the data on a remote web server and allowing the WiFi module to scan for multiple pre-programmed WiFi connections, which we believe would be very strong features that would allow this device to actually serve the purpose for which it was created — enabling a pet owner to view their pet’s data from a different location, and a different WiFi connection. We had some success experimenting with these features but discovered that full integration would require rewriting the ESP8266 library to some extent. We hope to integrate them in the future.
Another potential future addition is the heart rate monitor was implemented using a pulse rate monitor from Adafruit. The sensor outputs an analog input signal which was sent through an ADC and then processed by the PIC32 to detect beats and calculated BPM. The Arduino libraries provided for processing output signals of the sensor were converted to C and used in computing desired parameters. While we set up the heart rate monitor hardware and code, we did not incorporate it into our final design due to time constraints.
Standards
Our design conformed the applicable standards listed below.
UART
Universal Asynchronous Receiver/Transmitter (UART) is a circuit module in a microcontroller used to transmit and receive serial data. It requires only two wires, one transmit channel (TX) and another receiving channel (RX). Since there is no clock line, UART communication is asynchronous, instead adding start bits and optional stop bits to the data packet to define the beginning and end of a message, and predefining the data rate. The communication channels between the PIC and GPS module as well as the PIC and Huzzah wifi module used UART.
NMEA
NMEA 0183 is a communication standard defined by the National Marine Electronics Association for communication between marine electronics and other devices. It is a standard data format used in GPS receivers. The protocol uses an ASCII serial communications scheme to transmit data between one “talker” and multiple “listeners”. The standard defines several different types of messages, also called sentences, as well as the format of each sentence, so that data can be parsed accurately. The GPS module used in our project outputs data in NMEA 0183 format to the PIC.
I2C
The Inter-integrated Circuit (I2C) protocol allows multiple “slave” chips to communicate with one or more “masters”. Like UART, it requires only two signal wires to exchange information, which gives it an advantage of SPI; unlike UART, however, it is a synchronous protocol, which means that it has a clock signal to synchronize the process of outputting and sampling data. Because of this, data rate does not need to be predetermined and is usually faster, as no bits need to be wasted on start/stop bits for every packet.
Intellectual Property Considerations
Several components of this project made use of code and hardware developed by individuals outside of our team. The UART setup and parsing code for the GPS module was built off of a previous ECE 4760 project, as was the I2C setup code for the IMU. The Arduino code for the Huzzah module was based on the open source ESP8266 Temperature / Humidity Webserver project. These sources are referenced below in the “References” section. None of these sources required us to sign NDAs or deal with patent/trademark issues.
The main factors separating our project from previous ones are the real-time map updates, the velocity calculation processing, and the integration of the components into a wearable dog collar. Since there are several products in industry that perform similar functionality of GPS tracking and activity measurement, we do not intend to file any patents based on our work on this project. However, after we implement some of the project extensions discussed in our above, we may seek to publish our results in a hobbyist magazine or website.
Ethical Considerations
The IEEE code of ethics outlines ten standards to which members of the community commit themselves to upholding. These standards include conforming to ethical and sustainable design practices, making evidence based claims and estimates, improving the understanding of of society of implications of emerging technology, properly crediting the contributions of others to a given work, etc. The actions we undertook during the course of this project are in accordance with these standards. Any part of the code, hardware, etc. of our design which was sourced from a secondary source has been cited, and all claims of accuracy are based on the data presented in this report. Our design is non-discriminatory and poses no real of perceived conflicts of interest. Potentially dangerous aspects of the design (exposed circuitry, hacking of the website) which we have identified have been disclosed in this report. This device has the potential to educate the general public of the potential and rising popularity of IOT and smart devices, which are becoming increasingly popular. Throughout this project design, we assisted each other and any classmates we collaborated with in furthering their professional development through this final project. Additionally, at no point during the implementation of this project did bribery or false/malicious actions result in damage to other individuals or their property.
Legal Considerations
As our project did not make use of any patented material, or conflict with established standards for any of the protocols or modules used, there are not many legal considerations involved in the design.
Regarding GPS use, the FCC regulations state “If the GPS receiver is incorporated with another device, then the remaining portion of the device must still comply with its requirements (FCC Part 15, or licensed rules as applicable).” Our system fulfills this condition since the remaining parts of the device, specifically the WiFi module, connect only to 2.4 GHz or 5GHz bands that the user possesses the SSID and Password for.
GPS use is often regulated, with laws preventing placement of GPS devices on objects without the owner’s permission. This product is intended as a tracker for pets, to be used by their humans, thus the intended use does not violate any laws, as long as the pet is not present in a location where GPS use is regulated.
Regarding use of the Google Maps API on our web page, Google’s guidelines on attribution are quoted below. The default text was not removed or altered in any way in our project:
“All uses of the Content must provide attribution to both Google and our data providers. We require clear, visible attribution when the Content is shown. You may not move the attribution to the end credits or fade it out after a few seconds.
Note that if you embed a classic map, Street View panorama or My Map; use one of our APIs on the web or in an application; or export a video or JPEG from Google Earth Pro, the necessary attribution is already baked into the map and no further credit is needed. Learn more about how to properly credit, as well as how to identify providers, on our attribution guidelines page.”