Summary of 8 Channel Programmable Timer
This article details the design and implementation of an 8-channel programmable timer using a PIC 18F4520 microcontroller and Flowcode software. The project aims to provide accurate timekeeping with battery backup, data retention during power failures, and flexible programming for up to 100 programs including day/night modes. It features a user interface with an LCD and keypad, supports auxiliary inputs/outputs, and includes optional I2C relay expansion and RF links for remote control.
Parts used in the 8 Channel Timer:
- PIC 18F4520 Microcontroller
- DS1307 Real Time Clock (RTC)
- 24LC256 I²C EEPROM
- 16x4 Line LCD Display with LED Backlight
- 4x3 Matrix Keypad
- Piezo Buzzer
- Light Dependent Resistor (LDR)
- 7812 Voltage Regulator
- 7805 Voltage Regulator
- ULN2803 Transistor Array
- MCP23017 I/O Port Expander (Optional)
- AtMega328P Microcontroller (RF Link)
- 315MHz RF Modules
- Relays (250V AC, 10 Amps)
Introduction
I have been using Microchip’s PIC range of microcontroller for my projects since 1993, and have done all my programming in assembler language, using the Microchip MPLab IDE. My projects ranged from simple traffic lights and flashing LEDs, to USB joystick interfaces for R/C models, and switchgear analisers used in industry. Development took many days, and sometimes thousands of lines of assembler code.
After receiving Matrix Multimedia Flowcode 4 Professional, I was quite skeptic of the software. It looked too easy to believe. I decided to give it a try, and tested all the different Component Macros, all with great success. The best part of using Flowcode was that simple projects could be coded in a single night. After playing with the I²C and a DS1307 real time clock, I decided to design the 8 Channel Timer using Flowcode. Not being a small and easy project, I believed that this would be a great project to teach myself Flowcode.
Selecting a microprocessor and other components
Due to the number of I/O pins required, it was clear that a 40 pin device will be needed. The PIC 18F4520 was chosen, mainly for its 32K program memory, and 1536 bytes of data memory. All components used, are standard through-hole devices, making it possible to build the circuit on Vero board if required. This also assisted with the development on a breadboard.
Step 1: Project Objectives

Objectives
– Accurate time keeping, with battery back-up.
– All programs and data to be retained, even after loss of power.
– Simple user interface.
– Programming flexibility.
Time keeping
Living in an area prone to power failures, the standard 50/60Hz from the power lines will not be sufficient for accurate time keeping. A real time clock was essential, and after testing several RTC chips, I decided on the DS1307 due to its simple oscillator and battery back-up configuration. Quite accurate time keeping was obtained using only a 32.768 kHz crystal connected to the DS1307. Accuracy was within 2 second over a 2 month trial period using 4 different makes of crystals.
Data retention
All the timer program data must be retained, even during power failure. With up to 100 different programs and various configuration data, it became clear that the 256 bytes of on-board EEPROM of the PIC will not be large enough. A 24LC256 I²C EEPROM is used to store all programming information.
Simple user interface
The user interface consists of only 2 items, a 16 x 4 line LCD display with LED backlight, and a 4 x 3 keypad. All programming can be done with the press of only a few buttons. Additions to the interface are an audible piezo buzzer, and visual flashing LCD backlight.
Step 2: Programming Flexibility
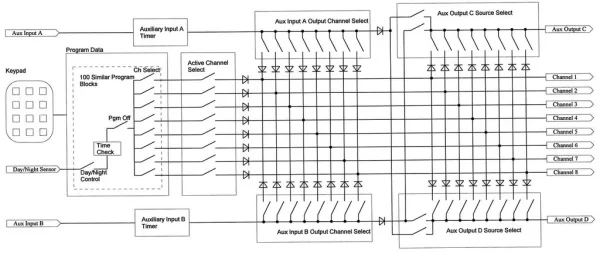
To ensure enough program flexibility, the timer has 100 programs which can be set individually. For each program, the On time, Off Time, Output Channels, and Day of Week can be set. Each program has three modes:
– Auto: On Time, Off time, Output Channel and Day of week is set.
– Off: The individual program can be disabled, without deleting the settings. To enable the program again,
simply select a different mode.
– Day/Night: On Time, Off time, Output Channel and Day of week is set. Works the same as the Auto mode, but will
only turn the outputs on between the On and Off times when it is dark. This enable full Day/Night control, as well
as the added flexibility to turn lights on at sunset, and off at sunrise.
Example 1: Will turn light on after 20:00, and turn light off at sunrise.:
On: 20:00,
Off:12:00,
Example 2: Will turn light on at sunset, and turn light off at 23:00.
On: 12:00
Off: 23:00
Example 3: Will turn light on at sunset, and turn light off at sunrise.
On: 12:01
Off: 12:00
Additional options available, all working independently from the 100 On/Off programs.
Program Channels Active: Instead of turning off several programs, individual output channels can be disabled without the need to change the programs.
Auxiliary inputs: Two digital inputs are available, to allow certain output channels to be turned on for a specific time. It can for instance be used to turn on certain lights when arriving home late at night, when a button on a remote is pressed, or to turn on a different ser of lights when the house alarm is triggered.
Auxiliary outputs: Two additional outputs (apart from the 8 output channels) are available. They can be programmed to turn on with certain output channels, or with the digital inputs. In my installation, I have outputs 6-8 controlling my irrigation, which works on 24V. I use channels 6-8 to turn on one of the auxiliary outputs, to switch on a 24V power supply for the irrigation system.
Manual On: When in the main screen, buttons 1-8 can be used to manually turn channels on or off.
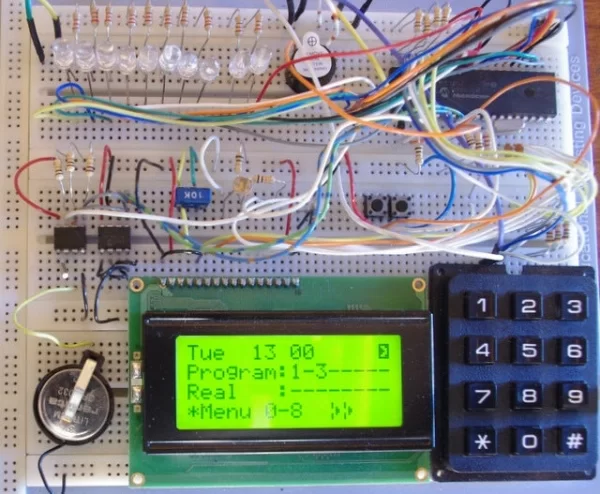
Step 3: Hardware
Power Supply: The power supply consists of a rectifier, smoothing capacitor, and a 1 Amp fuse for overload protection. This supply is then regulated by a 7812 and 7805 regulator. The 12V supply is used for driving the output relays, and all other circuits are powered from the 5V supply. As the 7805 regulator is connected to the output of the 7812 regulator, the total current must be limited to 1 amp through the 7812 regulator. It is advisable to mount these regulators on a suitable heat sink.
I²C Bus: Although Flowcode allows for hardware I²C control, I decided to make use of the software I²C configuration. This allows for more flexibility of pin assignments. Although slower (50 kHz), it still performs great compared to the hardware I²C bus. Both DS1307 and 24LC256 is connected to this I²C bus.
Real Time Clock (DS1307): During start-up, the RTC register 0 and 7 is read to determine if it contains valid time and configuration data. Once setup correct, the RTC time is read and the time loaded in the PIC. This is the only time that time is read from the RTC. After startup, a 1Hz pulse will be present on pin 7 of the RTC. This 1Hz signal is connected to RB0/INT0, and via an interrupt service routine, the PIC time is updated every second.
External EEPROM: All program data and options are stored on the external EEPROM. The EEPROM data is loaded at start-up, and a copy of the data is stored in the PIC memory. EEPROM data is only updated when program settings are changed.
Day/Night Sensor: A standard light dependant resistor (LDR) is used as the Day/Night sensor. As LDRs comes in many shapes and varieties, all with different resistance values under the same light conditions, I used an analog input channel to read the light level. The Day as well as Night levels are adjustable, and allow for some flexibility for different sensors. To set up some hysteresis, individual values for Day and Night can be set. The state will only change if the light level is below the Day, or above the Night set points, for longer than 60 seconds.
LCD Display: 4 line, 16 character display is used, as all the data could not be displayed on a 2-line display. The project includes some custom characters, that is defined in the LCD_Custom_Char macro.
Auxiliary Inputs: Both inputs are buffered with a NPN transistor. +12v and 0V is also available on the connector, allowing for more flexible connections to external connections. As an example, a remote control receiver can be connected to the supply.
Outputs: All outputs are electrically isolated from the circuit by means of a 12V relay. The relays used, are rated for 250V AC, at 10 amps. The normally open and normally closed contacts are brought out to the terminals.
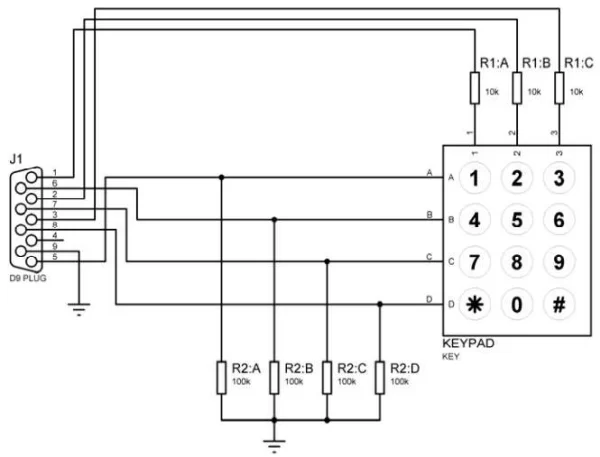
Keypad: The keypad used is a 3 x 4 matrix keypad, and is connected PORTB:2..7.
Step 4: Keypad Interrupts
I wanted to make use of the PORTB Interrupt on Change interrupt on any key press. For this, a Custom Interrupt had to be created in Flowcode, to ensure that PORTB direction and data is set up correct before and after each keypad interrupt. An interrupt is generated each time a button is pressed, or released. The interrupt routine only responds when a key is pressed.
CUSTOM INTERRUPT
Enable Code
portb = 0b00001110;
trisb = 0b11110001;
intcon.RBIE = 1;
intcon2.RBIP = 1;
intcon2.RBPU = 1;
rcon.IPEN = 0;
Handler code
if (intcon & (1 << RBIF))
{ FCM_%n();
portb = 0b00001110;
trisb = 0b11110001;
wreg= portb;
clear_bit(intcon, RBIF);
}
Problems found
During an interrupt, the interrupt service routine must under NO conditions, call any other macro that might be used somewhere in the rest of the program. This will eventually lead to stack overflow problems, as the interrupt can occur at the same time that the main program is also in the same subroutine. This is also identified as a SERIOUS ERROR by Flowcode when the code is compiled.
In the Custom code of the Keypad under GetKeyPadNumber, there is such a call to the Delay_us macro, which will cause a stack overflow. To overcome this, I have removed the Delay_us(10) command, and replaced it with 25 lines of “wreg = porta;” commands. This command reads PORTA, and places its value into the W register, just to get some delay. This command will be compiled to a single instruction similar to assembler movf porta,0. For the 10MHz clock used in the project, each instruction will be 400ns, and to get a 10us delay, I needed 25 of these instructions.
Note on the second line of Figure 3: GetKeypadNumber Custom Code, that the original delay_us(10) command has been disabled with “//”. Below this, I have added my 25 “wreg = porta;” commands to get a new 10us delay. With no calls to any macros inside the Keypad_ReadKeypadNumber custom code, the Keypad macro can now be used inside an interrupt service routine.
It should be noted that the Flowcode Keypad and eBlocks components does not use the standard pull-up resistors on the input lines. Instead, it uses 100K pull-down resistors. Due to some interference found on the keypad during development, the 100K resistors were all replaced with 10K, and all 10K resistors replaced with 1K5. The keypad was tested to work correct with leads of 200mm.
Step 5: Using the Timer
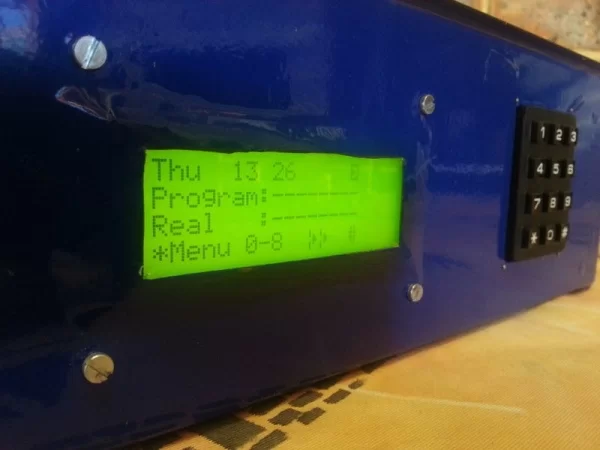
All the screens are set up to indicate all required information for the user to make quick changes to the settings. Line 4 is used to assist with navigation through the menus and program options. A total of 22 screens are available during normal operation.
LINE 1: Time and Status
Shows current day and time, followed by status icons:
A – Indicates that Aux Input A was triggered, and Aux Input A timer is running.
B – Indicates that Aux Input B was triggered, and Aux Input B timer is running.
C – Indicates that Aux Output C is turned on.
D – Indicates that Aux Output D is turned on.
} – Day/Night sensor status. If present, indicates that it is night.
LINE 2: Program Outputs
Shows the channels that have been turned on by the different programs. Channels are displayed in their output numbers, and a “-“ indicates that the specific output is not turned on. Channels that have been disabled in the “Program Outputs Active” will still be indicated here, but the Real outputs will not be set.
LINE 3: Real Outputs
Shows which channels are turned on by the different programs, Aux Inputs A & B, or manual outputs set by the user. Pressing 0 will return all manually activated outputs to off, and reset the Aux Output A & B timers.
LINE 4: Menu and key options (on all menus)
Indicates the function of the “*” and “#” keys.
The center part indicates which numeric keys (0-9) are active for the selected screen.
The input status of Aux Input A & B are also shown by means of an Open or Closed switch icon.
Outputs can be turned on/off manually by pressing the corresponding key on the keypad.
Throughout the menus, the Star and Hash keys are used to navigate through the different program options. Keys 0-9 are used to set the options. Where multiple options are available on a single screen or programming menu, the Hash key is used to step through the different options. The current selected option will always be indicated by the “>” character on the left of the screen.
0-9 Enter time values
1-8 Change channel selection
14 36 Step through programs, 1-step back, 4-step back 10 programs, 3-step forward, 6-step forward 10
programs
1-7 Set days of week. 1=Sunday, 2=Monday, 3=Tuesday, 4=Wednesday, 5=Thursday, 6=Friday, 7=Saturday
0 In the main screen, clear all manual overrides and Input A & Input B timers. In other menus, changes
selected options
# In the main screen, will disable all manual overrides, Input A & Input B timers and Program Outputs, until
the next event.
* and 1 Reboot the timer
* and 2 Clear all programs and options, restore settings to default.
* and 3 Put timer into standby. To turn timer on again, press any key.
During incorrect entries of any time value, the LCD backlight will flash 5 times to indicate an error. In the same time, the buzzer will sound. The Exit and Next commands will only work when the current entry is correct.
LCD Backlight
On initial start-up, the LCD backlight will be turned on for 3 minutes, unless:
– There is a hardware failure (EEPROM or RTC not found)
– Time not set in the RTC
The LCD backlight will again turn on for 3 minutes on any user input on the keypad. If the LCD backlight is off, any keypad command will first turn on the LCD backlight, and ignore the key that was pressed. This ensures that the user will be able to read the LCD display before using the keypad. The LCD backlight will also be turned on for 5 seconds if Aux Input A or Aux Input B is activated.
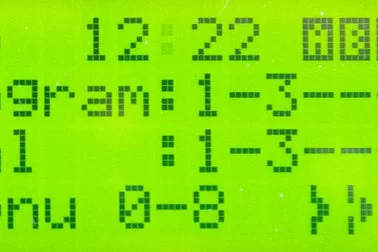
Step 6: Menu Screen Shots
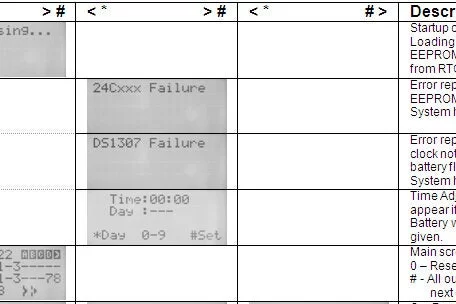
Using the keypad, each of the options can be programmed easily. The images give some information of what each screen does.
Step 7: Design of the System
All development and testing was done on breadboard. Looking at all the sections of the system, I broke the system down in three modules. This decision was mainly due to the PCB size limitations (80 x 100mm) of the free version of Eagle.
Module 1 – Power Supply
Module 2 – CPU board
Module 3 – Relay board
I decided that all components must be easily obtainable, and that I did not want to use surface mount components.
Let’s go through each of them.
Step 8: Power Supply

The power supply is straight forward, and supply the CPU and relay boards with 12V and 5V.
I mounted the voltage regulators on decent heat sinks, and also used overrated capacitors for the supply.
Attachments
Step 9: CPU Board
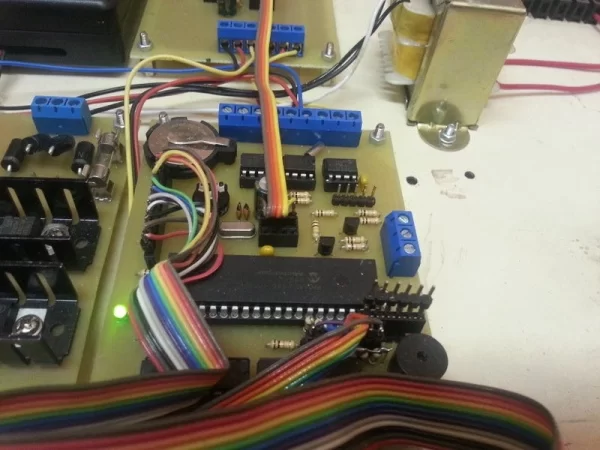
All components, except LCD screen, keypad and relays are mounted on the CPU board.
Terminal blocks was added to simplify the connections between the supply, two digital inputs, and the light sensor.
Header pins/sockets make provision for easy connections to the LCD screen and keypad.
For the outputs to the relays, I used the ULN2803. It already contains all required driving resistors and flyback diodes. This ensured that the CPU board can still be made using the free version of Eagle. The relays are connected to the two ULN2803s. The bottom ULN2803 is used for the 8 outputs, and the top ULN2803 for the two auxiliary outputs. Each auxiliary output has four transistors. Connections to the relays are also through header pins/sockets.
The PIC 18F4520 was fitted with a programming socket, as to allow easy programming via the PicKit 3 programmer.
NOTE:
You will notice that the board contains an additional 8 pin IC. The top IC is a PIC 12F675, and connected to a digital input. This was added during the PCB design. This makes it easier to pre-process the digital input. In my application, one of the digital inputs is connected to my alarm system. If the alarm sounds, certain lights are turned on in my house. Arming and disarming my alarm system gives different beeps on the siren. By using the PIC 12F675, I can now distinguish between arm/disarm and a real alarm. The 12F675 is also fitted with a programming socket.
I also made provision for an I2C port via header pin/socket. This will come in handy later on with the relay boards.
The board contains a few jumpers, which should be soldered before fitting the IC sockets.
Attachments
- Home_Timer_Version_3_02_2014.asmDownload
- Alarm_Input_Board.asmDownload
- Home_Timer_Version_3_02_2014.hexDownload
- Alarm_Input_Board.hexDownload
- Home_Timer_Version_3_02_2014.fcfDownload
- Alarm_Input_Board.fcfDownload
- trompettiste.zipDownload
Step 10: Flowcode Conclusion
As I am used to work on register level in assembly, it was sometimes difficult and frustrating to use the component macros. This was mainly due to my lack of knowledge of Flowcode’s programming structure. The only places that I have used the C or ASM blocks, was to turn outputs on inside an interrupt routine, and in the Do_KeyPressed routine to disable/enable the keypad interrupt. The PIC is also placed into SLEEP using an ASM block, when the EEPROM or RTC is not found.
Help around the use of the different I²C commands, were all obtained from within the Flowcode Help files. It is required to know exactly how the different I²C devices work, before the commands can be used successfully. Designing a circuit does require the designer to have all relevant datasheets available. This is not a shortcoming of Flowcode.
Flowcode really stood up to the test, and is highly recommended for persons wanting to start working with the Microchip range of microprocessors.
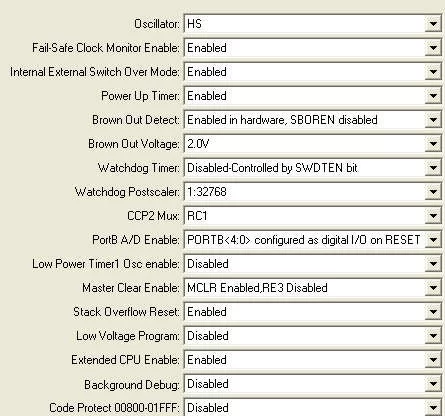
Flowcode programming and configuration for the PIC were set as per pictures
Step 11: Optional I2C Relay Board
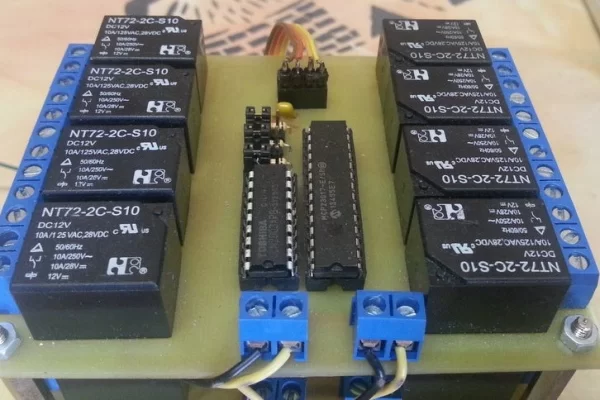
The CPU board already has header connections for 16 relays. These outputs are open collector transistors via the two ULN2803 chips.This can be used to power the relays directly.
After the first tests of the system, I did not like all the wires between the CPU board and relays. As I included an I2C port on the CPU board, I decided to design the relay board to connect to the I2C port. Using a 16 channel MCP23017 I/O Port Expander chip and a ULN2803 transistor array, I reduced the connections between the CPU and relays to 4 wires.
As I could not fit 16 relays on a 80 x 100mm PCB, I decided to make two boards. Each MCP23017 uses only 8 of it’s 16 ports. Board 1 handles the 8 outputs, and board 2 the two auxiliary outputs. The only difference on the boards is the addresses of each board. This is easily set with a mini jumper. Each board has connectors to supply power and I2C data to the other board.
NOTE:
If required, the software makes provision for only one board that can use all 16 ports. All output relay data is available on the first board.
As the circuit is optional and very simple, I did not create a schematic. If there is enough demand, I can add it later.
Attachments
- MCP23017 16bit IO Expander.pdfDownload
- ULN2803.pdfDownload
- I2C Relay Board.schDownload
- I2C Relay Board.brdDownload
- I2C Relay Board Schematic.pdfDownload
Step 12: Optional RF Link

After completion of the project, I soon realised that I have to pull a lot of 220V AC wiring to the timer. I developed an RF link using standard 315MHz modules that allowed the timer to be placed inside a cupboard, and the relay boards inside the roof, close to all the 220V wiring.
The link uses a AtMega328P running at 16MHz. The software for both transmitter and receiver is the same, and the mode is selected by a mini jumper.
Transmitter
The transmitter is simply plugged into the CPU I2C port. No additional setup is required, as the AtMega328P listens to the same data as the I2C relay boards.
Data is updated once per second on the I2C port, and the transmitter sends this information over the RF link. Should the transmitter not receive I2C data for about 30 seconds, the transmitter will continuously transmit data to turn off all relays to the receiver unit.
Power to the transmitter module can be selected between 12V and 5V with a mini jumper on the PC board. I am powering my transmitter using 12V.
Receiver
The receiver listens for coded data from the transmitter, and places the data on an I2C port. The relay board simply plugs into this port, and works the same as it was plugged into the CPU board.
Should the receiver not receive valid data for 30 seconds, the receiver will continuously send data on the I2C port to turn off all relays on the relay boards.
Schematics
One day, if there is a demand for it. The Arduino sketch does contain all required information to build the circuit without a circuit diagram.
Range
In my installation, the transmitter and receiver is about 10 meters apart. The timer is inside a cupboard, and the relay unit on top of the ceiling.
Attachments
Step 13: Final Product
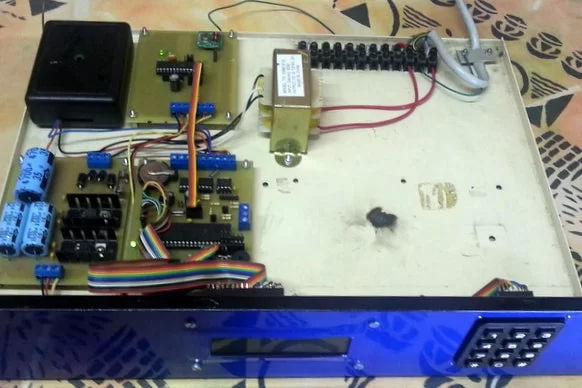
The main unit was fitted in an old project box. It contains the following:
– 220V/12V Transformer
– Power Supply Board
– CPU Board
– LCD Display
– Keypad
– RF Link Transmitter
– Additional home remote receiver unit to enable me to turn lights on/off via the remote
The relay unit consist of the following:
– 220V/12V Transformer
– Power Supply Board
– RF Link Receiver
– 2 x I2C Relay Boards
All boards were designed with he same dimension, making it easy to stack them on top of each other with 3mm spacers.
Source: 8 Channel Programmable Timer
- Why was the DS1307 chosen over standard power line frequency for time keeping?
The DS1307 was selected because the area is prone to power failures, making standard 50/60Hz lines insufficient; the RTC provides accurate time keeping with a 32.768 kHz crystal and battery backup. - How does the system retain program data during a power failure?
All program data and options are stored on an external 24LC256 I²C EEPROM, which retains information even when the main power is lost. - What is the Day/Night mode functionality in this timer?
This mode allows outputs to turn on between set times only when it is dark, enabling lights to switch on at sunset and off at sunrise based on LDR readings. - How many programs can be individually set in this project?
The timer supports 100 individual programs that can be configured with specific On times, Off times, Output Channels, and Days of the Week. - What hardware is used to detect light levels for the Day/Night sensor?
A standard Light Dependent Resistor (LDR) connected to an analog input channel is used to read light levels with adjustable Day and Night set points. - How are the output channels electrically isolated from the circuit?
All outputs are electrically isolated from the circuit by means of 12V relays rated for 250V AC at 10 amps. - Why were pull-up resistors replaced with pull-down resistors on the keypad?
The original 100K pull-down resistors were replaced with 1K5 resistors to overcome interference found on the keypad during development. - What happens if the transmitter does not receive I2C data for 30 seconds?
If the transmitter or receiver does not receive valid data for about 30 seconds, it will continuously transmit data to turn off all relays. - Can individual output channels be disabled without deleting their programs?
Yes, individual output channels can be disabled via the Program Channels Active option without needing to change the underlying programs. - How is the keypad interrupt handled to prevent stack overflow?
The developer removed the Delay_us macro call inside the interrupt routine and replaced it with 25 lines of assembly-like commands to create a delay without calling other macros.