Summary of Writing Your First Program with PIC Microcontroller and Setting up Configuration Bits
This tutorial introduces the second step in a PIC Microcontroller series, focusing on creating the first LED blinking program using the PIC16F877A. It guides users through setting up the XC8 compiler and MPLAB-X IDE, emphasizing the importance of reading the datasheet and configuration registers before coding. The article provides initial steps for launching the IDE and creating a new project, serving as a foundation for hardware interfacing.
Parts used in the First LED Blinking Program:
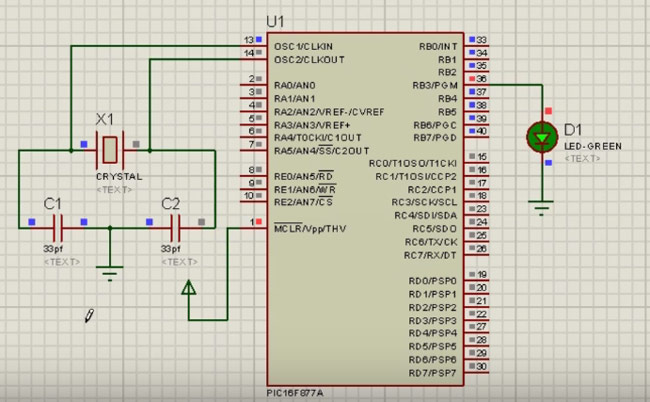
- PIC16F877A Microcontroller
- PicKit 3 Programmer
- XC8 Compiler
- MPLAB-X IDE
- LED
This is the second tutorial of our PIC Tutorial Series. In our previous tutorial Getting started with PIC Microcontroller: Introduction to PIC and MPLABX, we learnt the basic stuff about our PIC microcontroller, we also installed the required software and purchased a new PicKit 3 programmer which we will be soon using. Now we are ready to get started with our First LED blinking Program using the PIC16F877A. We will also learn about Configuration Registers in this tutorial.
This tutorial expects that you have installed the required software on your Computer and you know some decent basics about the PIC MCU. If not, please bounce back to the previous tutorial and get started from there.
Getting Ready for Programming:
Since we have decided to use the PIC16F877A, with the XC8 compiler let us get started with their datasheet. I recommend everyone to download the PIC16F877A Datasheet and the XC8 Compiler manual, as we will be referring to these frequently as we progress through our tutorial. It is always a good practise to read the complete Datasheet of any MCU before we actually start programming with it.
Now, before we open our MPLAB-X and start programming, there are few basic things that one has to be aware of. Anyway, since this is our first program, I don’t want to harangue you people with lot of theory but we will stop here & there as we program and I will explain you things as such. If you don’t have enough time to read through all these then just have a glimpse and jump into the video at the bottom of the page.
Creating a New Project using MPLAB-X:
Step 1: Launch the MPLAB-X IDE that we installed in the previous class, once loaded it should look something like this.
For more detail: Writing Your First Program with PIC Microcontroller and Setting up Configuration Bits
- What is the main goal of this tutorial?
The main goal is to create the first LED blinking program using the PIC16F877A. - Which microcontroller is being used for the first program?
The PIC16F877A microcontroller is being used. - Can I start this tutorial if I have not installed the software?
No, you should go back to the previous tutorial to install the required software first. - What documents are recommended to download before programming?
You should download the PIC16F877A Datasheet and the XC8 Compiler manual. - Does the article provide detailed theory before starting the code?
No, it avoids haranguing with too much theory and explains things while programming. - What tool is used to launch the development environment?
MPLAB-X IDE is launched to start the project. - What concept will be learned alongside the blinking program?
You will learn about Configuration Registers in this tutorial.