Summary of Smart-O-Pan ECE4760
Summary: The Smart-O-Pan is a wireless temperature-regulating pan and knob system using a thermocouple, PIC32 microcontrollers, XBee radios, and PID control to keep a pan at a user-set temperature by turning a stove knob via a servo. The design emphasizes safety (automatic shutoff at 182°C), modularity, and lessons learned about communications, integration, and hardware tradeoffs.
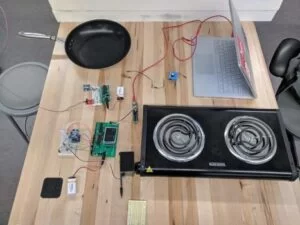
Parts used in the Smart-O-Pan:
- PIC32 microcontrollers (two PICs)
- K-type thermocouple
- Temperature sense element board
- XBee radio modules
- SPI temperature sensor/board
- UART interface
- Servo motor
- Hotplate or conventional stove knob
- PWM level shifter circuit (transistor and resistors)
- TFT display
- 5V and 3.3V power rails / voltage regulators
- Breadboard and prototyping hardware
- Various connectors and wiring
A smart control knob and pan designed for the absent-minded chef! The Smart-O-Pan takes the constant vigilance out of your culinary creations, making cooking bdddoth simple and safe.
I designed the smart-o-pan with people like my mom in mind. I was the family chef for a number of years but since attending university, she’s taken over as house cook. Learning how to cook can be difficult and my mom’s tendency to start multiple other tasks while food is on the stove causes several small kitchen fires annually.
All joking aside, unattended cooking is one of the leading cause of house fires in the United States. This project ideas could help make a dent in that statistic while also making cooking easy and fun for new and learning chefs.
High level design:
General Overview, High Level Diagram
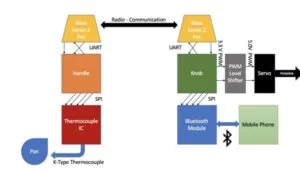
Overview:
The project has two main hardware functional blocks, the pan and the knob. The pan contains a sense element board and a radio transmitter connected to the PIC32. The sense element board reads a K-Type thermocouple inside the stovetop pan. This temperature reading is transmitted the knob hardware with an Xbee radio. These two blocks communicate wirelessly because in the long term I would like to have them operate independently as a pan and knob.
The knob hardware receives that radio transmitted temperature value and outputs a PWM value to a servo. This servo rotates a knob on a hotplate or conventional stove. The knob hardware continuously adjusts this temperature such that the pan levels off at a consistent user set temperature. When food on the pan cooks it evaporates much of its water. The high specific heat of water makes the pan easier to heat, leading to runaway boiling or burning. This system seeks to provide constant temperature to the pan by dynamically changing the applied temperature.
The Xbee Radios use the UART communication protocol to communicate with their respective PICs and SPI to communicate with the temperature sensor.
Background Math:
PID Control System
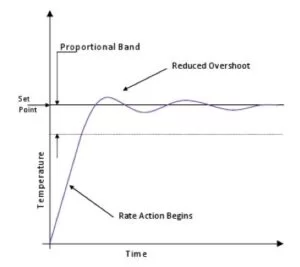
I made heavy use of PID control principles for controlling the temperature of the pan. Most of the material regarding PID has been explained in heavy detail during lab 4. However, I will highlight the basics of PID and the key differences between PID control of the 1DOF helicopter and PID control of a pan here.
PID Control stands for Proportional Integral Differential Control. It works by finding a proportional, integral and derivative term of an error function to minimize the error function in an unknown dynamical system.
What this means from an implementation standpoint is that PID works by finding a mapping between a sensor value/Desired value and an actuated output that influences the sensor reading. This makes more sense in the context of a project, so I’ll use this one as an example.
In this project, T(t) is a vector representing the temperature of the pan over time, D represents the desired temperature that we command the pan to reach and PWM(t) represents the equivalent pulse width output duty cycle from the microcontroller. That duty cycle turns a stove knob, thus adjusting the temperature to a value closer to the desired temperature.
In the project context, we can define our error function as the difference between the desired temperature and the initial temperature.
This PID function can be broken down into a weighted sum of terms.
The terms Kp, Ki, and Kd represent derivative, integral and proportional gain terms. These terms effectively convert the different components of the error function into the actuator/control value. If you remember dimensional analysis from physics or chemistry, these constants are useful to think of in their respective units for your specific application as sanity checks (i.e. my Kp = °C/Degree of Servo Rotation).
Modeling Pan Heat Dissipation:
My original goal was to determine the temperature at the center of a pan without invasively drilling into it. I attempted to do this by guessing the central temperature of the pan from peripheral thermocouple measurements. This required an estimator using some cylindrical solution to the basic heat equation. In an independent design project, I would consider revisiting this methodology because It has the potential to modularize the custom-made pan into a pan handle that can be attached to any pan rather than tied to one.
A professor recommended this model for dissipation in a cylinder heated by a smaller cylinder.
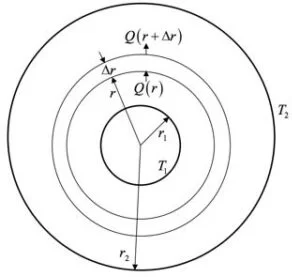
Where are simply temperatures at different radial points from the center of the bottom of our pan in this case. Therefore, knowing the temperature at two separate radial points allows us to predict the central temperature.
There are several good mathematical models for such a measurement. The shell balance approach with the resultant model makes the most sense to me. The full mathematical basis for this model can be found here.
Use of XBees rather than Bluetooth Communication
In retrospect, Bluetooth would have been a much more useful communication method between the pan and handle. Radio Communication’s biggest advantage is that it can communicate over very long distances, but it suffers more from interference than other types of communication. During testing, I noticed that I would lose packets in the lab that I wouldn’t have lost in the Baja office. I didn’t have the time to order new components after this initial purchase, but in an independent study or long term project, I would use entirely Bluetooth communication.
Logical Structure & Pictures:
It might be easy to understand the project by breaking up the functions in software between the pan and handle and illustrating how a single temperature measurement “flows” to an actuator PWM command.

Tradeoffs:
Internal/External Hotplate Control:
In the original project, I wanted to attach the PIC to the hotplate internally rather than via a knob. The idea was to use controllable digital potentiometers hooked up to high power transistors that spliced into the control circuitry of the hotplate. This would act as a digitally controllable knob on the inside of the device without any moving parts. However, these power transistors frequently broke down and required special connections. Therefore, I decided instead to physically rotate the knob from the outside using a servo motor instead.
Drilling into the Pan vs. Mathematical Modeling
I had also intended for the handle of the pan to be significantly more modular. Such that the pan could slide off of one pan and onto any other pan easily. Using two thermocouples, and our model before we could guess the temperature in the center of the pan non-invasively.
However, this too was problematic. Early testing gave unreliable results. Ultimately, drilling into the underside of the pan was the only way to get temperatures consistent with observation.
IEEE, ISO, ANSI, DIN/ Other standards.
No relationship either than the use of ubiquitous communication protocols. (SPI and UART)
Patents, Copy writes and Trademarks:
Use of Xbee, Sparkfun and Adafruit components for coursework only. This a permitted use case by the three websites. Not intended for use for profit or personal gain.
Design:
Software Design:
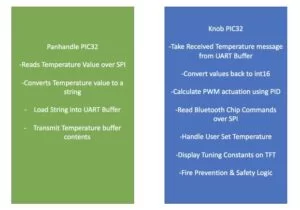
Given the breakdown of tasks in the Logical Overview Section, we can now get into thread specifics and software implementation specifics.
PID in the ISR:
I ran a standard implementation quite similar to that of lab04. To get less jitter from the derivative term, I implemented a moving average filter for the derivative error function. The temperature controller experiences a slight amount of oscillation about the set value due to a combined latency from transmitting temperature data and the thermal lag when the value on the hotplate is changed. This control function in placed in the ISR to keep control scheduled unlike other less time dependent functions.
Other considerations needed to be taken in software as well. I used an area under the curve method for calculating I, and the subtraction of two subsequent values to calculate the derivative. I took 10 samples of the derivative term to make for smoother control.
Safety Logic:
If the temperature exceeds a safety value, the stove turns off by setting the User Set Value to zero. I set that safety value to 182°C because it is the point at which lard begins to smoke. This is the minimum temperature that can result in an oil fire and is outside the necessary temperature range of any typical stovetop dessert. This logic runs in the main method because I didn’t want to write over the user set temperature variable from another thread.
UART Xbee Communication
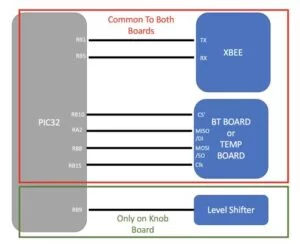
I ran the UART initialization in main with a 9600-baud rate. I followed a guide that used RB5 TX and RB1 as the RX for the transmission. Plib has several useful UART methods to transmit single bytes. I converted my temperature values to strings before sending each individually so that I could use the Plib functions that work with char datatypes. I iterate through each char of the transmit string with a string pointer writing each individually. In reception/transmission, there is an interrupt flag in the ISR designed to only edit the store and receive buffer when the buffer is empty/full. I was only sending data from the handle to the knob in one direction, so I only needed to implement a one directional “baby monitor” system.
SPI Communication with the Bluetooth Board and the Temperature Board
I used SPI Channel 2 for both boards because I had used that setup in the past. I used framed SPI to communicate with each device. Each PIC has only a single SPI device, so directly controlling the Chip select line for each device doesn’t interfere with communications. I developed the SPI communication code from an example on the course website where communication occurs in the ISR. This loads my ISR pretty heavily and ideally, I’d like to put SPI communication somewhere else but racing to implement this element of the project during a busy week took more time than expected. I didn’t notice any extreme delays by putting SPI communications in the ISR, but It could be done better with more time. I’ll consider this outlet in my independent study.
PWM generation in the ISR:
PWM runs in the ISR because it needs to happen as close to real time as possible. Delays and interrupts from other threads could cause the PWM to delay and therefore output an incorrect value. I used the RB9 pin to output PWM control similar to the implementation in lab04. This required a little initialization in the main method, but otherwise ran completely in the ISR.
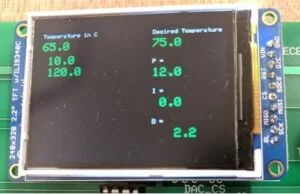
TFT Display for Testing: PT DISPLAY THREAD
I ran the TFT Display in its own thread and displayed the desired temperature, the set temperature and the current transmitted temperature value. This can run in its own thread because it only displays but doesn’t modify any of the values that the main method or the ISR need to operate. Additionally, I displayed the P,I and D coefficients so that we can tune the control values during usage. This made for much easier debugging and tuning.
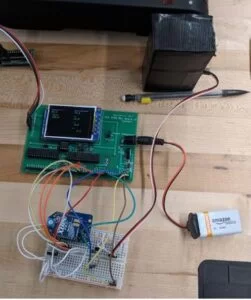
Hardware Design:
Hardware Overview:
PWM Output:
PWM Level Shifter:
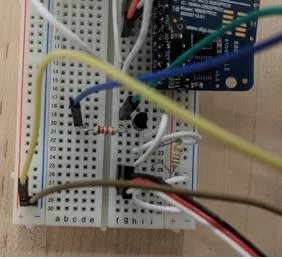
The PIC only supplies 3.3V logic, and therefore can only supply a servo with 3.3V amplitude PWM. This causes the servo to jitter about instead of moving to a controlled value. This circuit upshifts that value by draining a 5V line in sync with the rising/falling PWM. The two resistors simply limit current flow from power lines.
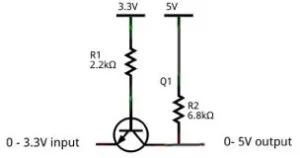
A good way to think about how this circuit works is to notice that It is just effectively a common base amplifier of for the PWM. The base is held at +3.3V when the input is high (also +3.3V) and the transistor is off. This allows the collector to float up to the +5V rail.
When the input goes low, the transistor turns on hard and pulls the collector to just above the logic low level of the input. Note that all of the sinking output current goes through the input pin.
I built a version of the above schematic on a breadboard to shift the level of the PWM to 5V so that the servo motor could read the PWM that the PIC could supply.

Problems and Lessons:
The biggest problem that I ran into was not accurately estimating how long hardware projects take. I’m much more of a theoretician by background, so for example imagining that a board layout would take about an hour was misguided. I also allotted myself about half a week to implement each communication protocol that I used. However, ironing out mistakes in those protocols or even just getting the correct pins to turn on takes days of consistent work. I wish I had planned for that length of time in advance and maybe scaled back a design feature to make the rest of the system function more smoothly.
I also had huge problems with power supplies. I wanted to power both circuits off of two independent 9V batteries so that they could be standalone products. I didn’t want to blow through a package of 9V batteries during debugging, so I bought a 9V supply offline without checking it’s polarity. I followed a false lead, which unfortunately baked several power supplies and a pair of components due to an incorrectly hooked up regulator. This could have been avoided with a second pair of eyes and more careful unit testing of components.
I also had problems integrating all of the individually implemented component boards together because of pin usage conflicts. The larger knob board took some creative allocation because so many of the pins are taken up by the TFT, Bluetooth module and UART channels for the XBee. When I was trying to integrate all of the individual components together, the pins needed to shift around. This caused issues with all previous bricks of code that I had written and took several days to debug. All of which could have been fixed by walking through my planned pin allocations with the TA’s earlier.
Design Results:
Several of the individual subsystems of the system worked but never at the same time. I was able to sample temperature, independently send and receive strings of data between PICs and communicate a user set temperature over Bluetooth from my phone. However, getting these functions to work all at once is another beast entirely.
I made a functional chimera board of the temperature sensor and PWM hardware for testing early on, and had a lot of promising results. This board would simply sample temperatures and output PWM.
PID control worked really well and I was quite proud of it. I think engineers generally have to build something a second time before they can reason about higher levels of functionality. The long delay time between temperature reaching the set value is dominated by the physical propagation of heat from the burner to the pan, so even with half a second waiting times between PID samples the response is very smooth and the delay is immeasurable.
The value that I would set the pan to also was quite accurate and constant to within a degree Celsius. The safety feature worked well too. I tried an experiment early on where I had some water boil and evaporate in the pan, and it quickly responded to the runaway temperature condition once the water had boiled down to a small layer. This feature should really improve safety for the user when I can fully implement the project.
The pivot from internal hotplate controls to an external knob also improved safety for the developer. Playing with the internal circuitry of a hotplate can lead to high power shocks through the body, which isn’t really ideal. Working with an external knob powered by a servo motor is both safer and simpler.
The setup could interfere with other radio communication designs because the Xbee radios could interfere with other similar radio hardware. In the next incarnation of the project, Ill be moving away from the XBees to an all Bluetooth system. Projects that use the 802.11 and 802.15.4 standards also could see packet loss due to this project because they operate in the same 2.4 GHz range. Xbee transmitter/receivers are FCC approved and licensed to work in the hobbyist 2.4GHz range. (source)
I also think that the design will be very usable, and is semi-useable now. Even though all of the individual components are broken out on breadboards, attaching the knob is really all that you have to do once the tuning is taken care of. The project would be great for anyone who tends to forget things on the stove, or those that for one reason or another can’t operate knobs on stoves easily.
Conclusion:
I’m quite proud of the components of the project that ended up working, especially temperature logging and PID. I didn’t get everything working as I had planned, but I think I’ve learned more from this project than in any individual theory based class. Every mistake and success gives you immediate feedback, so the data rate of new learned information is massive.
I struggled the most with systems integration. I did the project methodically and carefully until connecting several components at the same time ate up the last two weeks of my project time. This rush to put everything together broke my methodical streak, and operating under that anxiety led to hastier decisions and more problems. In the future, I think it makes more sense to design from a system first approach. Rather than rushing to implement a design change, it would be more advantageous to slowly plan out every detail first down to the pin assignments.
I also wish I had worked with a partner for the project. I think another pair of eyes would have made all of the difference while debugging. It takes infinitely longer to do everything when you’re by yourself.
I think it’s a great idea to pursue as an independent study in the spring. There are a couple of interesting features that I could pursue. An auto tuning mechanism with user input would allow anyone to simply attach the knob to a stove and get the system running without going through a custom PID tuning scheme.
Intellectual Property:
I used publically available tutorials and the ECE4760 website to source all code. I used nothing proprietary or from other groups. Half of the software implementation was sourced from previous labs that I completed earlier on in the course.
The individual hardware modules are not my IP, each of those was sourced from a vendor online.
There are potential patent and publishing opportunities for this product. I’ll have to see how much of it is fleshed out after an independent study and some tinkering over this winter break.
Ethical Concerns:
I believe that this project might do a lot of good for the world if it’s successful. House fires are constant and interfere with the welfare of the public. Unattended cooking and oil fires make up a significant component of such disasters. If I could make a small dent in that statistic without massive other ethical violations, then I think that I’d hit get a gold star for ethics. In addition to providing better public safety, this project could potentially give those with limited mobility of impaired senses the chance to discover cooking. That small jolt of autonomy is invaluable to someone who’s lost it and I think that It would be liberating. It also serves to disseminate knowledge about cooking and show techniques to those who otherwise may have been discouraged by a burned dish. More knowledge in the world regarding cooking doesn’t harm anyone, and I believe that it is ethical to do so if its within your means.
The project does little to discriminate, or harm anyone. It has a proof of concept and doesn’t make any claims that are unsubstantiated. I personally accept any technical critique of my work. I’ll take all product related criticism without considering my ego. If anyone reading this would like to build their own, feel free to reach out.
Source: Smart-O-Pan ECE4760
- How does the Smart-O-Pan measure pan temperature?
The pan contains a K-type thermocouple on a sense element board that reads temperature and sends it to the PIC32. - How is temperature data transmitted from the pan to the knob?
Temperature values are transmitted wirelessly using XBee radios over UART between the two PIC32s. - How does the knob adjust stove temperature?
The knob hardware receives temperature via XBee, computes a PID output, and outputs PWM to a servo that rotates the stove knob. - Can the Smart-O-Pan automatically prevent overheating?
Yes; safety logic sets the user set temperature to zero if temperature exceeds 182°C, turning the stove off. - Why was PID control used in this project?
PID control minimizes error between desired and measured pan temperature by computing proportional, integral, and derivative terms to drive the PWM actuator. - Why were XBees chosen over Bluetooth initially?
XBees were chosen for longer range and hobbyist 2.4 GHz operation, though the author later favored Bluetooth for reduced interference and practicality. - How is PWM level shifted for the servo?
A level shifter circuit using a transistor and resistors shifts the PIC32 3.3V PWM to a 5V-compatible signal for the servo. - Where does PID run in the software?
The PID control runs in the ISR to maintain timely control and reduce jitter, with a moving average used on the derivative term. - What display information is shown on the TFT?
The TFT displays desired temperature, set temperature, current transmitted temperature, and P, I, and D coefficients for tuning. - What tradeoffs were made for safety and practicality?
The design uses an external servo-driven knob instead of modifying internal hotplate controls to avoid high-voltage hazards and simplify implementation.