
Summary of PlayPIC – A Tutorial Board for the PIC16F84A Microcontroller
This article describes the PlayPIC, a tutorial board designed for beginners learning PIC16F84A microcontroller programming. It features an in-circuit programming (ICP) header for easy reprogramming without removing the chip. The board includes eight LEDs, a 7-segment display, an LCD screen, and five push buttons controlled via specific ports. Dip switches manage feature configurations like interrupt debouncing and buzzer connectivity, making it an ideal educational tool for initial microcontroller projects.
Parts used in the PlayPIC:
- PIC16F84A microcontroller
- Eight single LEDs
- LED9 indicator
- 7-segment display
- LCD display
- Five push buttons (S3 to S6)
- S1 power switch
- S2 reset button
- S8 LCD on/off switch
- S9 LED and 7-segment on/off switch
- S7 debounce switch
- Buzzer
- SW1 dip switch
- SW2 dip switch
- In-circuit-programming (ICP) header
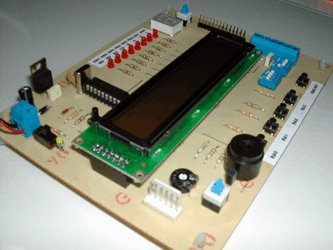
This is a new design of a tutorial board based on the popular PIC16F84A microcontroller. It features eight single leds, a 7-segment display, an LCD display and five push buttons. It is an ideal solution for the beginner to take his/her first programming steps in the world of microcontrollers. Having an in-circuit-programming (ICP) header, it can be easily reprogrammed without unplugging the microcontroller each time, provided that the programmer also supports this feature (like OziPic’er).
 Connections
| PIC16F84A | Feature |
| RA0 | JP2 – S3 – JP4 |
| RA1 | JP2 – S4 – JP4 |
| RA2 | JP2 – S5 – JP4 |
| RA3 | JP2 – S6 – JP4 |
| RA4 | JP2 – JP4 |
| RB0 | JP2 – LED1 – 7 Seg (dp) – S7 Debounce – Buzzer |
| RB1 | JP2 – LED2 – 7 Seg (a) – LCD RS |
| RB2 | JP2 – LED3 – 7 Seg (b) – LCD R/W |
| RB3 | JP2 – LED4 – 7 Seg (c) – LCD E |
| RB4 | JP2 – LED5 – 7 Seg (d) – LCD DB4 |
| RB5 | JP2 – LED6 – 7 Seg (e) – LCD DB5 |
| RB6 | JP2 – LED7 – 7 Seg (f) – LCD DB6 |
| RB7 | JP2 – LED8 – 7 Seg (g) – LCD DB7 |
| PlayPIC PCB |
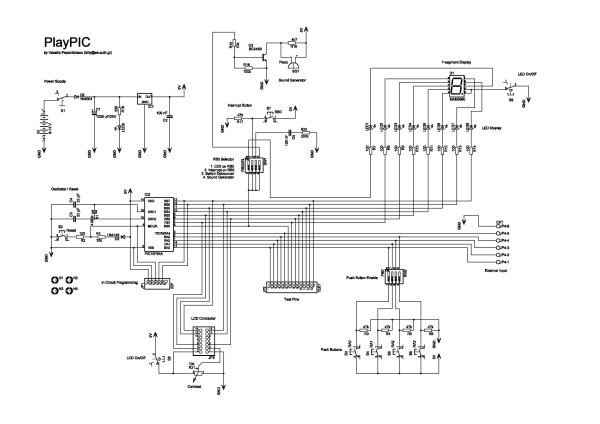 Feature Description
- S1 switches the board on and off. When on, the indicator led LED9 is lit.
- S2 resets the microcontroller.
- S8 switches the LCD display on and off.
- S9 switches the eight individual leds AND the 7-segment display on and off.
- Push buttons S3 to S6 correspond to RA0-RA3 inputs. They are enabled or disabled by the SW2 dip switch.
- The SW1 dip switch enables or disables the following features :
- Connects RB0 (used as output) to LED1.
- Connects RB0 (used as interrupt input) to S7.
- Enables the debouncing circuit for interrupt switch S7.
- Connects RB0 (used as output) to the buzzer.
For more detail: PlayPIC – A Tutorial Board for the PIC16F84A Microcontroller
- What is the main purpose of the PlayPIC board?
It is an ideal solution for beginners to take their first programming steps in the world of microcontrollers. - How can the microcontroller be reprogrammed easily?
The board has an in-circuit-programming header that allows reprogramming without unplugging the microcontroller. - Which components are included on the board?
The board features eight single LEDs, a 7-segment display, an LCD display, and five push buttons. - What does the SW1 dip switch control?
It enables or disables features like connecting RB0 to LED1, the buzzer, or the interrupt input with debouncing. - How are push buttons S3 to S6 managed?
They correspond to RA0-RA3 inputs and are enabled or disabled by the SW2 dip switch. - What happens when the S1 switch is turned on?
The indicator LED9 lights up to show the board is powered. - Can this board work with any programmer?
No, the programmer must support the in-circuit-programming feature, such as the OziPic'er.
