
Summary of PIC16F84A LCD interfacing code (using 3 pins only) + Proteus simulation
This article details a method to interface an LCD with a PIC16F84A microcontroller using only three pins (RA0, RA1, RA2) via a 4094 serial-to-parallel shift register. The C code was developed in MPLAB with the HI-TECH C compiler and simulated in Proteus. This approach solves pin shortage issues when combining keypad and LCD interfaces on the same chip.
Parts used in the PIC16F84A LCD Interfacing Project:
- PIC16F84A microcontroller
- LCD display
- 4094 serial to parallel shift register IC
- 4x4 keypad
This post provides the LCD[1] interfacing code using only 3 pins of PIC16F84A microcontroller. This code is written in C language using MPLAB with HI-TECH C compiler. You can download this code from the ‘Downloads‘ section at the bottom of this page.
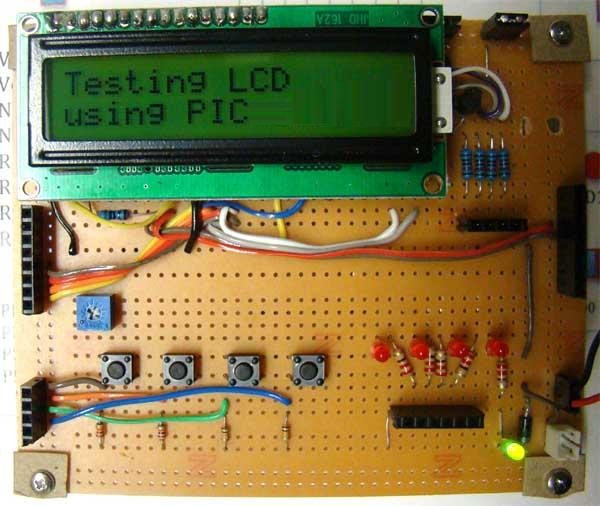
It is assumed that you know how to make an LED blink with PIC16F84A microcontroller. If you don’t then please read this page first, before proceeding with this article.
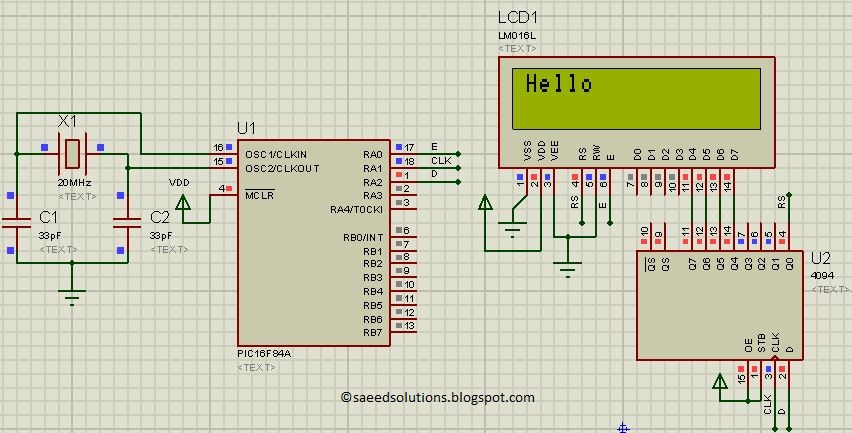
PIC16F84A microcontroller has 13 IO pins. A 4×4 keypad needs 8 pins to interface with controllers. LCD needs at least 6 pins to interface with controllers. In order to interface keypad and LCD, both with PIC16F84A we need at least 14 pins. So it is not possible to directly attach LCD and keypad both with PIC16F84A even in 4bit mode[2]. To make this possible, a serial to parallel shift register IC (4094) is used in this circuit. In this way by only using 3 pins of PIC16F84A microcontroller, we can interface LCD with it in 4bit mode. This is shown below in the figure.
In the above figure, RA0 pin is being used as Enable pin for LCD. RA1 pin is used as Clock pin and RA2 pin is used as Data pin for 4094 IC. When code starts running, then Hello is displayed on the LCD screen as shown in the above figure.
Code
In the code you can easily select pins to be used for interfacing with the LCD. Following figure shows the pin selection code.
Here for example, you can change RA0 to RA3 if you want to attach Enable pin of the LCD on pin2 of PIC16F84A. You will also need to change LCD_E_Dir to TRISA3 for RA3.
The code for the main function is shown below.
Downloads
LCD interfacing code using 3 pins for PIC16F84A was compiled in MPLAB v8.85 with HI-TECH C v9.83 compiler and simulation was made in Proteus v7.10. To download code and Proteus simulation click here.
For more detail: PIC16F84A LCD interfacing code (using 3 pins only) + Proteus simulation
- How many pins are required to interface an LCD directly with PIC16F84A?
An LCD needs at least 6 pins to interface with controllers. - Can you attach both a keypad and LCD directly to PIC16F84A?
No, it is not possible because interfacing both requires at least 14 pins while the microcontroller has only 13 IO pins. - What component allows LCD interfacing using only 3 pins?
A serial to parallel shift register IC (4094) is used to enable this connection. - Which specific pins of PIC16F84A are used for the 4094 IC?
RA0 is used as the Enable pin, RA1 as the Clock pin, and RA2 as the Data pin. - What message appears on the LCD when the code starts running?
The word Hello is displayed on the LCD screen. - Which software tools were used to compile and simulate the code?
The code was compiled in MPLAB v8.85 with HI-TECH C v9.83 and simulated in Proteus v7.10. - Is it possible to change the pin assignments in the code?
Yes, you can change RA0 to other pins like RA3 if you update the corresponding direction registers.
