Summary of How to write embedded C project in Mikro C to build .HEX file
This article guides electronics hobbyists on creating their first embedded C program using Mikro C Pro for PIC microcontrollers. It explains that the software compiles C code into .HEX files, which are machine codes readable only by microcontrollers. The text details the step-by-step process of setting up a new project, selecting the specific PIC model (e.g., PIC16F877A), configuring the clock frequency based on the hardware crystal, and saving the project to generate the necessary file for burning onto the chip.
Parts used in theMikro C Project:
- Mikro C pro software
- PIC microcontroller (specifically PIC16F877A)
- Crystal oscillator
- PC with Mikro C pro installed
- Project folder directory
Are you an electronics hobbyist? I will help you to write your first embedded C program. ‘Mikro C pro’ is one of the popular embedded C software for PIC microcontroller. It is more user-friendly and has a set of inbuilt functions and commands. After compiling a microcontroller program in C using ‘Mikro C pro’,you will be able to generate .HEX files from the program codes.What is .HEX file? .HEX file is a machine code that corresponds to our C language codes. Only microcontroller and microprocessor can interpret the .HEX files. After building a .HEX file, you need to write the .HEX file to the memory of micro controller. This process is called burning of microcontroller.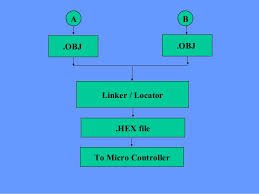
This article will give you an idea about getting started with ‘Mikro C’ programming for microcontrollers and how to build .HEX files.
Steps to create a PIC microcontroller project in ‘Mikro C’ (Getting started programming for microcontrollers)
- Open ‘Mikro C pro’.
- Navigate to Project>>New Project.
- ‘Welcome to the New Project Wizard’ window will appear. Click the Nextbutton.
- Choose your PIC from the drop down menu, different types of PIC microcontrollers are available. We are using PIC16F877A, then click Next.
- You will be asked to set up the device clock frequency. Look into the crystal oscillator in your PIC development board where the frequency is marked in MHz. (eg: 4.00=4MHz) Give the clock frequency and click Next.

- Now choose any folder (project location directory) to save the project by clicking the Browse button as shown below.
- Put a name to the project and click Save, then Next button.
- Now you can see ‘Add file to project’ window, right now there is no work for you just click Next button.
- Now you have successfully created the new project, click the Finish button.
For more detail: How to write embedded C project in Mikro C to build .HEX file
- What is a .HEX file?
A .HEX file is a machine code corresponding to C language codes that only microcontrollers and microprocessors can interpret. - How do you create a new project in Mikro C pro?
Navigate to Project, select New Project, click Next, choose your PIC from the dropdown menu, set the clock frequency, choose a save location, name the project, and click Finish. - Where do you find the correct clock frequency value?
You must look at the crystal oscillator in your PIC development board where the frequency is marked in MHz. - What happens after compiling a microcontroller program in C using Mikro C pro?
You will be able to generate .HEX files from the program codes. - What is the process called when writing a .HEX file to the memory of a microcontroller?
This process is called burning of microcontroller. - Which PIC microcontroller example is used in the article?
The article uses the PIC16F877A as the example for the drop-down menu selection. - Can different types of PIC microcontrollers be chosen in the wizard?
Yes, different types of PIC microcontrollers are available in the drop down menu. - What window appears immediately after clicking the Next button in the New Project Wizard?
The Welcome to the New Project Wizard window will appear.