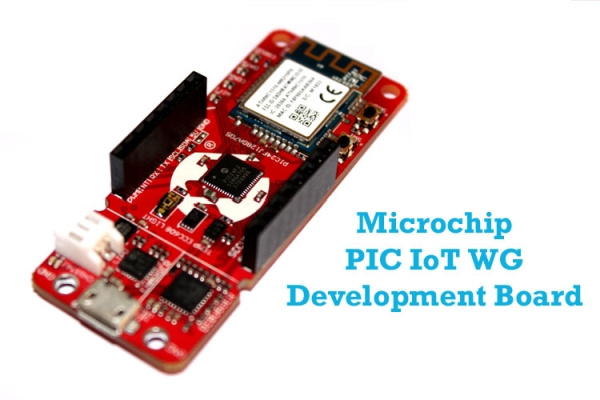
The three main parameters to consider while developing a portable IoT device would be Low Power Consumption, Wireless Connectivity, and Security. With exactly these three in mind, Microchip has launched a new development board called the PIC IoT WG. The board is powered by a 16-bit PIC microcontroller with ATWINC Wi-Fi module and many more interesting things. In this article, we will learn more about this board and how to use it for your IoT Designs. If you are interested in other IoT development boards you can also check out the Arduino Nano 33 BLE sense board which was recently introduced by Arduino.
PIC IoT WG Development Board:
Let’s start with the very name of this board. It is called PIC IoT WG, where WG stands for WiFi and Google. Yes, Microchip and Google have partnered up to bring to us this wonderful development board which can help us design embedded IoT applications that can easily and securely communicate with the Google Cloud IoT Core Services. As shown below the development board has a lot of components present on it, it has its very own microcontroller, a Wi-Fi module, a cryptographic co-processor, a couple of sensors and much more
PIC IoT WG Hardware Overview
The board is split into three sections, the charger section, the debugger section, and the controller section. Let us take a look at each section and the important components present in it.
PIC24F Microcontroller with WINC1510 Wi-Fi Module
The controller section has the two most important components one is this PIC Microcontroller which is the PIC24FJ128GA705 and the other is this Wi-Fi module which is WINC1510. About the microcontroller part, the PIC24F is an extremely low power 16-bit Microcontroller operating on 32MHz clock frequency with an integrated 12-bit ADC. And the Wi-Fi module is ATWINC1510, also from microchip and it is a low-power certified IoT network controller. Both these device are good if you are trying to design a battery-operated IoT Edge Device
Cryptographic Co-processor for secure data communication
To the left side of the controller, we have another interesting IC which is a cryptographic Co-processor called ATECC608. Today so many sensitive devices are getting connected to the cloud, like heart rate monitors, continuous glucose monitoring devices, Asset tracking devices and much more. With that, data security is becoming a major concern, this is where the cryptographic co-processor IC ATECC608 comes in. So what happens here is that your board will generate a private key and a public key. The private key will be used to encrypt every message that is being sent from this board and the public key will be shared with the could service provider like Google IoT cloud. Then, when this encrypted message from our board reaches the cloud, the cloud will verify and decrypt this message using the public key.
The ATECC608 IC here acts as a crypto Authentication device for creating and managing these private and public keys. And the IC is pre-configured and pre-provisioned for authentication to take place between your board and the Google cloud IoT core. Meaning, by the time you receive the board the private key for your board would have already been generated and locked and in this IC and the public key is registered with the microchip sandbox account hosted on Google cloud IoT this way you don’t have to be a networking or encryption expert to make your IoT devices secure. Later, after you are done with prototyping you can move your board into a private registry as well.
On-board temperature and Light Sensor
On both sides on the cryptographic co-processor IC, we have two on-board sensors that are ready for testing. One is this Light sensor which is TEMT6000X01 and the other is this MCP9808 Temperature sensor. The Light sensor is a simple current sense sensor that is connected to a 10-bit ADC of our PIC controller and the Temperature sensor can measure temperatures between -20*C to 100*C with a typical accuracy of 0.25*C and it communicates using I2C.
On-board Lithium Charger
The PIC IoT WG development board can be powered either with the micro-USB port or with a 4.2V lithium battery that could be connected to the battery terminal (White colour). Now, if you are powering the board with a battery, the board also has as a charging IC which will charge your lithium battery through the micro-USB port with a charging voltage of 4.2V and charging current of 100mA. You will also find two LEDs at the corner of the board, the red one indicates that the battery is charging and the green one indicated that it is fully charged.
PKOB – Programmer and Debugger
The development board also has its own on-board programmer, emulator, and debugger called PKOB. The term PKOB stands for Pic-kit on board, so many of us would have earlier used a separate pic-kit to program and debug our controllers but this board has an onboard emulator and also supports serial communication, which comes in very handy for debugging without any requirement for external hardware.
Pinout, LEDs, and switches
Over here, we have four LEDs each of different colors. The first one is a blue color LED which turns on when your board is connected to a Wi-Fi network, the second one is green colour LED that turns on if you are connected to Google cloud services, the third one is a yellow colour LED that blinks every time you send a data to the cloud and the fourth one is a red color red that turns on to indicate an error on the board. We also have two switches SW1 and SW2 that can be used to enter softAP mode.
Now coming to the pinouts, the board has 8-female headers on both sides which stand as a Mikrobus expansion that allows to you connect a wide verity of sensors and modules from Mikro Elektronika. The other general-purpose pins of the PIC controller can also be accessed through these pads found at the bottom of this controller.
PIC IoT WG –Software Support
Coming to the software part, Microchip has made it a breeze in programming and debugging this board. When you connect this board to your computer it will be discovered as a flash storage device where you can modify your Wi-Fi credentials or reprogram it by simple drag and drop option. And this being a 16-bit PIC controller can be programmed using the MPLABX IDE with the XC16 compiler and it also supports Microchips Code Configurator (MCC) for quick programming and debugging.
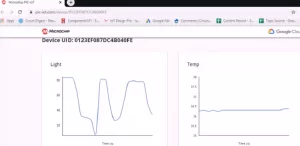
Also when you receive this board it will be pre-programmed and configured for a demo in which we can read the values of this light sensor and temperature sensor and graph it on the Google cloud platform.
Getting started with PIC IoT WG Development Board
To start with grab a mini USB cable and connect it to our development board, and connect the other end to your computer. You will notice your board light up and on your computer, you can find a new flash drive called curiosity. Open the drive and you will find the contents in it as shown below.
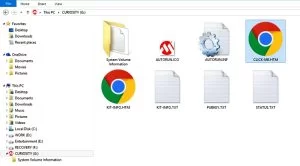
Click on the file called CLICK-ME.HTM to open a web-page. On the web page enter the Wi-Fi credentials and click on download configuration.
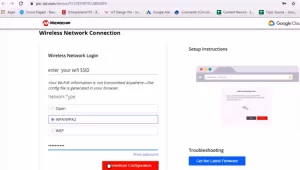
This will download a file called WiFI.config, simply drag this file into the curiosity drive and you will notice the blue led and green on your board turning on to indicate that your board is now connected to Wi-Fi and Google cloud. Open the webpage again to check the status of the board then scroll down to check the light and temperature sensor value from your board being graphed on the page. You can check the video above if you have any questions.
Similarly, you can also send data from the Google cloud to your device. Just open any serial monitor software like putty and connect it to the COM port of the board, then type a sample message in this text box and click on send to the device.
Source: PIC IoT WG Development Board Review – What’s new and How to Get Started with it