Summary of Lucid Dream/Dream Recall Machine using infrared.
This Instructable details a DIY Lucid Dreaming and Dream Recall device. It uses an infrared sensor to detect REM eye movement, triggering a PIC microcontroller to flash an LED and emit a piezo sound to gently wake the user into their dream. The project includes a 60-second startup delay, a three-hour initial rest period, and a scanning cycle with adjustable intervals. A safety warning is provided regarding epilepsy due to flashing lights. The author offers kits or complete devices for purchase.
Parts used in the Lucid Dream/Dream Recall Machine:
- R1 = 3K3 1/4 WATT resistor
- R2 = 10K resistor
- R3 = 5K6 resistor
- R4 = 150R resistor
- VR1 = 5K PRESET
- VR2 = 100K PRESET
- C1 = 1000uF 6.3V ELECTROLYTIC capacitor
- C2 = 100nF CERAMIC capacitor
- C3 = 22pF CERAMIC capacitor
- IC1 = 12F675 PIC MICROCONTROLLER
- INFRARED PHOTO TRAN 3mm OR 5mm
- INFRARED LED 5mm
- 5mm LED
- PIEZO 20mm
- SW1 = MINATURE SLIDE SWITCH
- PB1 = MINATURE PUSH BUTTON
- 8 PIN DIL SOCKET
- AAA BATTERY HOLDER FOR TWO AAA BATTERIES
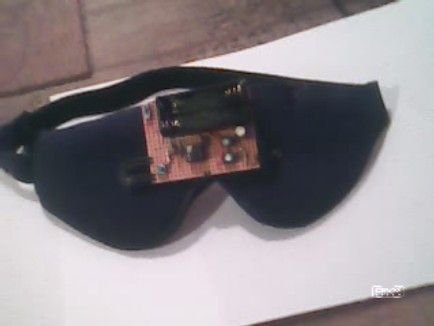
- SLEEP MASK
- DOUBLE SIDED STICKY PADS X 2
- STRIP BOARD 25 HOLES X 18 STRIPS
- 1mm HEAT SHRINK SLEEVING
- TINNED COPPER WIRE FOR LINKS
This is my first instructable, so I hope everything is clear and hoping you find it interesting, and would appreciate any feedback, so here I go. I am sill testing this device with other people, but personally I have found my dream recall has improved dramatically, wow! some of the dreams are totally amazing.
WARNING. Because of the flashing Led this could pose a problem with people that are affected by epilepsy. One solution would be to connect a switch to the Led, therefore there would only be a sound as a dream trigger.
If any one is interested in this project I can sell a kit of parts or sell a complete and tested device. Please contact me for prices at. [email protected]
Description.
The device will scan the closed eye using infrared and when movement is detected(REM) the PIC microcontroller will flash an LED and produce a sound on a piezo. This should wake one up into a dream. Useful for Lucid dreaming or if one wants to better their dream recall. I have found using this device, my dream recall has greatly improved.
Operation.
After switching on the device there will be a delay of approximately 60 seconds, to allow one to settle into bed. Then the device will scan the closed eye three times, to check functionality, after this the device will stop scanning for three hours. It will then go into a cycle of scanning the eye then delay for 15 minutes until the device is turned off or the push button is pressed. If button is pressed the LED will illuminate then flash once after which there will be a delay of 30 minutes then scanning is resumed. This is to allow you to interrupt the cycle eg. sleep was interrupted so as to allow you to go back to sleep or can be used for a nap.
Setup mode.
1/ Keep push button pressed then turn on and release button, the LED will flash and piezo will sound, this is to allow adjustment of the LED light intensity VR1 and piezo volume VR2, also to check battery state of charge.
2/ Press button until LED only flashes and release, this will enter infrared functionality test.
3/ Pressing button again, the device will go into the main program or turn off device.
Summary of operation.
1/ When one is ready for sleep turn on device then count to 60(seconds approximately).
2/ Move the eyes under closed lids until the device has triggered three times. This is to test functionality.
3/ Device will go into a three hour delay until scanning starts.
4/ Then it will scan the eye, delay for 15 minutes and repeat until the device is turned off or the push button is pressed.
5/ If push button is pressed the Led will stay on until released then flash once, there will then be a delay of 30 minutes and continue as in 4/. The button can be pressed at any time.
6/Sweet dreams and or great lucids.
7/Turn off device with the slid switch. Good morning
Jeff Barnes
Step 1: PARTS LIST
Parts list.
R1 = 3K3 1/4 WATT
R2 = 10K
R3 = 5K6
R4 = 150R
VR1 = 5K PRESET
VR2 = 100K PRESET
C1 = 1000uF 6.3V ELECTROLYTIC
C2 = 100nF CERAMIC
C3 = 22pF CERAMIC
IC1 = 12F675 PIC MICROCONTROLLER
INFRARED PHOTO TRAN 3mm OR 5mm
INFRARED LED 5mm
5mm LED
PIEZO 20mm
SW1 = MINATURE SLIDE SWITCH
PB1 = MINATURE PUSH BUTTON
8 PIN DIL SOCKET
AAA BATTERY HOLDER FOR TWO AAA BATTERIES
SLEEP MASK
DOUBLE SIDED STICKY PADS X 2
STRIP BOARD 25 HOLES X 18 STRIPS
1mm HEAT SHRINK SLEEVING
TINNED COPPER WIRE FOR LINKS, 7 IN TOTAL.
SLEEP MASK
Jeff Barnes
Step 2: CONSTRUCTION
Construction.
Please refer to schematic and board overlay
For the circuit board I have used Vero/stip board and the tracks cut using a spot face cutter or a 3mm drill bit, as indicated by X’s in the circuit board layout, 9 in total. I have also included a PCB lay out.
Construction of the board is pretty straightforward, just have to watch for the polarity of the electrolytic cap, IC1, infrared led, infrared tran(collector denoted by the short leg) and visible led.
Some things to watch out for:-
The push button legs will have to be straightened to fit into the correct position, as shown in the circuit board overlay.
The two white rectangles by the side of the piezo are the double sided sticky pads for securing the battery holder.
Piezo is glued to the circuit board with a small amount of adhesive.
The battery holder:-
Two lengths of tined copper wire are soldered onto the board at the points marked with a + and a _, then pass them through the solder tags on the battery holder, stick holder in place after sewing to sleep mask with the two double sided sticky pads and solder wires to the solder tags, being careful not to use too much heat, are the plastic of the holder will melt.
Led, infrared led and infrared transistor:- (infrared tran collector denoted by short leg)
Use 1mm sleeving on the legs of these components and try to keep them as long as possible when soldering to board. The short lead on the infrared transistor indicates the collector. Bend these components out from the board and bend the heads so as to be able to shine on the eyes. Next stitch board to sleep mask, as indicated on the board overly, mark the position of the Leds and transistor on the mask, then cut small holes using a leather hole punch or something simular, press the heads of these components through so the leds protrude approximately 3mm and the photo tran 2mm, making shore the infrared led is slightly angle towards the photo transistor and then glue into place using supper glue. There is a photo of the templates I used showing the position of these components, there is another photo showing the ideal position of the infra red led and photo transistor in relation to the eye. WARNING, ALLOW AT LEAST 3 HOURS BEFORE PUTTING MASK ON FACE, BECAUSE FUMES FROM THE GLUE CAN IRRITATE THE EYES.
The PCB software I am using is from http://www.expresspcb.com/expresspcbhtm/download.htm
Jeff Barnes
For more detail: Lucid Dream/Dream Recall Machine using infrared.
- How does the device detect when to trigger?
The device scans the closed eye using infrared; when movement (REM) is detected, the microcontroller flashes an LED and produces a sound. - What is the initial delay after switching on the device?
There is a delay of approximately 60 seconds to allow the user to settle into bed before the functionality check begins. - Can I adjust the light intensity and volume?
Yes, by keeping the push button pressed while turning on the device, you can adjust VR1 for LED light intensity and VR2 for piezo volume. - Does the device scan continuously throughout the night?
No, after the initial three functional checks, the device stops scanning for three hours before starting its regular cycle. - How long is the delay between scanning cycles?
After scanning the eye, the device delays for 15 minutes before repeating the process until turned off. - What happens if I press the push button during operation?
The LED illuminates then flashes once, followed by a 30-minute delay before scanning resumes. - Is there a risk for people with epilepsy?
Yes, the flashing LED could pose a problem, so users should consider connecting a switch to disable the light and use only sound. - How do I attach the circuit board to the sleep mask?
You must stitch the board to the mask, cut small holes for components, and glue them in place using super glue after allowing fumes to clear. - What safety precaution is required after gluing the components?
You must wait at least 3 hours before putting the mask on your face to ensure glue fumes do not irritate the eyes. - How do I turn off the device?
The device is turned off using the miniature slide switch located on the unit.