Summary of Line Follower Robot – Build it from scratch using pic microcontoller
This article introduces building Line Follower Robots from scratch, emphasizing the equal importance of hardware and software. It details three main construction sections: chassis, electronics, and software. The author advocates for designing custom chassis using materials like wood or acrylic rather than buying kits, highlighting sensor placement as critical. Specific projects mentioned include a basic 3-sensor robot, an upgraded version, and "Blackboy," a 5-sensor grid-tracker featuring a Beagle Bone and LCD display capable of future WiFi control.
Parts used in the Line Follower Robot:
- Chassis (Wood or Acrylic)
- Motors
- Line Sensors (3 sensors or 5 sensors)
- Electronics components
- Beagle Bone
- 20×4 LCD Display
- WiFi Adapter
Line Follower Robots are the most common type of robots that are built by hobbyist and student interested in robotics and embedded systems. The reason for the popularity of the Line Follower robot is the fact that is simple to build and easy to understand the logic behind it. This post will give you working level knowledge on building and programming line follower robots from scratch.
A robot is a combination of hardware and software. One has to give equal importance to both these aspects. The hardware is just the skeleton of the system; it’s the program that has to give the flesh and blood. The reason for my interest robots was the amazing integration it provided between the various fields of Engineering. Knowledge of one stream of engineering alone is not sufficient to build robots.
Introduction to the concept of line follower:
For those of you don’t already know, Line Follower type robots are those that are capable of following a line (black or white) as long as there is no discontinuity in the track. These robots have sensors on them to sense the line. They make proper direction changes according to the data acquired from the line sensors.
The nature of the line could be linear with abrupt, acute, right or obtuse angled turns. Or it could be a non-linear track which has ‘T’ and ‘+’ junctions. A non linear track may be difficult to tackle as the junctions are all decision points. This post will only deal with the prospect of building a line follower robot. I will follow up this post with another one to handle the programming and logic analysis.
The one the left was my first line follower and is still at my loft and the one to the right is an upgraded version. You can see both of them have just 3 line sensors (will come to that). The third and final line follower I built was the ‘blackboy‘ you already had a look at him
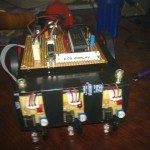
This is a line follower I designed to trace a Grid type tracks, It has 5 line sensors to track the line. This five sensor arrangement is quite good; I have used it a couple of times with good results. This I call it the balckboy. It has a Beagle Bone sitting on top of it adjacent to the 20×4 LCD display. I added the Bone to control black boy through WiFi (you can see a WiFi adapter connected to it even then though the WiFi control is still a future plan ![]() )
)
This I can call the best hardware design I have ever achieved. It was built with such foresight that it is no longer just a line follower. That was probably the reason behind the fact that it has a name the others don’t ![]() It can be modified to work as a edge detector or a wall follower or a maze solver. I will publish a separate post on blackboy some time later.
It can be modified to work as a edge detector or a wall follower or a maze solver. I will publish a separate post on blackboy some time later.
Construction:
Now, unlike my previous post, “Make a RC Robot Car” this line follower is real robotics. Here the decision is made by the robot (I should say the software) and not fed from an external source. The total constriction can be divided into three sections.
1. The Chassis,
2. The Electronics, and
3. The Software.
Building the Chassis:
Some people prefer to buy a fully designed chassis from robotic kit vendors and use them instead of building them. They also believe, it is pointless spending time making chassis when it can be bought dirt cheap. That is probably the attitude of someone who is in a hurry to get the ‘job’ done rather than enjoying the process.
It is my opinion that one should spend adequate, if not lots of time designing and producing the chassis. The chassis build is a craft and it develops over time. So don’t worry if you make a crappy looking robot in the first go.
I remember these words from a book that I read a long time ago and I don’t happen to remember the name of the author, or the book. I will update this post if I found the the name of the book. It had pretty detailed accounts on various design strategy, especially the part which dealt with choosing the right material for the chassis.
That is something I leave it as experimentation section. Try your luck with all the materials and find out which one is the best ![]() he says,
he says,
 That is something that I have personally seen and verified and that is probably the reason behind the persistence of the idea in my head. So build a poor but self built chassis. I suggest you start off with wood as they are the most commonly available material. Then you could move on to Acrylic, for making some cook designer finish and vibrant colors chassis.
Above all, the chassis is what is going to house the motors, sensors and the electronics, so spend some time thinking where to place the stuffs or you are going have trouble when you come to the later part of the design. The most important of them is the location of the line sensors. Read the part for sensor alignment (yet to come) carefully before deciding on the position of motors and circuitry.
Uses Google find some creative design for the chassis and show your passion for design of the robot make it look great. If you did a good job, it will inspire you to do more and learn more. There is no substitute for an inspiration from within you.
For more detail: Line Follower Robot – Build it from scratch
- What is a line follower robot?
It is a robot capable of following a black or white line as long as there is no discontinuity in the track. - How many line sensors does the basic project use?
The basic versions described in the text utilize just 3 line sensors. - Can a line follower handle non-linear tracks?
Yes, they can handle non-linear tracks with T and + junctions, though these are considered difficult decision points. - What material is suggested for building the chassis first?
Wood is suggested as the starting material because it is the most commonly available. - What is the name of the advanced 5-sensor robot?
The advanced robot with 5 sensors designed for grid tracks is called Blackboy. - Does the Blackboy robot have WiFi capabilities?
It has a WiFi adapter connected, but the author notes that WiFi control is still a future plan. - What are the three main sections of the robot construction?
The total construction is divided into the Chassis, the Electronics, and the Software. - Why should one build their own chassis instead of buying one?
Building your own chassis is considered a craft that develops over time and allows for better design inspiration.